Introduction

Is your Pebble Steel not turning on and you've tried all other troubleshooting options? The battery may need to be replaced. If so, this guide can help!

Replacing the battery in this device requires soldering. To learn more about soldering, check out iFixit's soldering technique guide!

  1. 56gfJfTbFA6SDIfC
    56gfJfTbFA6SDIfC
    ETNtFM5mTKqkBZRD
    EkYuhV5mFKoNNDTd
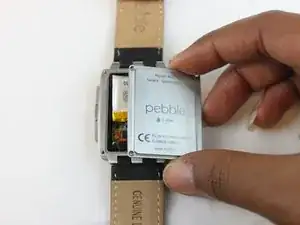
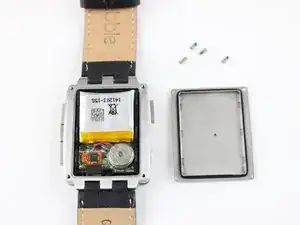
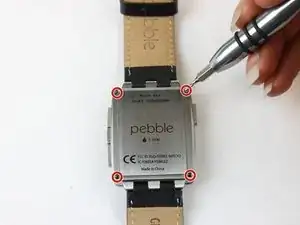
    • Use a Torx T3 screwdriver to unscrew the four 3.5 mm Torx T3 screws holding the back plate.

    • Make sure the screws are kept in a safe place to insure they are not lost.

    • Remove the back plate.

    The vibration motor is glued to the back plate. So remove the back plate a little bit, and look, if the motor sticks to it. Then first use a plastic opening tool to remove the vibration motor from the back plate.

    Gauner -

    Same comment as Gauner: The vibration motor is glued to the back plate. DO NOT simply pull off the back plate as per the instructions else the two small wires that connect the motor will be damaged. I used a SIM tray pin tool to gently pry off the motor.

    Steven Holbourne -

    There’s no need to desolder the battery. Use wirecutters to clip the ribbon cable as close as possible to the motherboard, then use the old solder beads to attach the wires of the new battery. Cutting out the old battery reduces the amount of heat the motherboard is exposed to. Also, the polarity of the battery is indicated by two tiny symbols next to the solder pads. In case you can’t read them, the positive wire is soldered to the terminal closer to the center of the motherboard. Finally, be aware that leaving too high a bead of solder above the motherboard will cause pressure and bright dots on the backlight when the watch is reassembled. Check your solder before reassembly and either melt down, cut or file off the excess solder to save yourself a second teardown.

    Rich Stillman -

    After reassembly, the watch will sometimes need a little attention before the display works again. You may need to either press buttons or attach the charger to jump-start the watch. Also, even if the display fully works, the backlight may not function immediately after reassembly. This is almost always fixed by shutting down and restarting the watch. You will almost never need to disassemble the watch again to get the display working, unless you forgot to reinsert the zebra strip or reconnect the ribbon cable connector.

    Rich Stillman -

  2. rxLOZRo1xxNVTLvl
    rxLOZRo1xxNVTLvl
    TOlD2vSQiAOCHAPa
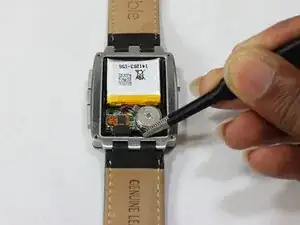
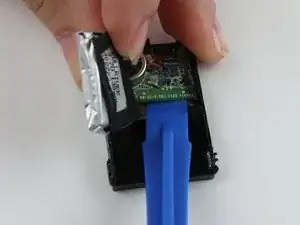
    • The plastic frame is clipped inside the steel body with four clips, two each on the left and the right side of the watch, near the corners. You can stick a small screwdriver into the cutouts right above the clips and gently lever the plastic frame up, corner by corner.

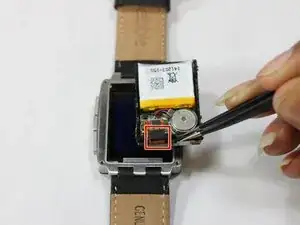
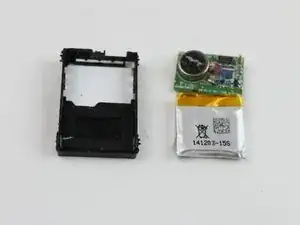
    • Once the clips are released, use a pair of tweezers to grab onto the black plastic frame and remove the internal hardware.

    • Adhesive on the back side of the battery holds the internal components to the front case.

    • Use tweezers or a plastic opening tool to disconnect the ribbon cable from the motherboard.

    Don't just pull the hardware out. The plastic frame is clipped inside the steel body with four clips, two each on the left and the right side of the watch, near the corners. You can stick a small screwdriver into the cutouts right above the clips and gently lever the plastic frame up, corner by corner.

    Gauner -

    During this step I broke off one of the contacts for the charge connector on the side of the motherboard. I'm not sure if it still works.

    [deleted] -

    I did the same - broke off the charge connector. The trick is to remove the plastic frame by pivoting out the 3-button side first, and put it back in by putting the one-button side with the charge connectors first. That way you’re not forcing those thin metal contacts past the frame. They don’t often break, but they did for me one time, and the watch will not charge after that.

    Rich Stillman -

  3. bvrXNs4C3iWoYBga
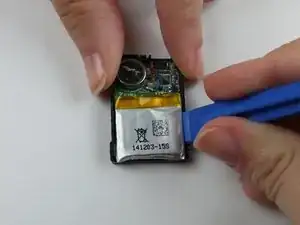
    • Flip the internal components over, and use a plastic opening tool to pry the battery out of the black plastic frame.

    • The battery has a ribbon cable that is soldered to the motherboard. Be sure not to tear the cable when removing the battery from the case.

  4. rXrSN6QETRhbH5LP
    rXrSN6QETRhbH5LP
    Pcdk6BnPNUiCQPxx
    • Use a plastic opening tool to remove the motherboard from the black plastic frame.

    • The frame has integrated clips above the 4 corners of the motherboard. You can flex the frame gently to release these clips while lifting gently from below.

  5. edTBYDqhdblvEQLs
    edTBYDqhdblvEQLs
    kOEervxSRwyryOtC
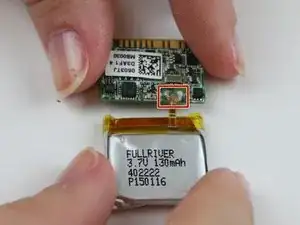
    • Turn the battery and motherboard to the opposite side to expose where they are connected.

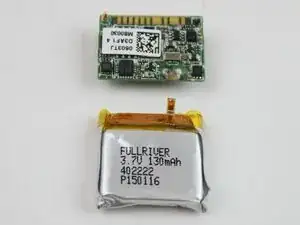
    • Desolder the two battery connections to remove it from the motherboard.

    As I mentioned in the comment in step 1, there's no need to desolder the battery. Instead, cut the ribbon cable as close to the motherboard as possible. This exposes the motherboard to less heat and makes the repair more likely to succeed. Also, the solder at the battery contact points is almost always enough to hold the leads of the new battery, so you don't need to add more solder.

    Rich Stillman -

    When reassembling, be careful at several points:

    1. Make sure there is no excess solder on the battery contacts. If the solder dome is too high, it will exert pressure on the backlight and cause bright spots on the display when the backlight is on. If you reassemble the watch and see bright spots, you can usually fix them by taking the watch apart and trimming the top of the solder dome with fine wire cutters or a file. Be careful not to short the battery when you do so!

    2. When putting the midframe back in the case, insert the one-button side first, most of the way, and then tip in the three-button side. One of the most delicate parts of this operation is putting the midframe back in without shearing off either a charging contact or one of the button domes against the sharp upper edge of the steel case. If you put the midframe in flat, you will most likely lose a charging contact. If you put one side all the way in, you will force the components on the other side against the edge and can shear one off.

    Rich Stillman -

    The contact between the vibration motor and the back of the case is fairly weak, especially after disassembly. I use a small square of double-sided duct tape (check Amazon) on the back of the vibe motor to replace the factory glue. After the case is reassembled, pressure will bond the tape to the inside of the watch back. Any other solution I've tried has caused the stack of components to be too thick, and caused bright spots on the display backlight.

    Rich Stillman -

Conclusion

To reassemble your device, follow these instructions in reverse order.

MTS

Member since: 01/10/15

889 Reputation

27 comments

And how do you connect the new battery to the motherboard?

What kind of connection is used between the two?

yvesyernaux -

Instead of desoldering the old battery, I clip the ribbon cable that connects the battery to the motherboard. Trim the ribbon cable as short as possible to the motherboard. The replacement batteries I’ve found have braided wire instead of a ribbon cable, so they can be resoldered to the pads that the remnant of the ribbon cable is attached to. Pebble used enough solder that I’ve never had to add any - just melt the solder that’s already there and drop in the new wires. You can tin the wire ends before attaching them to make a better connection, but you get a good solder connection even with the bare wires. Make sure you get the polarity right - the positive (red) battery wire attaches to the pad closer to the center of the motherboard. If you look carefully there are tiny + and - symbols silkscreened into the motherboard just outboard of the pads.

Rich Stillman -

Farely certain battery ribbon conector is soldered to the circuit board. Gently pulling on it will seperate it but results in tearing. Two other things not mentioned is when removing the rear cover note the round disc object that looks like a button cell, it is glued to the back plate. Care must be taken when removing or one can pull out the red and blue wire from the circuit board. Second thing is a ribbon connector that needs to be disconnected from the cicuit board before the board can be removed. The plastic spudger or tweezers should do he trick. Its easy to miss as a piece of foam hides the connection point.

mjstev17 -

Anyone found a source for these batteries? I've found the manufacturer but not a retailer.

Paul K -

There are some really small batteries on aliexpress, do you know the measurements of the original one? I kinda want to replace mine as battery life has been declining.

Sindre Bjerke -

if I can find my T3 driver I'll pull my watch open and use the calipers. You just need the external dimensions of the battery?

Paul K -

The Fullriver 402222(s) is 21 x 21.5 x 3.9 mm. This is currently the closest thing I can find on the market. http://www.bsdmicrorc.com/index.php?show...

It is the same manufacturer as far as I can tell and I believe its basically the same battery. I think the measurement discrepancy is due probably to the flaps that LiPo batteries have. Either way, this is the website that I got sent to by Fullriver when I contacted them to see where I might be able to purchase their batteries in the US seeing as I couldn't immediately find them.

The obvious problem here is that it doesnt come with the ribbon soldered on it. You would have to desolder the battery assembly from the pebble, desolder the ribbon carefully from the bare cell, then reverse that with the fresh cell. And thats assuming your problem is the cell itself and not something on the assembly.

Zach Hillebrant -

Have we made any more progress on this issue? I fear that my Pebble Steel's battery is showing its age as it is going on over two years now of constant use. Has anyone even been able to purchase a new battery and attempt an install? If so is it even possible to desolder the ribbon from the bare cell and put it on the new battery? Just curious as to what your thoughts are. I am average at soldering but I am unsure if it is even feasible to attempt such an undertaking considering the battery does not seem to be easily available and the actual install seems a little concerning as well. Just curious as if any further research or ideas have come about.

Brandon Martin -

These batteries are easy to find on eBay. Search for 402020. They are slightly smaller capacity than the originals, 120mAh instead of 130. Battery life is a little shorter than the original. I’ve seen people do all kinds of alterations to fit bigger batteries, like cutting the plastic frame or removing the safety circuit from the battery, but IMO it’s better to live with slightly more frequent charging than to risk a lithium fire from an overcharged battery. I don’t wait for the low battery warning on mine and still get a comfortable 2-3 days from a charge on my OG Steels.
Rich Stillman -

Here is a link to the original manufacturer: http://www.fentbattery.com/en/Cylindrica... They are still listing the 402222...

pitone671 -

I don't think that I can actually purchase the battery individually from them though. I will send them an email and see what they say.

Brandon Martin -

Now I have got it apart, it would be good to know if anyone has obtained a battery and managed to fit it. If as Zach says a new battery comes without leads then how practical is it to connect the existing ribbon to the battery, as the solder points on the motherboard are covered with a resin glue and will be difficult to desolder cleanly. All advice greatfully received.

Mike Shepard -

I have sorta successfully replaced my battery with a 402020 from aliexpress.

Replacing the battery was pretty straight forward but now i have no backlight or stauts led.

I'm yet to see where i went wrong, reaseating the flex does nothing. Battery seems fine so far though.

The resin came of with my finger nail and was not hard at all, apply flux and a suitable tip for the job

The new battery came with small wires with the positive end taped off.

Where to order pebble steel Battery replacement

Sindre Bjerke -

Can you link the battery that you bought?

Brandon Martin -

Thanks! Were you able to fit the battery inside the case and were you able to fix the led and backlight issues?

Brandon Martin -

Battery fits fine with extra room, as of today i have not fixed the backlight. From looking at the teardown of the kickstarter edition i may have to disassemble a little further and find the soldering on the backlight. Another trick was to discharge the battery fully and see if its comes back on. So far I'm still discharging @ 50% battery. The LED is on the PCB though, no idea why that doesn't work. I'm 50% sure this is because i struggled abit to get the black plastic frame out of the metal case and maybe broke the backlight solder points. Or because the is damaged somehow, the latter would suck because i don't know where to find one.

Edit: Also i should probably check if i lifted the resistor next to the battery connector

Sindre Bjerke -

any updates?

Brandon Martin -

No, really, was there any progress since?

Now, let's assume that the backlight issue isn't because of the battery but some loose soldering somewhere.

The LED status issue however is something I do not like at all.

Might the IC of the new battery's protection board be the problem?

That being said, if you put the old battery in and start charging the watch, the LED (and who knows, maybe the backlight as well) might start working. If so, it's about the IC of the new battery, if not- then it's not.

Anton Neufeld -

If the backlight doesn’t work, try shutting the watch down (Settings-System-Shut Down) and restarting. In my experience the backlight doesn’t work about half the time immediately after the watch has been disassembled and reassembled, but power cycling almost always fixes the problem.

Rich Stillman -

where to purchase pebble time steel capacitor sp551923ae

gwenag48 -

I bought this battery quite a long time ago and finally got a new T3 screwdriver recently. The battery fits fine. It's a little bigger than the old one and sits over the edge of the motherboard a bit, but it's wrapped in non-conductive plastic so that's ok. The hardest part was deciding how far to trim back the wires.

https://www.aliexpress.com/item/Polymer-...

[deleted] -

I just completed a replacement using this LiPo cell:

https://www.ebay.com/itm/4-pcs-120mAh-Li...

It’s listed as a 402020 120mAh cell and the dimensions are just slightly smaller than the factory battery.

Andrew Morton -

Installation notes:

I cut the LiPo protection board off of both cells since they were spot welded onto the tabs, and found that the welding pads on the Pebble’s board are actually soldered on. This means you can heat the little squares after you’ve removed the cell, and sort of push them off of the board to reveal solder pads beneath. I tinned the tabs on the new battery with a bit of flux, and then soldered them directly to the Pebble’s protection board. The tabs lined up perfectly.

I then retaped the LiPo pack, soldered the Pebble’s board back in the way it came out, and fit everything right back together. It turned on immediately, because it was working when I reinstalled the board (there was some garbage on the screen that cleared up when I pressed some buttons to make it redraw). I also had to prod around at that square mainboard connector to get my backlight working again, but it’s all together and functional after replacing the LiPo pack now.

Andrew Morton -

Thanks for putting this guide up, my Pebble Steel is now back alive again!

Blair May -

P.S. I got my battery from Adafruit https://www.adafruit.com/product/1317 it is 150mAh LP402025 so it is a bit bigger then original. I had to carefully replace the battery leads with smaller gauge wire and squeeze all back in, but it did just fit.

Blair May -

OMG, talk about a small business made to order. I think one of you kind soles should offer battery replacement on our Pebbles. Coming into 2019 and I still can’t find a watch I love nearly as much as the Pebble Steele Time. Won’t someone step up to the plate, work from home and offer those of us with no soldering skills Pebble Life after battery death? Seems like something that would be a nice small business.

Please contact me at lizdvine@gmail.com if you can help. I have two wonderful Pebbles both showing me a sad face due to batteries that will no longer charge. Thank you.

Liz Devine -