Introduction

The Flipper Zero is a versatile multi-tool device that is widely used for hardware hacking, electronics prototyping, and security testing. One of its key features is its display, which allows users to interact with the device and view information. However, if the display on your Flipper Zero becomes damaged or stops working, it may be necessary to replace it.

Replacing the display on a Flipper Zero is a bit more involved than replacing some other components, as it requires desoldering the old display from the device's circuit board. However, with the right tools and some basic knowledge, it's a task that can be accomplished even by those with limited experience in electronics repair.

In this guide, we'll take you through the steps involved in replacing the display on your Flipper Zero, including how to desolder the old display. By following these steps, you can restore the functionality of your Flipper Zero and continue to use it for all your hardware hacking, electronics prototyping, and security testing needs. So, let's get started!

  1. Go to <strong>Main Menu</strong> &gt; <strong>Settings</strong> &gt; <strong>Power</strong>.
    • Go to Main Menu > Settings > Power.

    • Select Power OFF.

    • Alternatively, you can press and hold the Back-button for around 10 seconds.

    • Confirm by pressing the Right-button.

  2. raJt3Q3A3mUaV6Jl
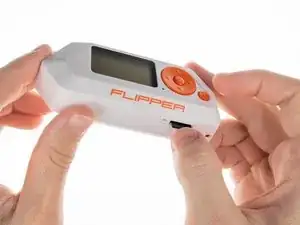
    • Eject the microSD card by pressing it with your fingernail.

  3. fMudNYEZuGtPmk2j
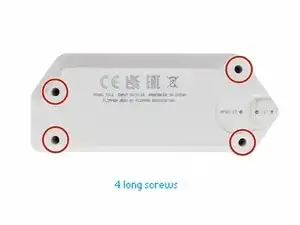
    • Use a PH1 screwdriver to unscrew the four long screws holding the back cover.

    • Be careful, the screws are quite easy to strip.

  4. YV2JCfLXowDYIEOA
    YV2JCfLXowDYIEOA
    UDeOVehahANEQROx
    XVOGkVrhAaGcRyhx
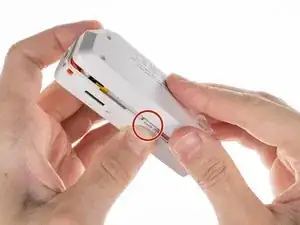
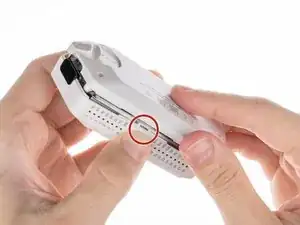
    • Press the middle of the top cover on both sides, one by one, to release the latches that hold the back cover in place.

    • Once the latches are released, you can remove the bottom cover.

  5. vRobAtrM6mjFOAHm
    vRobAtrM6mjFOAHm
    cq65MmxLuSRKokd5
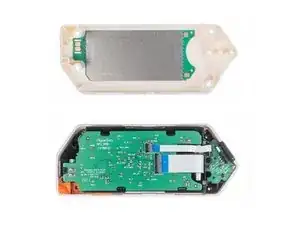
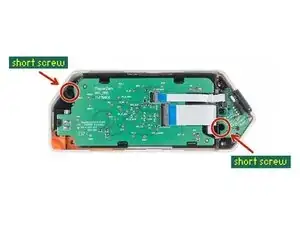
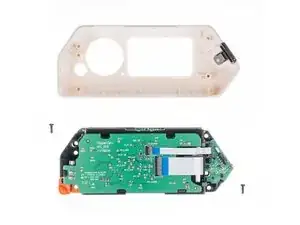
    • Use a PH0 screwdriver to unscrew the two short screws that are holding the chassis and top cover together.

    • Once the screws are removed, separate the chassis from the top cover.

    the upper one is "long"

    Facu -

  6. GRUiEVAAlCyKXC5H
    • Disconnect the battery by carefully prying the connector with a Spudger and pulling it out.

  7. TwwFuMGLHATFOfFK
    • Disconnect the large ribbon cable from the board. Use a plastic pick to lift the latch up to open the lock and carefully pull it out of the connector.

  8. tvvYmWejEIZIkHPB
    tvvYmWejEIZIkHPB
    TrZEWqoOasiMZHej
    • To release the battery chassis, lightly rock it back and forth while pulling the two parts apart.

    • Be sure to apply gentle and consistent pressure to avoid damaging the device.

  9. AL2FifX6umToiCEq
    • Unscrew the two short screws holding the button chassis using a PH0 screwdriver.

  10. RGagRaUqTEcHkoQX
    RGagRaUqTEcHkoQX
    qMWTZNOPelMoEVPB
    RH2WZK311BhIQVQa
    • To seperate the button chassis and the board, press the latch on the side shown below and pull the chassis away from the board.

  11. qgofbwPUDDeW32i5
    qgofbwPUDDeW32i5
    2ESWpBjrtbRPBmgr
    • Disconnect the screen ribbon cable from the board. Use a plastic pick to lift the latch up to open the lock and carefully pull it out of the connector.

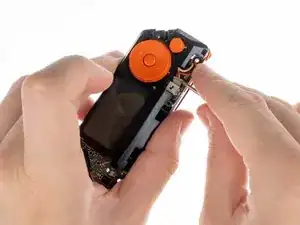
    If the screen is broken, but the backlight is still functional, you can carefully peel the screen away from the backlight and reuse the backlight. This also removes the requirement to desolder/solder the backlight. Be sure to use gloves or a soft plastic tool (credit card, spludger, etc) as the adhesive will pick up dirt which will be visible after the repair.

    If your backlight is still functional (glows orange) but you have no images/text on the screen, you can likely re-use the backlight.

    Frosty -

  12. lNKKiCGEiCbiPPAS
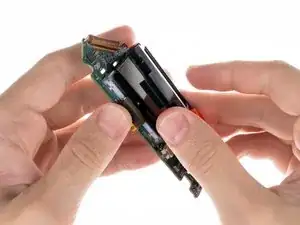
    • To remove the screen you need to desolder two contacts.

    • See this guide on how to solder and desolder connections.

    Those little legs/contacts go to the PCB of the backlight LEDs and are really fragile. I broke one and it's not easy to fix. Be careful!

    Facu -

    BEWARE DESOLDERING!!! I just followed this guide -- I purchased a screen replacement through AliExpress and have concluded that this step is INCORRECT. You are not Desoldering the screen, you are desoldering the backlight!!! If you just need to replace the screen (why you're here on this page probably), you can remove the existing one by carefully using a pry-pick to pull it off the adhesive connecting it to the backlight, then simply replace it with the new screen and reconnect the ribbon cable, all that jazz. That is way easier! Desoldering is completely unnecessary, and puts people at a higher risk of ruining their Flipper for no reason. Please update the guide!

    Brando Calrissian -

    That is, if your backlight is broken. Refer to the comment on step 11

    Tiger -

    While it's technically possible to separate the LCD layer from the backlight and connect a new display in that manner, the original replacement typically includes the backlight already assembled. Therefore, removing the old backlight is necessary when installing the new display.

    Sebastian -

Conclusion

To reassemble your device, follow these instructions in reverse order.

Take your e-waste to an R2 or e-Stewards certified recycler.

Sebastian

Member since: 19/08/18

25411 Reputation

9 comments

Everything worked fine following this guide. Thank you for the help. In my case was just the glass that was broken, so at the end, i didnt needed to desolder. Just removed the glass with the Plastic pick and worked perfectly. Thank you again for the help.

arthureldo -

Where did you find a replacement glass?

Ben Durrant -

The company behind FZ is not selling screen replacement (they promise they will do it in the future) but for now... So i don't what to think about this guide

Gusbill -

Where can you get an LCD replacement (backlit)?
David Williams -

Checked with Flipper Zero Support and they said there's no replacement screens available. Found one on AliExpress and ordered it so I'll post here in about a month once the display has arrived and I have time to try the replacement, then report back and link the part if successful.

Cody Ouellette -

Did you get a chance to attempt the replacement?

joehannsenn -

I'm going to try and replace the display and keep the original backlight. I'm seeing a lot of reviews saying that the display just needs to come away from the backlight and that desoldering isnt required, but I can't tell where the backlight ends and the display begins. any advice?

Noah -

Got a replacement display from AliExpress and it works just as it should and only 20$.

Aiden Hughes -

I was able to find and order a replacement screen from AliExpress. I would have thought by now flipper would have a replacement parts section on the official website. It only took about 2 weeks for the screen to arrive and hopefully I can get to changing it out sometime soon. I’ll post with success or tragedy update.

Brandon Agnew -