Surface finish, also known as surface texture or surface topography, is the nature of a surface as defined by the three characteristics of lay, surface roughness, and waviness.[1] It comprises the small, local deviations of a surface from the perfectly flat ideal (a true plane).
Surface texture is one of the important factors that control friction and transfer layer formation during sliding. Considerable efforts have been made to study the influence of surface texture on friction and wear during sliding conditions. Surface textures can be isotropic or anisotropic. Sometimes, stick-slip friction phenomena can be observed during sliding, depending on surface texture.
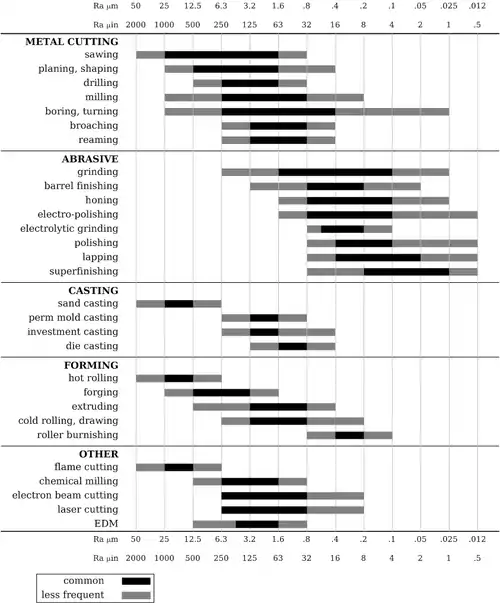
Each manufacturing process (such as the many kinds of machining) produces a surface texture. The process is usually optimized to ensure that the resulting texture is usable. If necessary, an additional process will be added to modify the initial texture. The latter process may be grinding (abrasive cutting), polishing, lapping, abrasive blasting, honing, electrical discharge machining (EDM), milling, lithography, industrial etching/chemical milling, laser texturing, or other processes.
Lay

Lay is the direction of the predominant surface pattern, ordinarily determined by the production method used. The term is also used to denote the winding direction of fibers and strands of a rope.[2]
Surface roughness
Surface roughness, commonly shortened to roughness, is a measure of the total spaced surface irregularities.[1] In engineering, this is what is usually meant by "surface finish." A Lower number constitutes finer irregularities, i.e., a smoother surface.
Waviness
Waviness is the measure of surface irregularities with a spacing greater than that of surface roughness. These irregularities usually occur due to warping, vibrations, or deflection during machining.[1]
Measurement

Surface finish may be measured in two ways: contact and non-contact methods. Contact methods involve dragging a measurement stylus across the surface; these instruments are called profilometers. Non-contact methods include: interferometry, confocal microscopy, focus variation, structured light, electrical capacitance, electron microscopy, atomic force microscopy and photogrammetry.
Specification
In the United States, surface finish is usually specified using the ASME Y14.36M standard. The other common standard is International Organization for Standardization (ISO) 1302:2002, although the same has been withdrawn in favour of ISO 21920-1:2021.[3]

Many factors contribute to the surface finish in manufacturing. In forming processes, such as molding or metal forming, surface finish of the die determines the surface finish of the workpiece. In machining, the interaction of the cutting edges and the microstructure of the material being cut both contribute to the final surface finish.
In general, the cost of manufacturing a surface increases as the surface finish improves.[4] Any given manufacturing process is usually optimized enough to ensure that the resulting texture is usable for the part's intended application. If necessary, an additional process will be added to modify the initial texture. The expense of this additional process must be justified by adding value in some way—principally better function or longer lifespan. Parts that have sliding contact with others may work better or last longer if the roughness is lower. Aesthetic improvement may add value if it improves the saleability of the product.
A practical example is as follows. An aircraft maker contracts with a vendor to make parts. A certain grade of steel is specified for the part because it is strong enough and hard enough for the part's function. The steel is machinable although not free-machining. The vendor decides to mill the parts. The milling can achieve the specified roughness (for example, ≤ 3.2 μm) as long as the machinist uses premium-quality inserts in the end mill and replaces the inserts after every 20 parts (as opposed to cutting hundreds before changing the inserts). There is no need to add a second operation (such as grinding or polishing) after the milling as long as the milling is done well enough (correct inserts, frequent-enough insert changes, and clean coolant). The inserts and coolant cost money, but the costs that grinding or polishing would incur (more time and additional materials) would cost even more than that. Obviating the second operation results in a lower unit cost and thus a lower price. The competition between vendors elevates such details from minor to crucial importance. It was certainly possible to make the parts in a slightly less efficient way (two operations) for a slightly higher price; but only one vendor can get the contract, so the slight difference in efficiency is magnified by competition into the great difference between the prospering and shuttering of firms.
Just as different manufacturing processes produce parts at various tolerances, they are also capable of different roughnesses. Generally, these two characteristics are linked: manufacturing processes that are dimensionally precise create surfaces with low roughness. In other words, if a process can manufacture parts to a narrow dimensional tolerance, the parts will not be very rough.
Due to the abstractness of surface finish parameters, engineers usually use a tool that has a variety of surface roughnesses created using different manufacturing methods.[4]

See also
References
- 1 2 3 Degarmo, Black & Kohser 2003, p. 223.
- ↑ Herkommer, Mark (1995). FM 5-125: Rigging Techniques, Procedures, and Applications. Washington, DC: United States Department of the Army.
- ↑ "ISO 21920-1:2021 Geometrical product specifications (GPS) — Surface texture: Profile — Part 1: Indication of surface texture". International Organization for Standardization. International Organization for Standardization. December 2021. Retrieved 20 February 2022.
- 1 2 Degarmo, Black & Kohser 2003, p. 227.
Bibliography
- Degarmo, E. Paul; Black, J T.; Kohser, Ronald A. (2003), Materials and Processes in Manufacturing (9th ed.), Wiley, ISBN 0-471-65653-4.