Introduction

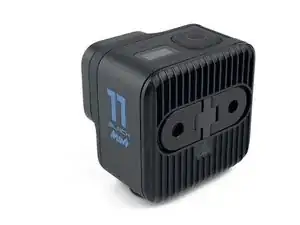
This year's GoPro release had a surprise: An all-new camera shape.

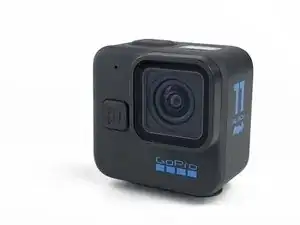
While the HERO11 Black looks virtually identical to last year's HERO10 Black, GoPro also released the HERO11 Black Mini. Sporting almost the same hardware features as its bigger brother, providing the same video modes with up to 5.3k 60fps and built-in HyperSmooth video stabilization.

Despite its modern features, the HERO11 Black's Mini-Me gives off a "back to the roots" vibe—no display for live preview whatsoever. Just a rugged little camera, ready to take a beating.

Now let's take a look at its inner workings to uncover the secrets that make this new form factor possible!

  1. htaaSAQa6MG4MYeK
    htaaSAQa6MG4MYeK
    hnPRoNcrJEIELf6i
    ANAPJKTYZb54POQI
    • While The HERO11 Black Mini does have some shortcomings compared to its bigger brother, such as the lack of a GPS or a photo mode, here's what it does offer:

    • GoPro's GP2 processor to enable their most up-to-date image processing and stabilization

    • 27.6MP 8:7 1/1.9" sensor with 10-bit colors and an ultra-wide angle lens (ƒ/2.5)

    • High-resolution video with up to 5.3k @60fps and up to 2.7k @240fps for slow motion

    • 0.5" 72x32px OLED status display

    • Waterproof up to 10m

    • 133g, thus 21g lighter than the bigger and more expensive HERO11 Black

    • A beefy aluminum heatsink, covering the entire back

  2. iyVISB2HIS4VGVUF
    iyVISB2HIS4VGVUF
    3Zp4MrUcZco3Vemi
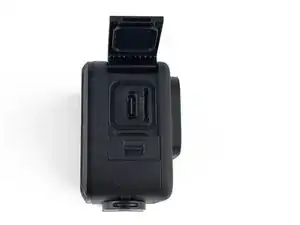
    • A first look under the hood reveals: This GoPro has an internal battery. All we get is a USB-C port to charge it and a microSD slot.

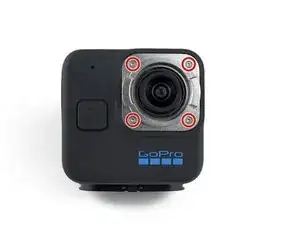
    • The lens cover is the same one GoPro has been using on their cameras since the HERO9 Black and it twists right off.

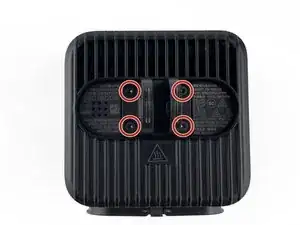
    • Hiding under the lens cover are four T4 Torx screws. Removing these does not provide a way into the camera, though.

  3. isCVJfQLcSVcDpJE
    isCVJfQLcSVcDpJE
    QKmCydWw1ObygTFZ
    hheQFYWiVSCBblRQ
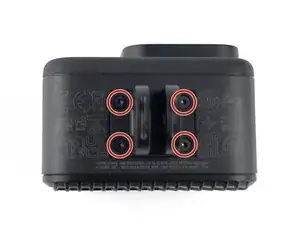
    • The HERO11 Black Mini is the first model to sport two sets of GoPro's signature "Folding Fingers" mount.

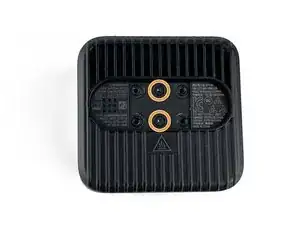
    • Flipping up the Folding Fingers uncovers a total of eight T5 Torx screws, enabling quick and easy replacement in case of a defect or some additional weight savings for those who aren't using them.

    • Underneath the folding fingers at the back are two more T5 Torx screws, but just like the screws under the lens cover, they turn out to be a red herring and do not provide access to the GoPro's insides. Sigh.

  4. vgBmmqH2QAiHDZlb
    vgBmmqH2QAiHDZlb
    njNfbRNoLjNerWiD
    SIejTrIRTnFnb6Iw
    • All screws are out but nothing moves, so there must be glue. No real surprise here—the last camera from GoPro that wasn't glued shut was the HERO4, all the way back in 2014.

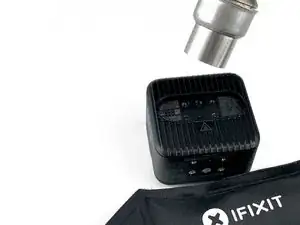
    • Heat usually works, but if your opponent is a literal heatsink, things get difficult. The trusty iOpener quickly reached its limits and had to request help from an adult a heat gun.

    • Facing the impending doom of an overheated battery, accepting defeat was the only sensible step. 1:0 for the heatsink.

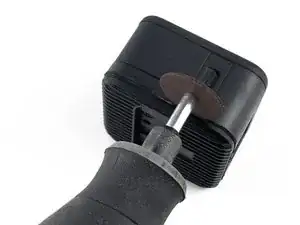
    • Losing the battle does not mean losing the war, though. It was time to confront the GoPro with the Bagger 288 of electronics: A Dremel.

    • Some components, especially the battery's flex cable, are located dangerously close to the seam between the heatsink and the GoPro's plastic shell.

    • A few minutes and some careful cuts later, the heatsink lifts off like it was never meant to be attached in the first place. At last: Victory!

  5. byI2SHgHn5NUt2jA
    byI2SHgHn5NUt2jA
    LiQXQZY3YOXnWeB6
    DMSPmgoFHYH4Q5nX
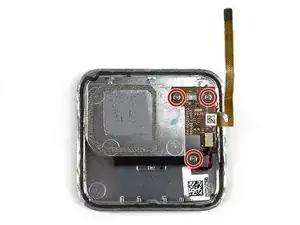
    • Three Phillips #000 screws to remove the flexible circuit board (FPC) from the heatsink.

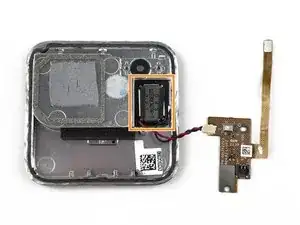
    • Underneath the FPC sits the speaker for the camera's lovely beeping sounds that let us know what it is up to.

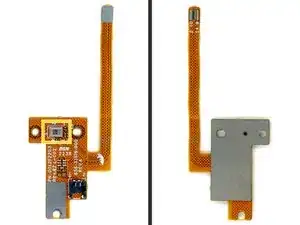
    • Inconspicuously located between two mounting holes, there's also the GoPro's rear-facing MEMS microphone.

    • The HERO11 Black Mini utilizes a total of three microphones facing in different directions to achieve optimal wind-noise reduction.

  6. 6NcbSewqAv2AKdtN
    6NcbSewqAv2AKdtN
    EuGE6vBo2mOdBBNo
    YUIrhuDdhq5VIpKh
    • Now on to the real adventure, but safety first:

    • With the heatsink removed, the battery can finally be unplugged.

    • After that, it takes just one T4 Torx screw to loosen the battery tray and carefully pull the 1500mAh Li-Ion cell out of the case.

    • An internal battery for a camera that is virtually impossible to open non-destructively? Not nice, GoPro.

  7. I43OUMnSgOinqZ1O
    I43OUMnSgOinqZ1O
    NxiYVPNlAcMFTNP4
    5QlwX2vK4KVnmqIg
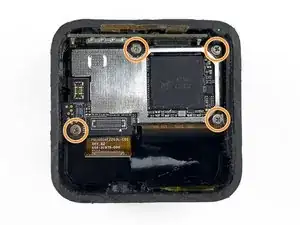
    • We're getting closer! The mainboard is in plain sight and almost free.

    • All it takes is to unplug the connector for the sensor...

    • And remove the four Phillips #000 screws...

    • To find out that it is a rigid-flex PCB and realize that the other part is buried even deeper.

    • Looks like the initial celebration was a bit premature. Whoops.

  8. HYYpraJ3gW6wrXkD
    HYYpraJ3gW6wrXkD
    5ciH6QMmKIDxnwrR
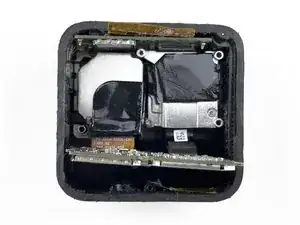
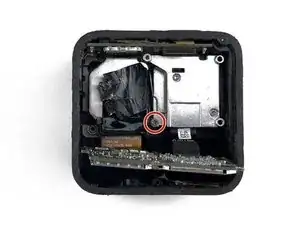
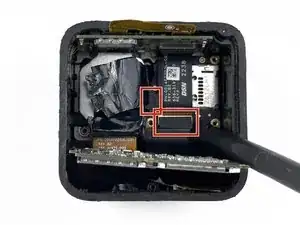
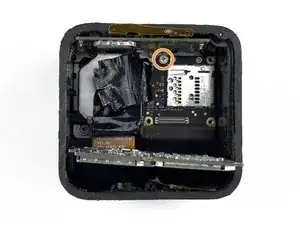
    • After peeling back some tape, there's one more Phillips #000 screw and the USB port assembly can be pulled out of the camera body.

    • The view onto the rest of the mainboard is almost unobstructed now and reveals that the microSD slot is actually soldered directly to the second part of the mainboard. A rather unusual choice, as that's often one of the first components to get "outsourced" from a mainboard when space is tight.

  9. HGnMEdIJWlvGLgBa
    HGnMEdIJWlvGLgBa
    2VLCalkktyKTFsJL
    cO2vXUhDSmvTNpcw
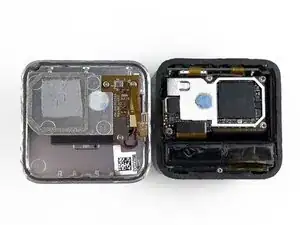
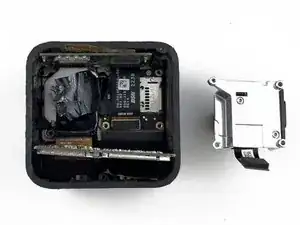
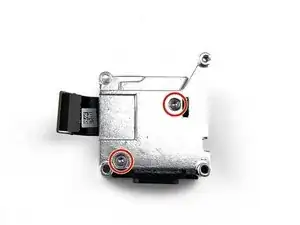
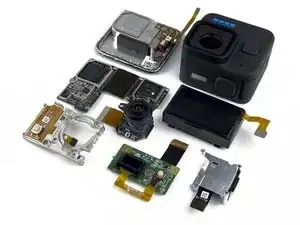
    • Before we dig deeper into this camera, let's take a closer look at the pieces we just removed.

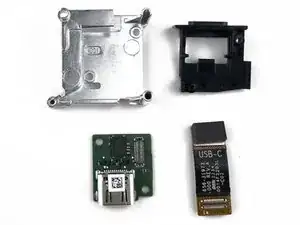
    • Removing two T4 Torx screws is all it takes. The assembly then just effortlessly falls apart and reveals this teardown's first IC:

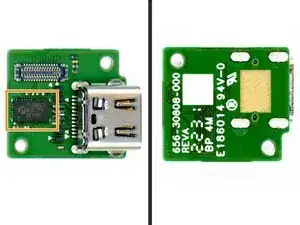
    • Pericom (Diodes Inc.) PI3DBS12612ZTFE

    • This USB-C module hasn't changed for several product iterations. It's the same one GoPro used for the HERO11 Black and previous generations.

  10. DQbCp1URvii1CWmJ
    DQbCp1URvii1CWmJ
    maOQUHXpDLDbEICc
    iBMFRh3dL26GNYRU
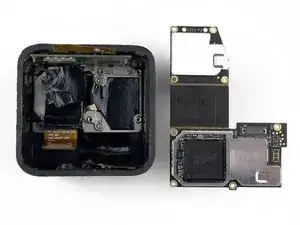
    • This might seem like a déjà vu, but: We're getting closer!

    • Two connectors to unclip and they pop off like they have already accepted their fate.

    • Removing the black FPC uncovers one more Phillips #000 screw and then...

    • It is done! The floppy mainboard has been freed from its shackles and presents itself in its full glory.

  11. H1hboMQogimfRabH
    H1hboMQogimfRabH
    XQLZZ4Np5fvAXXEr
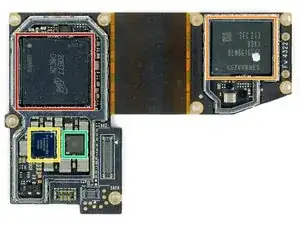
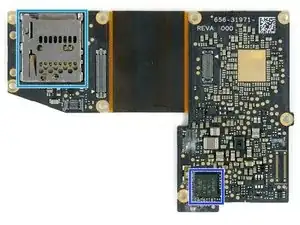
    • All that was left to do was to unclip the EMI shields and remove some thermal paste to finally uncover all the chips that make the magic happen:

    • GoPro GP2, GoPro's custom processor that was first introduced in the HERO10 Black

    • Samsung KLM8G1GETF-B041 8GB eMMC memory

    • "9150VD106" power management IC (potentially from Qorvo)

    • Qorvo ACT88760 power management IC

    • JAE ST11-H microSD connector

    • STM "GP081GPR" microcontroller (appears to be a custom version)

  12. DNQL5bWFjbMbNxSt
    DNQL5bWFjbMbNxSt
    MIcr1eCxqAEBsecg
    lOKhG1vZisYQTmQN
    • We've seen the mainboard, but this mission is not over yet. Next up:

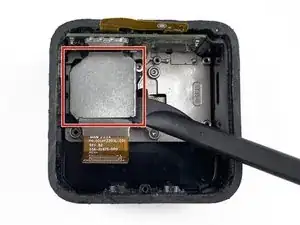
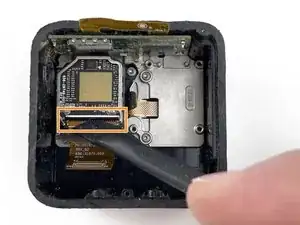
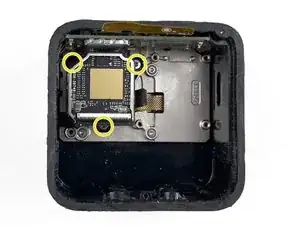
    • Unclipping the sensor's EMI shield.

    • Removing some tape and lifting the latch that keeps the FPC in place.

    • Removing three 1.3mm hex screws that secure the lens.

    • Remember the immovable part underneath the lens cover from step 2? Well, these screws are the reason why it didn't move.

  13. wphdEMqeeV3TlgLG
    wphdEMqeeV3TlgLG
    cNkeuSIWPXv1eYQg
    IEj3gZaxlGv3CGYD
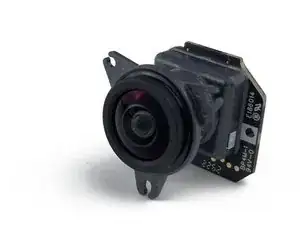
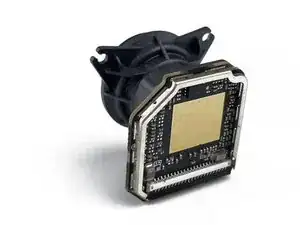
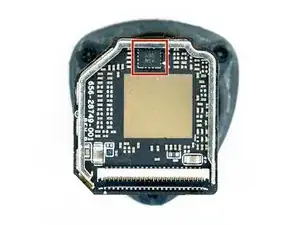
    • As promised by GoPro: The exact same lens and sensor that they also put in the full-sized HERO11 Black.

    • The PCB is rather unspectacular, featuring mostly a handful of passive components and a ground pad for cooling purposes, but at the very top we can spot a significant contributor to GoPro's HyperSmooth stabilization:

    • Bosch BMI260 intertial measurement unit

  14. oOHwngGlSvscl1eA
    oOHwngGlSvscl1eA
    hLCXBZnx62TTkj5h
    • "Are we there yet?" Not quite. First there are two more Phillips #000 screws that need to be removed.

    • Now we get a glimpse of the Mini's secondary PCB, featuring its status display. Buckle up for a deep dive!

  15. mW4BRaOexR4PqDm3
    mW4BRaOexR4PqDm3
    Tv4VO2OSeCNBFFSc
    LvCFVImjFwy4rmlU
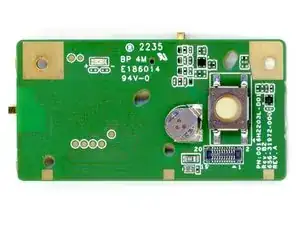
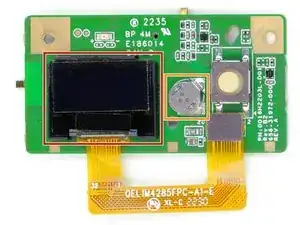
    • On the top side of this green beast, there's not just the GoPro's shutter button. Also part of the team:

    • 0.5" 72x32px OLED display (labeled OEL9E3033A0)

    • Seiko ML414H back-up battery

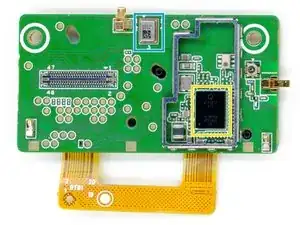
    • Another EMI shield and a thermal pad later, the bottom side isn't less exciting:

    • Qualcomm QCA9377 WiFi and Bluetooth chipset

    • Top-facing MEMS microphone

  16. yyMBdsmtlBXMVjIo
    yyMBdsmtlBXMVjIo
    hUHNB2UMJCGvg1hA
    6RrwaSWXZmuPt2CF
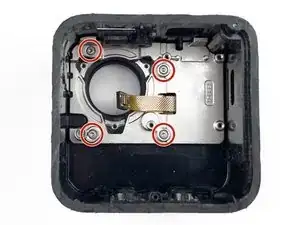
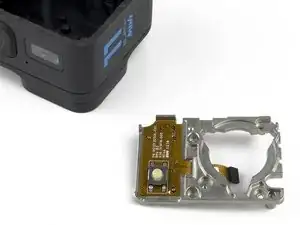
    • Four T4 Torx screws are left, holding the aluminum bracket in place to which all the circuit boards were once mounted.

    • No more glue, no more screws. Lifting the metal frame out of the case leaves behind a lifeless, empty plastic shell and reveals the last electronic components:

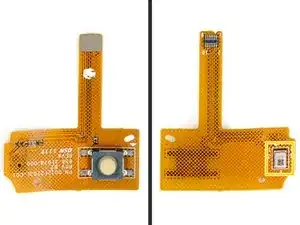
    • The power/pairing button and, hidden on the bottom side, the third member of the sound recording triplets:

    • Front-facing MEMS microphone

  17. SjB1GDx6V5enJwNF
    • Time to wrap it up! After a thorough dissection, we can definitely conclude that the GoPro HERO11 Black Mini was not built to be repaired. Let's start with something positive:

    • The lens cover can be easily twisted off and replaced. No tools are required and it is compatible with lens covers for GoPro's other cameras.

    • The Folding Fingers are secured with standard Torx screws and are almost as easy to replace as the lens cover. However...

    • The Folding Fingers at the bottom are only screwed to metal thread inserts in the GoPro's plastic shell and those thread inserts might give out easier than the Folding Fingers themselves.

    • Less exciting and surely a deal breaker for some:

    • The elephant in the room: It has a non-removable battery. Not only does this limit usability due to battery life constraints, it also limits the camera's life expectancy as a whole. We have seen similar things before—remember the GoPro SESSION?

    • All components on the inside are very easy to replace once the camera is open, but opening it non-destructively is virtually impossible.

    • Repairability score: 2/10. Looks like that's the price we have to pay for a modern action camera.

Jonah Blaeser

Member since: 12/11/22

290 Reputation

34 comments

What is the weight of the battery?

Does the mini work with just the USBC attached for power and without the battery connected?

digitaljustin -

The battery weighs 29g.

With nothing but USB power, the power/mode switch will not work. The bare minimum to get full functionality without the battery is 5V on the USB input and ~4V on the battery input.

Jonah Blaeser -

Thank you Jonah!

digitaljustin -

Someone found a way to buy replacement batteries? This is a big no (in my case) for buying this camera since the battery will need a change after some years of use. It's a shame it doesn't turn on with only usb power, since getting the battery out for less weight on FPV would be awesome.

Gabriel Fernández -

The battery is proprietary and not user-replaceable, so the batteries will never be available separately—at least not officially from GoPro. There might be some spare parts from dismantled cameras on AliExpress in the future, but that's about it. In that regard, the Hero11 Mini is very much like the older GoPro Session models.

Jonah Blaeser -

Great post as usual! Is the optic a M12 thread s-mount format? Can it be unscrewed to replace it with another wider FOV optic? That'd be great for my use.

BTW, @gabrielfer37221 ,about replacing the battery, "drone-fpv-racer" sells an BEC module "namelessrc" compatible for H9-H10-H11. Perhaps not compatible with the gopro H11 mini but it's worth a shot...

Maouss -

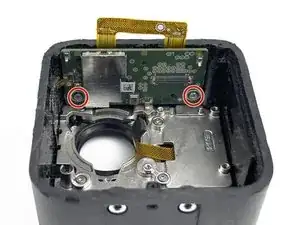
I haven't tried to unscrew the lens yet, but I'm 99.9% certain that it's the same one GoPro used on the Hero9/10, which looks like this and can't be replaced with a standard M12 lens. The limiting factor is the lens mount which becomes narrower towards the sensor with a minimum outer diameter of 12.0mm, so you wouldn't be able to fit an M12 thread inside it. You would have to remove the stock lens mount, which is glued to the sensor PCB, and replace it with a custom one, similar to Back-Bone's H11PRO.

Regarding the BEC module from NamelessRC: That one is only suitable for the full-size Hero9/10/11. The Mini does use the same JAE WP25D connector for its USB module, so you could (in theory) use the NLRC BEC to supply 5V to the Mini's mainboard, but that's about it. There is no off-the-shelf solution to use the Hero11 Mini without its battery at this time.
Jonah Blaeser -

Thanks for the feedback @mokato, I had a look at the Back-bone H11 mod, but I have the capacities to design and manufacture a custom adaptor mount myself, and I need a smaller form factor than the full Gopro H11, hence my interest in the mini version (back-bone doesn't mod the mini one). Would you say it's possible to separate the stock lens mount from the sensor's PCB in a non-destructive manner? Do you reckon that's how back-bone proceeds? Or do they swap the complete lens and sensor for another sensor-only PCB? Thanks!

Maouss -

Removing the stock lens holder without destroying anything else is definitely possible. It's glued to the PCB with what looks like some sort of epoxy and a combination of heat and a scalpel should make it fairly easy to remove it altogether, so you're just left with the an exposed sensor on its PCB. I supsect this is what Back-Bone does for their mods, too.

Jonah Blaeser -

Thanks @mokato! Let's do it then!

Maouss -

@mokato , just a little update about removing the lens stock. It is indeed possible but the layer of epoxy is very thick and after chipping away at it for about an hour with my scalpel I was nowhere near getting it separated. Also heat doesn't do at all. I ended up cutting with my dremel just between where the square base and the lens' cylinder meet and then snapped the corners with a small cutting plier and it chipped of, I wasn't planning to re-use the stock lens anyways and this ended up being a fast and efficient process. I can share some pictures of the resulting sensor-only pcb if you wish, but thanks in any case for this great teardown tutorial, made me very confident!

Maouss -

Is it possible to unscrew the lens without disassembling the camera itself? Interested in the possibility of extracting an IR filter.

laawert -

Theoretically - yes. The lens itself is screwed into the lens mount and it's possibly to grab the lens itself with needle nose pliers or similar tools. However, there is a glue "seal" around the lens that secures it in the lens mount. Looks like epoxy or something similar.

Give me a few days and I'll try it. I happen to have a defective sensor module that I can use for this.

Jonah Blaeser -

Thank you, friend. I am very much waiting for information about the availability of such an opportunity. If the IR filter cannot be removed in a relatively simple way, it will be sad.

laawert -

Wish I knew the weights. Want to make a naked GoPro Mini for a drone.

Josiah Mos -

Similar to a standard HERO11.
Sensor/lens assembly (incl. FPC): 6.8g
Mainboard: 8.5g
Daugtherboard for WiFi/BT (incl. FPC): 3.4g
Display: 0.6g

Jonah Blaeser -

@laawert

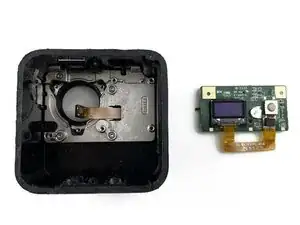
I've tried, but didn't succeed. There's glue around the lens, which is relatively easy to remove if you heat it up. However, this does not allow you to unscrew the lens, but just a little plastic ring that protects the edge of the lens itself. The actual thread for the lens and the glue that holds it in place is much further down and I couldn't get to it without a severe risk of damaging the lens. It might be possible if you build a specialized tool, that you can screw onto the lens or something like that, but I would say that unscrewing the lens is not feasible with standard tools. Pictures

Jonah Blaeser -

Oh, it's a pity. So this camera doesn't suit me, and I have to sell it. Thank you for your desire to help, and for the result of this analysis. Maybe you have information about how the camera is suitable for moss purposes?

laawert -

I am drone enthousiast and I'm looking to strip this thing down and use as little as I can. Would I be able to connect a small external 5V BEC to some pad on the motherboard to power it? Also the bluetooth seems to be ontop of the board with the record button, so I guess I'll need to keep that board to maintain functionality?

Stan Coene -

The green PCB is indeed necessary for wireless communication as it contains the BT/WiFi chipset.
Regarding power: The H11 Mini isn't meant to be used without its internal battery, so it won't work from USB power alone. There is a work-around, though: With USB power and an appropriate power source connected to the battery terminal (BMS isn't necessary), it works. You will need 5V on VUSB as the main power source and ideally just over 4V on VBAT. Some people have reported that applying the same 5V source to VBAT works as well, but do that at your own risk. I would recommend a diode between the 5V source and VBAT. Here are the test points that you can use as solder pads: https://i.imgur.com/e0MhfYb.jpg

Jonah Blaeser -

Okay thanks! The fact that nobody online seemingly has ever made a naked hero 11 mini sort of scares me. But I'm giving it a shot and if it works using my platform to share it. Usually it only takes a couple months for even mainstream manufacturers in FPV to start making conversion kits after they figured out how to mimick the buttons and power.
Stan Coene -

@stancoene
The reason I took the Mini apart in the first place is that I wanted a semi-naked version that's more or less stock but doesn't have a battery. Unfortunately, that project had been on hold for several months because other stuff was more important, but I finally got back to it. Currently tweaking the BEC and working on a custom heatsink. The Mini works fine without the battery and besides my own tests on the bench, I know two people who have been using it naked without significant issues.

The lack of commercially available kits is probably owed to the fact that a) it's not as simple as with a full-size GoPro, b) there are no significant weight savings compared to a normal Naked GoPro and c) most popular Naked kits are from "bandwagon brands" like GEPRC, Flywoo and iFlight, who only made their own version because it was already a proven concept that was selling well. BetaFPV seemingly gave up on Naked GoPros, so unless NLRC releases something for the Mini, we probably won't get an off-the-shelf kit.

Jonah Blaeser -

Hi so I have been trying to use this GoPro without its original battery. I keep running into the issue where it says it doesn't detect a battery. (Battery icon with a cross in the corner). I've tried a diode between VUSB (5v) and VBAT. And I have now tried a voltage divider that puts 4.15v on VBAT. Yet it still gives that error. I double checked wiring and voltages. When I plug in the original battery it starts recording as normal.

Stan Coene -

It will never actually detect a battery, unless it gets data from the BMS, so that's expected behavior. It should still record, though. Are you using GoPro Labs firmware? If not, you absolutely should and then also use the !MTUSB=1 QR command. It's primarily meant for full-size GoPros that are officially capable of working without a battery, but it also works on the Mini and can mitigate issues like this.

An alternative which I've also tested: Get a third party Hero10/11 battery (not original GoPro) and remove the BMS from it. Solder the output from a ~4V BEC to its battery input and then connect the BMS to the Mini's battery input with all four wires. The Mini's battery appears to use the exact same (custom) TI fuel gauge on its BMS as the full-size GoPros and that's why the Mini also works if you hook it up to a standard GoPro battery or a BMS from one with a BEC. The latter just won't work with an original BMS because they have a security feature that disables the device if the LiIon cell is disconnected.

Jonah Blaeser -

Avez vous trouver " 9150VD106" power management IC (potentially from Qorvo) ?

Bastien jougneau -

No, this IC isn't publicly available.
Jonah Blaeser -

всем привет являюсь облодателем го про мини , ребята помогите пожалусто проблема такая , камера новая включаешь через минуту появзяются полосы цветные , в чем причина поскажите ??

Александр Убейкин -

@aleksandru56534 Could be anything, but definitely nothing you can fix yourself. If it's actually a new camera you just bought, just return it as defective. Otherwise contact GoPro's support because that definitely sounds like a warranty case.
Jonah Blaeser -

очень жаль прошло 2 месяца продовец не примет обратно ((( работала норм внезпно стало это все

Александр Убейкин -

Nice teardown dude

anw, my gopro 11 mini has no gyro data at all, and when i use gopro lab firmware and make it to show gyro data, its always show .00g+0dps even when i shake the camera, but sometimes its need to be restart again many times to make it works https://drive.google.com/file/d/1uhnmPfb...

is it the IMU BMI260 IC is broken ?, and can i just replace this ic or it should replace whole camera module ?

Aziz Nur Ariffianto -

Can't I disassemble parts other than glue without cutting?

 領大 市村 -

Dear, I will need a new processor for go pro hero 11 black mini camera? Can you tell me where I can find it so I could order it? Thank you

Nebojsa Petrasinovic -