Introduction
The cordless grass strimmer (trimmer in US) accidentally ingested so much plastic string, the lower bearing seized and itself rotated wearing away its bearing housing wall in the motor housing. This loss of location caused more wear damage. I couldn't find a replacement casing for my exact model number, so I repaired the worn casing wall with pieces of plastic which were screwed and glued in place. This near zero cost repair was successfully tested on grass for over 20min, before being given back to its owner.
Tools
-
-
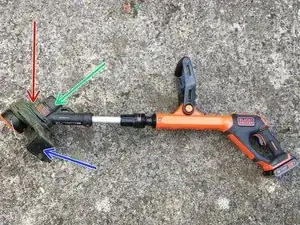
First image shows the general view of the strimmer (trimmer). To open, first remove safety shield (blue arrow, clean off grass deposits to reveal one cross-head screw, undo and press plastic tab to slide off).
-
Remove wheel attachment (red arrow, note wheel broken off in my case) by undoing 3 security screws with Torx15 heads to part and pull away.
-
Undo another 9 Torx screws to open the motor housing (green arrow note that 2 of these screws are deep set so a long shaft screw driver is needed).
-
Second image shows the motor (pink arrow), worn gear (orange arrow) and the lower bearing (yellow arrow). The image also shows all the black plastic string the strimmer had accidentally ingested (from degraded bio barrier often used in allotments)
-
The ingested string caused the lower bearing to seize on its shaft and so wear away the plastic wall which constrained it. The rotor assembly could thus move out of position and wear though other parts of the plastic housing and gearing, making a horrible noise or stop turning at all.
-
-
-
It's possible to buy a new motor housing (about £20) for many models, though none were advertised for my model. (Model numbers were close and the part looked right, but there is always a risk it will not fit). So I repaired the housing.
-
To re-constrain the bearing and its rotor assembly, the worn bearing wall was built up with some shaped pieces of plastic (red arrows), which were screwed and glued ( I used 2 part epoxy) in place on both sides of the casing as shown.
-
The pieces of plastic were made from 2mm thick rectangular sheet ( I used builders' spacer blocks) with a semi-circular hole (17mm radius) formed at one end.
-
The semi-circular holes were cut using abrasive paper around 17mm tubing (eg vape tube). Alternatively, one could drill a 17mm hole in one strip of plastic and cut in half. The exact dimensions depend on how much wear has occurred. Pack some glue between the new and old walls, so the bearing can seat near its original position.
-
Removing the accidentally ingested entangled string should free up the seized bearing. Try adding a little oil and rotating the bearing for some minutes till it spins reasonably freely.
-
If the white plastic gear is too badly worn a new assembly is available online for about £20. Part number of mine was 90556012 (embossed on the moulding)
-
After reassembly it was tested satisfactorily on allotment grass/weeds for 20 min on eco setting, before being handed back to its owner.
-
To reassemble your device, follow these instructions in reverse order. A update will be given (end 2024) to see how robust this repair is.


