Introduction
Tools
-
-
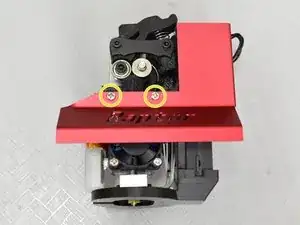
Use a #1 Phillips Screwdriver and remove the name plate.
-
DO NOT remove the hot end fan screws
-
Using a #1 Phillips and M2.5 hex, remove the screws securing the part cooler fan.
-
For the socket head screw, go to the next step.
-
-
-
Hold the nut with needle nose pliers and remove the socket head screw and nut.
-
The final screw holding the part cooler duct on is accessed from underneath. Use a #1 phillips for this.
-
-
-
Unplug the part cooler fan.
-
Unplug the hot end fan.
-
Remove the hot end fan and holder. Grab the fan with your thumb and index finger and pull it 180 degrees from the opening.
-
Using a small flat tip screw driver, loosen the phoenix connector to release the heater wires.
-
Unplug the thermistor connection.
-
Remove the bottom 2 motor screws.
-
Remove the 2 upper motor screws. They also hold the lever in place, which is under spring tension.
-
Squeeze the lever down while removing or installing the upper 2 to help align the holes.
-
-
-
Loosen the 4 socket head cap screws with M2.5 hex until the horseshoe is loose.
-
Remove the horsehoe.
-
The hot end can now be removed by pulling it down and out of the printed body.
-
If it is stubborn, you can gently pry between the top fin and printed mount with a flat screwdriver.
-
-
-
Now is the time to repair or replace your hot end.
-
The protrusion of ptfe tubing out the top.
-
The length of the hot end. Any change here will affect Probe Z Offset and may cause issues if too long or too short.
-
To reassemble your device, follow these instructions in reverse order.


