Introduction

A Toshiba Excite 7 tablet's screen replacement can be difficult, but with the correct equipment, and cautious measures, you can finish the repair. This guide will guide you step-by-step through the process of replacing the screen on a Toshiba Excite 7 tablet. The Toshiba Excite 7 tablet features a 7-inch TFT LCD touchscreen display with a resolution of 1024 x 600 pixels for vibrant visuals. If your tablet screen is cracked or broken please refer to these instructions on shattered glass displays before starting this guide. For positive results, make sure you have the appropriate tools and a replacement screen.

  1. OVxOVfgeMCWaAhTk
    OVxOVfgeMCWaAhTk
    MPesyfp1RoNcayjN
    wxBWmAk4q1SCDThV
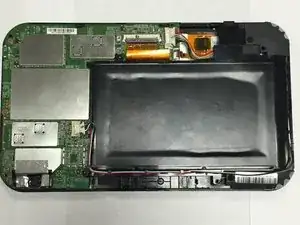
    • Remove the back cover.

    • Work your fingernail or flat object under the cover’s seal. Start at the top right corner just above the front facing camera this is the device “Weak Spot”.

    • After you pry open the first clip slide the flat object along the perimeter of the cover until the cover is removable. You should hear the clips pop open.

    Remove the back cover. Work your fingernail or flat object under the cover’s seal (Start at the top right corner just above the front facing camera, this is the device “Weak Spot”). After you pry open the first clip slide flat object along the perimeter of the cover until cover is removable (you should hear the clips pop open).

    Martin Bucheli -

  2. bCs3CHtcmR3h1bK1
    bCs3CHtcmR3h1bK1
    52wRl2rBnrqBKHjR
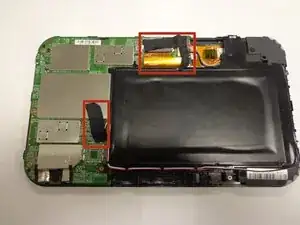
    • Remove any black tape from the device.

    • Keep the tape, you will need to put it back on when you are done.

    Remove any black tape from the device. Keep the tape. You will need to put it back on when you are done.

    Martin Bucheli -

  3. kNAhfcEBeqKdGA1x
    kNAhfcEBeqKdGA1x
    JSFPu3Fsi1nBBwVh
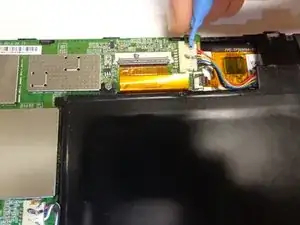
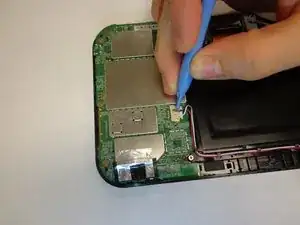
    • Unplug the wires from the battery.

    • The battery is the black rectangle in the middle of the device. The device has two wiring harnesses attached to it, one just above the battery and one just to the right.

    Unplug the wires from the battery; the battery is the black rectangle in the middle of the device and it has two wiring harnesses attached to it, one just above the battery and one just to the right.

    Martin Bucheli -

  4. lNDUTueG6IO1SgZM
    lNDUTueG6IO1SgZM
    gMOLGGZFjufX4Nx6
    • Unscrew the battery from the device.

    • The device has 5 screws to remove, keep the screws.

    My Excite 7 does not have screws as shown. There is a strip of tape on the top on each edge. Nothing else holds the battery.

    P/N of the unit is PDA0MU-001005. The parts layout is significantly different from what you show.

    Installed new battery; device is still dead. Looks like off to the recycling bin.

    indexer43 -

  5. v3DCXTQg1ikxRLZW
    v3DCXTQg1ikxRLZW
    mNBKMtlbSVDtmKmd
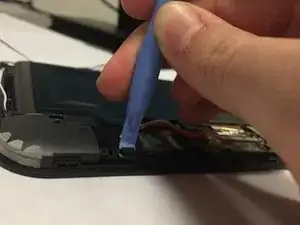
    • The battery has one clip you will need to remove. The clip is located at the bottom right corner of the battery just above the right speaker. The speakers and wires are not secured to the battery, they may fall off.

    • Push the clip back then lift the battery up.

  6. MIhkVHStCXyOR1S6
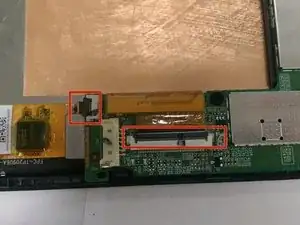
    • The screen is connected to the circuit board by 2 “Data Cables” (orange ribbons). Data cables include 3 working components, data cables, the white harness plug, and the black lever.

    • Gently flip the black lever up and unplug data cables.

  7. bijBwrgH3sspoMOJ
    • Remove the circuit board by gently coaxing it from the clips located just to the right of the circuit board.

  8. XME2xw1ybNJtloiH
    XME2xw1ybNJtloiH
    L4wSFH2ZhwgMZYXa
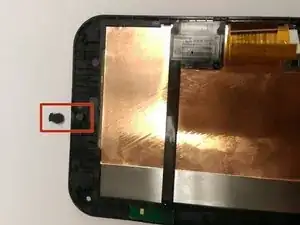
    • The screen has a rubber device used to support the volume control switch.

    • Remove the rubber device from the old screen.

    • Make sure you keep the rubber device to be install into the new screen.

    • Repeat other steps in reverse to install replacement screen.

Conclusion

To reassemble your device, follow these instructions in reverse order.

Sean Ulch

Member since: 15/01/15

340 Reputation

0 comments