Introduction

This guide will provide you with a detailed process on how to replace the back case of a Sony a6000 camera. Prior to replacing the case, make sure to remove the battery. Steps 1-4 will guide you on how to take out the battery and steps 5-12 guide you on how to replace the back case. The recommended tools for this procedure are a screwdriver, opening tools, a magnetic project mat, and gloves.

  1. sDrFtEXjVTiThUol
    sDrFtEXjVTiThUol
    O3eFAyYswiRac2EP
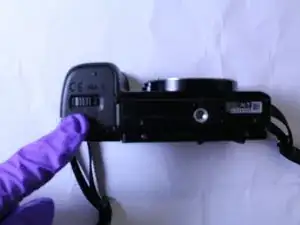
    • Begin by placing the camera facing upside down.

  2. 12qF3s2kma3frAZo
    12qF3s2kma3frAZo
    kIKTfUC5mEpVDmTL
    • Slide the notched locking bar on the battery compartment from LOCK to OPEN.

  3. 612NDeLGuCYQYLkE
    612NDeLGuCYQYLkE
    RGPxwIMCZuHsFbMk
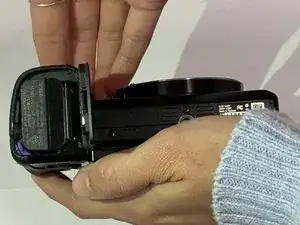
    • Push the small blue bar horizontally off of the battery.

  4. osjcsC4YPWFvH4Fx
    osjcsC4YPWFvH4Fx
    IGKDdY1VA21ifCxZ
    • Remove the battery.

  5. lR5Nim2CYk4SHOfY
    • Position the camera with the bottom facing upwards and the lens facing away from you.

    • Slide the notched locking bar on the battery compartment from LOCK to OPEN.

  6. ELqPb5pU3JYsDqod
    • Once the battery is removed, use a Phillips #00 screwdriver to remove the three screws at the bottom of the battery compartment.

  7. GLvwIEKnXXfyI61N
    • Use the Phillips #00 screwdriver to remove the screws located next to the camera strap.

    • There may be screws on either side by the camera strap mounts. If removing the screw on the left side doesn't sufficiently loosen the case, be sure to check for a screw on the other side before resorting to excessive force.

    There is another screw inside the usb door.

    zipmail -

  8. uTPQgj3GhCQSKRX4
    uTPQgj3GhCQSKRX4
    FXJUWCPecxIMJkpI
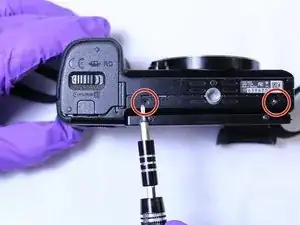
    • Position the camera with the battery housing facing upwards.

    • Remove the two screws on the bottom of the camera using the Phillips #00 screwdriver.

  9. NimEI1lwBMBKAymW
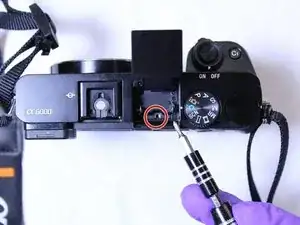
    • Position the camera with the flash assembly facing upwards.

    • Remove the screw located underneath with a Phillips #00 screwdriver.

    On possibly an older version of the A6000 there is an additional screw to the left underneath the Flash (next to hotshoe that also needs to be removed as well) must be different to this one pictured

    julian -

  10. F6I1ndGaLBpuQJQe
    F6I1ndGaLBpuQJQe
    pvKZ6lmGJwkYGBBO
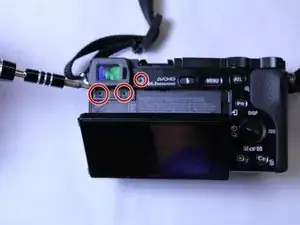
    • Pull back the LCD screen.

    • Remove the three screws directly underneath using the Phillips #00 screwdriver.

    How do you remove the spin wheel for the viewfinder to get to the third screw?

    grantgiffen -

    Needs to be a screw removed at the “dioptre correction wheel”, therefor the central small rubber patch needs to be removed with tweezers, then the underlying J00 can be unscrewed and the “dioptre correction wheel” removed.

    zipmail -

  11. Ojjq1TbnOQBdqWiv
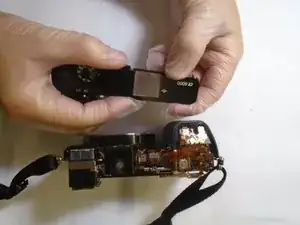
    • Gently pop off the top case of the camera using your fingers or a plastic opening tool.

    • If using a plastic opening tool, ensure that the pressure is being applied to the plastic rather than the metal.

    Better to invest in some Spudger tools and working the top case off since it can snap in two very easy.

    georgevp1 -

    I needed to remove a J00 screw holding down the eye piece. The eye piece helps hold the back panel.

    Screw is on the top of the camera, above the dioptre wheel.

    zipmail -

  12. ZJ5P4hRR3gDZ1I5A
    ZJ5P4hRR3gDZ1I5A
    npowheLtClXRVWPP
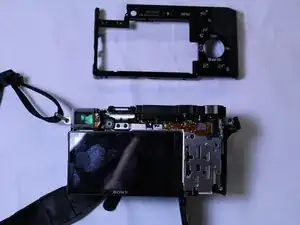
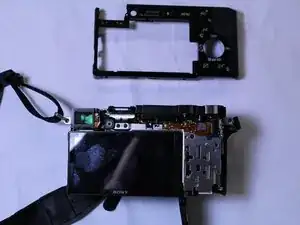
    • Position the camera with the LCD screen facing upwards.

    • Pull back the LCD screen.

    • Gently remove the back case guiding it around the LCD screen.

Conclusion

To reassemble your device, follow these instructions in reverse order.
Ryan Bilitski

Member since: 02/10/19

199 Reputation

0 comments