Introduction

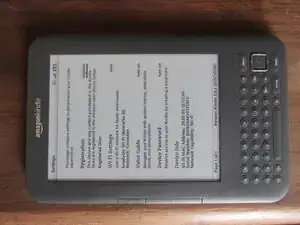
Click here for the updated version of this guide. This version is archived for historical purposes and should not be used.

  1. 2sFsQeYoXmwIeIf2
    2sFsQeYoXmwIeIf2
    XsnuFRuWM46LnBYU
    QRq6vctTC1RVObVF
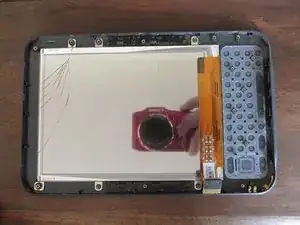
    • To remove the back cover, gently pry open the edge of the case with a small flat edged tool, beginning from a top corner, working your way towards the bottom in both directions.

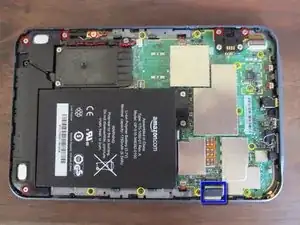
    • Remove the 6 silver screws.

    • Remove the 11 black screws.

    • Pop up the ribbon cable that connects the screen to the board.

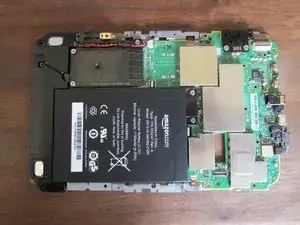
    • Gently lift out the board. The screen remains with the case. The top right (looking at the photo) corner of the board can be difficult to lift out. Lifting by the black plastic tab (where you've taken out two silver screws) may help.

    • Replace the clearly broken screen with a good one. The screen is glued on the frame slightly. You may break it if you don"t lift it around its sides slowly. You may use something thin (such as your finger nail) for that.

  2. F4fmNJw1QJFXiKQc
    • Reverse steps to put it back together.

    • Fire it up and hope for the best :D

Conclusion

To reassemble your device, follow these instructions in reverse order.

lmac

Member since: 22/11/12

652 Reputation

14 comments

Great guide! I'd love to try it out - where did you find a replacement screen?

Alan -

replacements are available on ebay. If you want to save a little money, (they aren't cheap) bid on a demo unit and remove the screen from that one and put it in your broken kindle. You may want to review some other teardown guides on some other sites, though. This walkthrough leaves out some details that are useful such as the fact that the screen is held in with adhesive, which makes the final removal tricky, just to name one.

Chad McCollister -

There is some glue on the edges of the screen, pull gently from edge to edge and your old screen should come out nicely.

Luc Vo Van -

My wife's Kindle 3 was frozen, and nothing I had tried worked. I saw a Kindle 3 on E Bay with a cracked screen very cheap. I took a chance and ordered it, and used the guide (sort of in reverse) to remove the guts from the one with the broken screen to replace the guts of ours. That way I didn't have to worry about the glue holding the screen to the case and she got to keep her case that already had her name on it! It came on immediately and after a few more minutes to deregister, re-register, update the firmware and transfer our titles, it was ready to go. I'm keeping the old motherboard (especially the battery and wifi connector) and screws for replacements. Thanks for the great guide! W. A. R.
Wendell Robison -

The guide was very useful. To avoid breaking the screen, you can use the spudger tool: gently insert next to a corner between the screen and the case; waiting for the glue to stretch and the glass to release in that spot, and gently work your way around until the entire screen lifts.

IMPORTANT when you order a replacement screen, MAKE SURE IT HAS THE EEPROM CHIP ON THE FLAT RIBBON CABLE. The chip is a little black square next to the connector on the connector side of the cable, read by the Kindle upon reset. Graphics / greyscale will look weird without the chip (although text still is readable).

You can get proper greyscale with the chip from your old display:

- connect the old display (or cut-off cable end with the chip)

- reset Kindle (push and hold power key until it blinks, then hold 5 more seconds)

- the Kindle restarts and reads the EEPROM

- re-connect new display (the one without the chip)

You are good to go (at least until another reset - then the procedure needs to be repeated)

Michael -

Thanks for this great, simple guide! My wife's Kindle was broken and neglected once she replaced it with an iPad. I purchased a replacement screen, fixed it during a lunch break at work, wrapped it up for Christmas, and put it under the tree. Two weeks later and she still can't get over the creative gift. She is already on her fourth book since the repair! Give a gift that keeps broken items out of the landfill! Fixit!

miccol -

Thank you for this helpful guide! It's great to have a working Kindle again.

A couple comments from my experience:

* When trying to remove the board, I found it was getting caught on a clip. I removed the little black thing shown in the upper right corner of the first image and then it came right out. (2 additional silver screws)

* When I connected the new display at first it didn't seem to be updating or responding at all. Then I tried following the steps in Michael's comment: reconnecting the old display, resetting the Kindle, and reconnecting the new display and then it started working.

Mike Henry -

Also, when removing the display, I discovered that I needed to separate the glass screen from the thin metal frame rather than the thin metal frame from the plastic case.

Mike Henry -

Here's an update. Unfortunately, the display I received was one of the ones lacking the chip. It worked briefly after following Michael's instructions, but then it kept hanging and needing to be reset, which would cause grayscale issues to return, and the combination of these issues made it unusable for regular use.

Mike Henry -

Beware of little black screws working loose.

After replacing my screen, everything seemed to be working fine. Then I had a problem with a frozen screen. The light near the on/off switch seemed to indicate that everything was working. I tried to reseat the ribbon cable, but it didn't help.

I noticed that two screw near the volume rocker were gone - I was sure that I had put them in. I moved one black screw from near the battery to the circuit board, but no better. Then, a loose screw fell out from somewhere, and when I placed that into the remaining circuit-board screw hole everything worked!! It had obviously been short-circuiting something.

I don't know where the other screw disappeared, but it probably fell out earlier when I didn't notice.

Consider putting superglue into the screw holes when reassembling.

RAWdaMedia -

Thanks for this. Brought new life to my wife's otherwise useless Kindle!

Cameron Fehr -

Nice to see a guide that doesn't involve taking every single piece apart! It's pretty clear that you don't need to remove the 3G unit (or placeholder), the ribbon connectors for the side buttons, the speaker, the keyboard ribbon connector or the keyboard membrane. The more you take apart, the more there is to go wrong putting it back together. Would there be any risk in performing this procedure with the battery attached though? I made the call to take an extra two screw out and disconnect the battery. (mind the two metal caps that sit over the screw holes between the battery terminal and the circuit board )

I'd recommend a magnetic screwdriver if you have less nimble fingers, as those screws can be tricky.

I was given mine 2nd hand about 5 years ago, and suspect that it may already have been replaced, as there were a couple of the black screws missing! Five years without further trouble is good value, though.

+1 to Michael for mentioning the EEPROM issue.

Matt Sweet -

I second the last reply. Much simpler than the other how to guides out there. Took less than a half hour to fix and working perfectly!

Robert Leibowitz -

Great guide! My husband recommended buying a new Kindle, but I took some time to scroll the internet and found this website. Great help, fixed it in half an hour. Then, strange enough, after a month, the screen broke again. Today a new fix, curious if it’ll be fine now. Thanks anyway.

Cecile Brommer -