Introduction
This guide is a pre-requisite guide, extracted and modified from Face Plate Replacement for use as a prerequisite in guides where you do not need to disconnect the faceplate fully. Thanks to the creators/contributors to that guide!
Tools
-
-
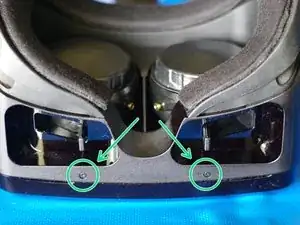
Lay HDK headset face down on a soft surface. Remove the two Phillips #00 screws from the bottom.
-
-
-
Turn the headset upright.
-
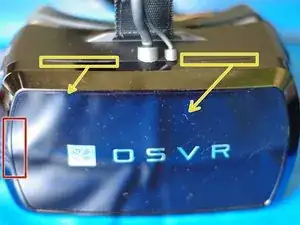
Behind the red box is a connector between a ribbon cable attached to the faceplate and a ribbon cable wrapped inside the body of the HMD. It's taped together in addition to the force of the connection, but is still somewhat fragile, so when opening, this left side should be treated as the "hinge".
-
There are now only two pairs of magnets at the top in the corners holding the faceplate to the body of the HMD. (In the inside image, one of the faceplate magnets is not pictured.)
-
There are two grooves on top, marked, to use in faceplate removal. Keeping in mind the minimal force holding the faceplate on, and the location of the faceplate connector, gently pull/fold the faceplate out and to the left. Do not use any tools for this step!
-
To reassemble your device, follow these instructions in reverse order.


