Introduction

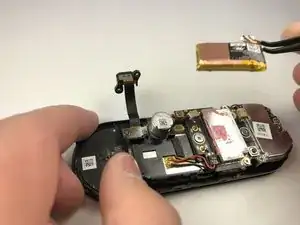
If your Nest Hello is losing charge faster than it used to, or refusing to power-on despite troubleshooting, this guide will help you access a faulty battery. The following steps will require the iFixit opening picks, Phillips #000 screwdriver, and tweezers. While removing the faceplate and casing from the device it is easy to damage the waterproofing O-Ring, so plan on replacing that as well.

  1. 4OhVXWLRmT2mwNrZ
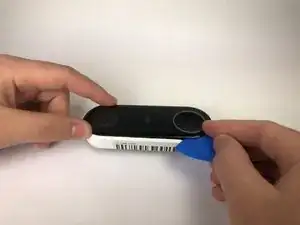
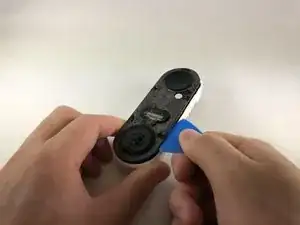
    • Insert the pick between the black faceplate and white casing of the Nest Hello.

    • Pry the faceplate away from the device with the opening pick.

    • If you have not opened the Nest Hello before, there will be a protective foam mesh that is glued to the plastic covering and the inside of the mesh, use a pick to cut through the mesh as much as possible.

    • Completely remove the faceplate from the device, do not be afraid to pull hard.

    I had to use a metal spudger tool to start and then used guitar picks.

    Joel Lundi -

    Be afraid to pull hard. The faceplate will break in two.

    B Bremer -

    I did the JerryRigEverything method and slipped a razor under the faceplate to separate it carefully from the body. Worked perfectly and nothing was damaged

    There I Fixed It -

    Be careful with the wiring and the heater element. I must have shorted something together when it put it back together and now it will no longer power up. It is probably best to cut the wires to the heater and deal with the consequences in the cold temperatures.

    Joe I. Fabritz -

    The secret I think is slicing through the adhesive. I shoved multiple picks in and worked my way around. You want to cut the adhesive. Prying is likely to break the faceplate. The big hint is the next picture in the step, seeing where the adhesive is.

    Arnold de Leon -

  2. iOunefeVg4DKHhOu
    iOunefeVg4DKHhOu
    bitW2l5mCQoWhyiQ
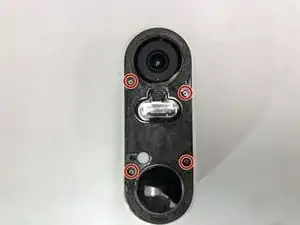
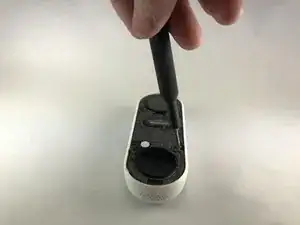
    • Peel back the cover stickers and use the Phillips #000 screwdriver to remove the four screws.

    There is a small circle sticker over each screw, about the size of the red circles in the image above. It wasn't clear from the directions what the "cover stickers" were. A small exacto knife was helpful to pry up the edge of each sticker.

    Tim Scott -

  3. HtCWfAHNKEYHltQb
    HtCWfAHNKEYHltQb
    Ik6niEiyH3bvD1nX
    JnHFQwOrSANXfEaJ
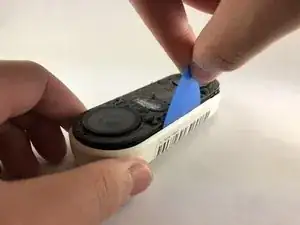
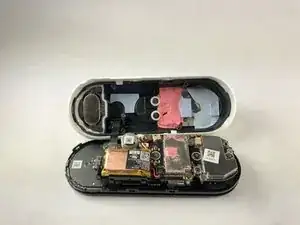
    • Insert opening pick between the white casing and the black internal circuitry and pry it out.

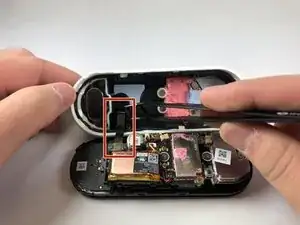
    • There is a ribbon cable connecting the white casing to the circuit boards. Be careful not to tear out the cable while separating the casing from the circuit boards.

    Where can you get a replacement faceplate from?

    nick -

    I ended up doing the headlight lens restoration method - I scraped away any plastic that was flaking off and then I used progressively finer sandpaper (start with 400-600 grit and go up from there). I finished it with rubbing compound and polish. Looks decent.

    There I Fixed It -

    Also - be careful not to cut or displace the rubber gasket that runs around the outside of the main body that has the circuitry - you'll risk losing the waterproofing

    There I Fixed It -

    What is the replacement battery type please?

    Dave Pawson -

    The top end has some kind of mild adhesive (the blue stuff). The bottom end came out more easily for me, and then I ended up bending my board slightly by trying to pry out the top end. May be better to start on the top end if you can get something under the edge of the board to get leverage.

    somebody -

    The black ribbon cable was instantly sheared in half the moment I got the two halves apart, which took more force than I was hoping to need. Turns out the ribbon cable is attached to a sharp metal piece and it will easily tear through it. No longer worth it to replace the battery for me, sadly.

    Ryan Littlefield -

    What a stupid design by Nest. If they know that battery will fail they should at least make it user accessible when removed from mount. Replaced mine. It’s a pain getting to the battery and it’s easy to crack the faceplate when prying it off. Also the plastic tools included with kit will fail before you’re into the device.

    If you can manage to get to the battery without destroying the Nest Doorbell it’s worth it to get a few more years of use.

    C Whitcher -

  4. pBLxCmQWuu3ZmUxq
    pBLxCmQWuu3ZmUxq
    MLPMtnNSWuLcDhgI
    hafMjtURWA4JBbE5
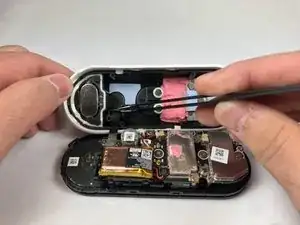
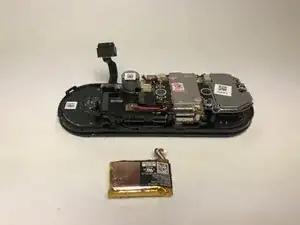
    • Once the back casing is removed, disconnect the battery cable and remove the battery from the device.

    What is the battery model?

    Benjamin Dudley -

    My Nest Hello would immediately lose power after the doorbell button was pressed. Changing the battery fixed the issue. My Nest Hello is 3-4 years old. The battery has what seems like a resistant thin film heater that wraps around the battery that must keep it warm when the temperature outside is cold. The film heater and copper films that wrap the battery can be carefully removed and transferred to your new battery. I was able to find a new battery module on Amazon by searching for “Nest Hello Battery”.

    benjaminrclark -

    For &&^& sake, what is the battery model?!

    Sergei B -

    See my post in the comments section below for part information.

    BigThunder -

    Steps 4-10 are not needed. After step 3, the battery is sitting on top. Just remove it and put the new one in and put everything back together.

    Dallas Shaw -

    Can you replace the ribbon cable?

    Sheila Morgan -

    Ok, so I did the swap and no more blank video. But now I don't have sound.. I can barely hear anyone talking, and they cant hear me at all. Anyone else have this issue?

    Ben Pritchard -

    Cool. Now I have a battery in my hands. How do I REPLACE it and with WHAT???

    harrisdjh -

    You're going to need something to stick the faceplate back on. It may snap slightly back into place, but it didn't hold for me. I used some transparent tape around the edges, but it doesn't look great. Perhaps some double-sided silicone tape or something. You don't want something too permanent in case you have to swap the battery again in the future.

    Tim Scott -

    I used a little B-7000 adhesive.

    Joel Lundi -

    Clear silicone sealant that you would use to caulk your bathtub/faucets from Home Depot. I also used it to resecure the camera lens cover that was coming off.

    There I Fixed It -

    I followed these instructions and successfully replaced my battery. Mine also has the heater elements around the battery, and I was able to wrap that around the new one.

    I do have one problem though: now my button does not trigger a doorbell ring. Tested the indoor chime and it’s working correctly. The app doesn’t register a doorbell notification when the button is depressed, so I think I’ve damaged it somehow.

    Any suggestions?

    RetroNinja611 -

    Same thing happened to me. It rings the indoor chime like once every 10 times. 😓

    Before replacing the battery, the outside chime didn't work at all (nor the inside)....it would start to ring and quit instantly. Now the outside works perfectly, but the I side randomly. 🤷🏼‍♀️

    Candi Carson -

    The replacement batteries suggested/on Amazon are listed as 1|CP7/17/26 (280mAh/1.04Wh/3.7Vdc). However my 1st gen Nest Doorbell has a 1|CP7/17/26 (300mAh/1.14Wh/3.80Vdc). Will replacement be sufficient?

    Gurizuriman -

    Just replaced with that 280mAh battery and it's working just fine

    Daniel Demers -

Conclusion

To reassemble your device, follow these instructions in reverse order.

Daniel Moore

Member since: 14/01/20

827 Reputation

41 comments

Any recommendations as to where we can find a replacement battery? Model #, specs?

Patrick Ouellet -

Flujoy 280mAh/3.7V Replacement Battery for Nest C1241290 Vido Doorbell Wired NC5100US Hello 1ICP7/17/26

About $16 from Amazon

Joel Lundi -

Battery and o-ring part source?

Ryan -

What is the replacement battery?

Leon Sparrow -

Search Amazon for the following and you should find several choices:

Nest Hello NC5100US C1241290 Video Doorbell Wired
JOHN ZUCKERMAN -

Bonjour, j’ai besoin de changer la batterie.

Merci pour le tuto,

avez vous un liens pour la batterie svp ?

urgent

dessolle.emmanuel -

Confirming that this battery being removed is from a WIRED Nest Hello doorbell? Thanks!

Vee Li -

Yes, this matches my experience from a few days ago on my original Nest Hello(Pre-google buy out). Initially there was only one version. I do not know if the current "Wired" V2 after google bought them is identical or not.

Michael Park -

I just installed this replacement battery and it seems to have fixed the disconnect problem when the external chime is enabled:

280mAh/3.7V Replacement Battery for Nest C1241290 Vido Doorbell Wired NC5100US Hello 1ICP7/17/26

https://www.amazon.com/dp/B09P57QLRZ

BigThunder -

What about the seal?

Ryan Gauder -

I was able to reuse the original seal

BigThunder -

At Step 4, the battery and the connector are staring at you. Why must you continue to disassemble the device if you are able to simply unplug the battery and replace at Step 4?

Clark Moore -

I totally agree

Anibal Morales -

This seems to have fixed my original Nest Hello(Pre-google buy out) that had after years of very reliable use started disconnecting and shutting down until it ultimately would only record a few seconds and then shutdown for hours again. As Clark Moore(above comment) said, you only need to get to step 4. No need to keep disassembling. The o-ring did not seem to require replacement, though I did apply some pure silicone grease to help it seal and hopefully make the inevitable next replacement easier. In the instruction it was not clear to me, but if you look closely at the pictures for step 4 there are 2 snap fitting on each end and on each side. This information may help in step 3. Mine was much harder to pry out than I had expected. Good luck, and thanks to those who provided info!

Michael Park -

I can confirm. Replacing the battery fixed the issue with the Nest disconnecting when someone would ring the doorbell. The O-Ring was still good and when I put everything back together, I put a few dots of gorilla glue under the faceplate. Also, there is no need to remove the motherboard to replace the battery, you can remove it in Step 4. I also connected the nest to a USB charger overnight, in case the battery needed some power. Lastly, I also ordered a silicone cover for the Nest that really helps the aesthetics, since the faceplate was peeling and looking old. Good luck, it's a rather easy repair.

Battery - https://www.amazon.com/dp/B09P57QLRZ?tag...

Silicone Cover - https://www.amazon.com/elago-Nest-Hello-...

Eric Martinez -

Steps 6, 7, 8 and 9 were totally unnecessary to remove the battery. You can see the battery in the picture in step 5, no need to keep disassembling. Also, you will need some adhesive to reassemble, otherwise the faceplate will just fall off. I used 3M General Purpose 45.

Charles -

Great instructions, thank you! If you only want to exchange the battery, steps 4-9 are not necessary - the battery can be removed directly and exchanged after step 3. I used a NC5100US (280 mAh, 3.7 V) replacement from the world's biggest online retailer.

Tobias Wabnitz -

Can confirm that you only need to do Steps 1-4 to replace the battery.

Can confirm is Step 1 is a royal pain to do to. You have to slip the pick all the way under the face plate all the way around to separate the glue from the face plate. Don't try to pry the face plate off, or you might crack it. And once you do this, you'll have to re-glue it back on because there will be nothing holding the face plate to the doorbell.

Scott B -

I followed this guide and big thanks to those who shared the link to purchase a battery. Oddly it did not seem to work right away. I plugged the doorbell once assembled to charge for 15 minutes or so and then installed.

About 24 hours later it just started working again so it was definitely the battery. You will need to get some glue for the cover and do not try and scrape off the foam adhesive. I just used my fingers to pull away any clumps and applied about a q-tip amount of flex seal in certain spots and held together for five minutes .

Battery: 280mAh/3.7V Replacement Battery for Nest C1241290 Vido Doorbell Wired NC5100US Hello 1ICP7/17/26 https://a.co/d/9zXgbXO

Glue: Flex Glue Mini Clear 3 Pack https://a.co/d/7ALQLGh

Doorbell cover: elago Silicone Case Designed for Google Nest Hello Doorbell Cover (Black) - Full Protection, Night Vision Compatible [US Patent Registered] https://a.co/d/fzTB3Lz

Dex R -

Yeah because the comments are hidden under load more comments, I started doing steps 5-8 which was annoying, not just because of the extra needless steps, but because the 6 screws in step 6 are actual 3 and 3 of slightly different screws, so reassemble got confusing.

Also I did slice my cable to the case that it warns about, I thought I was done for, and was just continued the steps to complete incase I could get my hands on an old one for parts, but then when I reassemble I realized it was just the usb cable, which is not necessary the battery was charged already and now my Nest Hello works and no longer cuts out on button presses.

There were also two rubber bumpers inside the white case that fell out, I only noticed one falling out, so it took me a while to find where they went (button side of white case) I couldn't find the second bumper, but seems to work okay with out it.

Jay Tuley -

well that didn't work. the faceplate snapped in half. I suspect that the old plastic having been in the sun for so many years didn't help. Oh well.

alex -

I was very careful but the ribbon snapped off, it was so short I cant see how it would have been avoidable. In addition there is another cable attached to a wrap around the battery. So once I disconnect the battery, I cant remove it due to the wrap and extra cable. Is there a way to replace the ribbon and additional instructions for the other cable/wrap around the battery?

Tiffany -

There must be two generations of Nest Hello (aside from Google version) - one with a 'plain' battery. The other generation (mine/yours) have a battery wrapped with a ribbon heater (I found a Reddit black hole - I guess this is called a Kapton heater). FYI, the battery is the white 3-wire and the heater is the black 2-wire. I guess Lithium batteries do not charge well in cold weather, hence the heater.

So, I painstakingly tried to unwrap the heater (it's got tape and layers of adhesive around the battery), but it eventually broke. I pulled out the heater's two wires (black/red) from the connector and tossed it. I replaced the battery as per usual and it's working fine without the heater. I'm in Chicago and it gets %#*@ cold, so I'm hoping there won't be performance issues this winter.

I searched for a replacment battery with the heater, but no luck. And I couldn't find a kapton heater replacement either. These must be very specific Nest/OEM parts that are not readily available to the public.

Good luck!

Nick Lyons -

Ok, so I did the swap and no more blank video. But now I don't have sound.. I can barely hear anyone talking, and they cant hear me at all. Anyone else have this issue?

Ben Pritchard -

Procedure worked as advertised. I used multiple wedges on the front plate until it separated without bending. It took all 6 to do this using 3 on each side.

My replacement battery had one wire and worked fine. The one that was removed had a black and white connector. The replacement only had a white connector. I need to figure out what will be best to use to reattach faceplate so I can remove it again if necessary.

Thank you!

Chip Lagdon -

According to Dex R’s response above, he used Flex Glue Mini Clear. If you look closely at the pictures accompanying this procedure, they show a battery connector with three wires (black, white, & red). This is identical to the battery wiring connector shown for all of the replacement batteries available from Amazon.

JOHN ZUCKERMAN -

Absolutely the worst instructions ever. Doesn't matter, this thing isn't supposed to be serviced.

1. It's nearly impossible to remove the faceplate without breaking it.

2. Doesn't show which side the ribbon cable is on, important for opening!

3. Doesn't mention the copper item around the battery (strain gage for detecting puffing?) or its wiring. This is stuck onto the battery, and the replacement battery doesn't come with it. It will be destroyed if you try to peel it off the old battery. I have no idea if the unit will function with this bit disconnected/destroyed.

Patrick Matthews -

#3 is a small heater to help with battery health in very cold climates. It's not required for operation. Many folks have just removed it and their units work fine with the new battery.

Damon Duerr -

I just completed this, and my old battery was puffy, so it was ready to let out it's magic smoke. The doorbell gave no warning about the puffy battery, so I assume it wasn't a strain gauge. The new battery did come with copper around it, but the connector was coming out of the opposite end of the battery on the replacement, and the connector had to be rotated 180 to keep the color orientation as the original when I put the label in the opposite way from the original. I will say to be careful around the thin part around the doorbell and camera openings, as I broke the cover one time at each end while spudging when I should have been picking. Luckily, it was only one break per end. I ended up using a thin paring knife to cut through the foam, the picks didn't seem like the most efficient way of cutting the foam, but vital for making enough room to get the paring knife in.

John Haller -

Thanks so much for these instructions. Here is the battery I used, and it fixed the problem I was having with the door bell rebooting.

Nest Hello Doorbell (Wired, Gen 1) Replacement Battery: Battery Replacement for Nest Hello Vido Doorbell Wired NC5100US C1241290 1ICP7/17/26 (280mAh/3.7V)

https://a.co/d/0uQbtTA

Jimbo -

Totally broke my Nest Hello trying to replace the battery following these instructions. The faceplate cracked when I was trying to pry it off, the O-ring tore as well, and the real kicker was ripping that ribbon cable when I finally got to the battery.

As others have said, it would be nice to point out where that ribbon cable is to prevent people from damaging it. It's on the right side of the unit near the top of the button.

Glad I gave this a shot, but be warned; it's extremely difficult to open this thing up. Also glad I can finally throw this piece of $@$* into the garbage now that it's fully broken.

T Blank -

This one should work: https://a.co/d/9tWcSkf

It is what I ordered.

Richard Navarrete -

The replacement batteries suggested/on Amazon are listed as 1|CP7/17/26 (280mAh/1.04Wh/3.7Vdc). However my 1st gen Nest Doorbell has a 1|CP7/17/26 (300mAh/1.14Wh/3.80Vdc). Will replacement be sufficient?

Gurizuriman -

FYI, when facing the Nest hello, the ribbon cable is located near the bottom right side of the button (I may have missed this info in the above much appreciated instructions and everyone's input!). I needed to use a small thin flat blade metal screwdriver to ever so gently pry the faceplate off (and then internals out). As mentioned before, the back of the faceplate is attached to the internal component using a foam like adhesive so, as I would get the separation to occur in one side, I would then slide in a spudger and credit card to keep the separation open so I could then continue to gently slide it in and continue to open / remove the faceplate. I needed to also use the metal (more rigid) thin screwdriver between the component and white case to start the removal process, again going slow and being careful to not use too much pressure to crack the case. Also there is a blue silicone gasket just below the internal component face so again, go slow and a bit deeper to ensure you do not damage it.

RickSoFlo -

My battery has two power cable connections. Does anyone has experience with this configuration?

Thomas Mareci -

I have the same battery. Did you find a replacement?

Michael Noquez -

One is for the battery and one is probably for the small heater wrapped around the battery (meant to help maintain battery health/function in severe cold weather). If you cant remove the heater from the battery and reuse it, don't worry about it. If you look on reddit and elsewhere, you'll find most people are just discarding the heater and everything is fine.

Damon Duerr -

I got a replacement battery from Amazon (there are many of course), but it was a waste of time. The battery works, but the faceplate is broken into multiple pieces and torn up around the edges, no matter how careful I was at trying to pry it up. I doubt the doorbell will survive the elements for too long. I put an Elago silicone cover on it (covers most but not all of the broken areas).

Nest/Google should be required to refund or replace these; a $250 doorbell that can't last 4 years (and isn't designed to have the short-lived part easily replaced) is defective by design.

And iFixit saying "do not be afraid to pull hard" on a thin piece of plastic that's heavily glued is part of the scam.

George Burdell -

I fully agree with you. I am still not able to remove the faceplate. It is heavily glued. It is impossible to remove the faceplate without breaking it. I think the information here is scam or at least does not work with the model I have. Nest/Google doorbell has a very poor design and that is on purpose, because they want to force you to buy another new one .

MEHDI AFZALI -

Does this use the same battery as the Google Nest Wireless Doorbell?

Chia Pet -

I really wonder why we remove door bell button ribbon cable at the last picture since white battery connector is at a separate location?

Utku -