Introduction

The entirety of the Moto 360 is very fragile. Take extreme caution when using tools. You will have to use the iOpener, so be sure to review this guide for instruction if you are unfamiliar with using it.

  1. 3WXoBt1HJjrXeHIo
    • Set the watch face down on a flat surface.

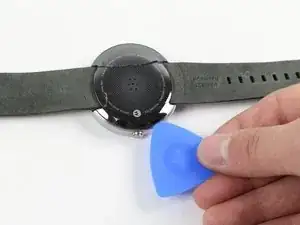
    • Place the heated iOpener on the face of the rear cover to loosen the adhesive underneath.

    Note other methods available that doesn't require the purchase of additional tools beyond what typical battery replacement kits offer. i.e. a hair dryer.

    Scott Fernandez -

    This step isn't necessary for battery replacement! Remove the wrist strap, then pull out the 4 catches and jump to step 4. See: https://youtu.be/Jw3n5qbGv-I

    Chris K. -

    Thanks Chris K. for pointing that out. Yes, I was able to pull the tabs without having to deal with adhesive back.

    Brian Li -

    I have used a hair drier: 10cm far for about 10 minutes; reheat it for couple minutes during the process, the glue must be soft to avoid breaking the rear cover.

    Tarik -

    NO, NO, NO, YOU DON”T NEED TO REMOVE CERAMIC BACK. just remove the 4 securing pins and the watch body can be easily removed without breaking the back

    Bernard McGrath -

    Skip 1-4 and just remove the 4 clips. Much quicker and less likely to damage your watch.

    lee -

    Remove the four back retaining clips. I used a strip cut from the bag the battery was sealed in. It's thin enough to slide in and stiff enough to force the clips out.

    Richard Burgin -

    Bonjour,

    Pour démonter la moto 360, pas besoin de tout cela !!!

    1° Vous retirez le bracelet de la montre;

    2° Récupérez une protection de vitre souple (mais pas trop) de smartphone dont vous n’avez plus besoin que vous découpez en petits rectangles (4*2cm).

    3° Vous devrez insérer ces petits rectangles à l’arrière de la montre entre la partie vitrée et le corps de la montre à quatre endroits différents pour chasser 4 petites goupilles en platiques qui vérouillent le démontage (voir ci-dessous).

    4° Montre retournée (imaginer une horloge): premier petit rectangle introduit à 1h30, dès que le rectangle est entré de +/- 1/2cm, chassez celui-ci vers midi, une petite goupille noire en plasitque devrait sortir au niveau l’ouverture laissée par le bracelet.

    Faites la même chose à 10h30 vers midi, à 4h30 vers 6h et 7h30 vers 6.

    5° Quand les 4 goupilles sont enlevées, le corps de la montre se sépare (pratiquement seul) en deux parties.

    6° Vous pouvez passer à l’étape 6 du tuto!!! :-)

    belveder04 -

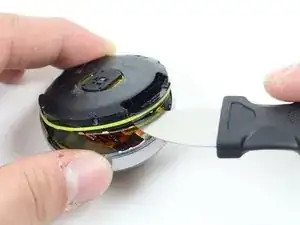
  2. Slide a strip of plastic cut from the edge of bag the battery came in into and along the edge where the back meets the case.

    Richard Burgin -

    This step should be moved to the front and the heating steps should be deleted. There is no reason to apply heat for the battery replacement so why risk it and offer it as a solution?

    SEAN Tanton -

  3. TYNpNeTueWbE2uvn
    TYNpNeTueWbE2uvn
    tWOdZjYNAu1DSNGD
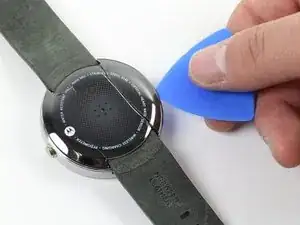
    • Gently slide the blue opening pick between the rear cover and the metal casing.

    • The rear cover is extremely fragile. Be very delicate when using the opening pick.

    • Work your way entirely around the rear cover.

    • It may take several attempts of reheating the adhesive to get the rear cover loose enough to pull off.

    Extremely fragile is an understatement. It pulled it with my fingernail and it cracked

    sercasti -

    Seems this video has all steps better covered. https://youtu.be/nXwq4zeehe8

    Some more tools are needed if you don't want to ruin the device you are fixing.

    Erik Ušaj -

    Why on earth would you guys show a watch with a cracked back cover?? Does not instill much confidence when looking over these instructions.... I mean, was this the only watch you guys had and you broke the cover when making the instructions or what? Or are you guys just trying to make it totally realistic? Just completely baffled by this....

    splangele -

    Most watches are ALREADY cracked! Mine has a hairline crack starting on the exact same place as the one on the pic (but it only goes from the indent for the the strap to the middle, not all the way thru, yet).

    You can only see it in the right light and angle. My guess is that the glue hold everything neatly and the cracks are not too visible. But they are probably there. Also the pic has Three to FOUR very visible cracks, not one :)

    gcb -

    I have the essential toolkit: in addition to the description above, I have used on extra opening pick (total 2) and the suction cup. The glue into the watch is !&&* and I am sure many breaks the rear cover because not ungluing enough of it before pulling the cover off. I found out that the rear cover offers a very small flexibility, but at least some flexibility (it is not absolutely hard as a glass piece as others say).

    Action: I have applied the suction cup on the rear cover and used the opening pick on one of the sides *while* applying some preassure to open with the suction cup (after heating it up to soften the glue) - that allowed inserting the opening pick without brutality; then leave the opening pick inside, and do the same procedure on the other side with another opening pick… and keep “digging” in until the rear cover releases. I have re-heated the rear cover twice during the whole process. Rear cover removed without any damage caused by the process.

    I wish I could add pictures.

    Tarik -

  4. l5GsPTmfVMFlaF4f
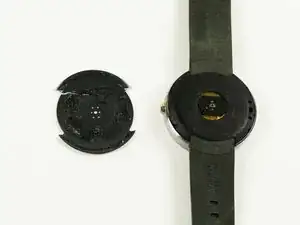
    • Once the adhesive has been successfully loosened, gently pull the rear cover off.

    How to stick it back? Which glue you suggest for the same?

    Anand -

    Do you have a replacement back case ?

    Mohd Arash -

    Where do I find the back case replacement

    Mohd Arash -

    I need a new back cover for mine too. Can't find the replacement parts online anywhere?? Can anyone help source the part?

    worboyz10 -

    I managed to find some for sale here, but they are out of stock everytime I try to order them.

    https://www.etradesupply.com/motorola/ot...

    worboyz10 -

    I don't think its possible to buy a replacement back but you can buy a skin protector for the back here: https://www.amazon.com/gp/product/B00K2C...

    CAT-TV -

    Mera gori Ka display tor geya me Keya korunga

    Kuddus Hossain -

  5. WiEIGwtC2mwccdxK
    WiEIGwtC2mwccdxK
    HCn6kLBoQ5CJMUpJ
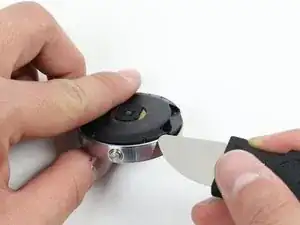
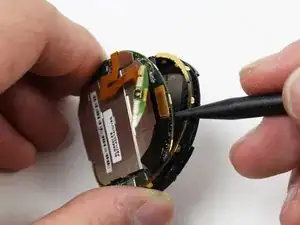
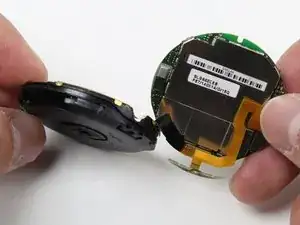
    • To get to the O-Ring, use the Jimmy to gently pry off the rear housing.

    There are small pins that you can push out from the 4 notches around the edge. After removing these, the whole assembly will almost fall out. Almost no prying needed.

    Dillin Smith -

    this is good point and not mentioned on this procedure

    Tarik -

    You don’t need to remove the ceramic back, just remove the securing pins and the whole assembly can be removed without damaging the back

    Bernard McGrath -

    Agree, much safer.

    Richard Burgin -

  6. QisnhHfASlPls1nC
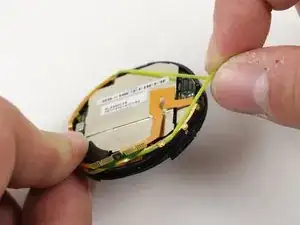
    • Pinch the green rubber O-Ring and slide it off of the watch.

    • The O-Ring is delicate and is easily severed. Use care around sharp objects.

    Its not necessary to remove the O-ring, I didn't when I dismantled mine.

    Christopher Tsamados -

    Agree. I did my repair without removing the o ring or screen ribbons.

    Richard Burgin -

    If you see the “connector'-like” like the one visible in frontground, you have destroyed LCD connection to the LCD glass (like me).

    You have 2 connectors to remove from the LCD : one for the LCD matrix and the other for the LCD backlight.

    If you have the same case as me, can you give me any advice to reconnect le flex to the LCD driver? (it seems impossible to me).

    Philippe Gressé-Lugué -

    I do not see any need to remove the o-ring.

    Tarik -

    Is there a way to get a replacement o ring? I broke mine during reassembly.

    Adam Turney -

    Don’t remove the o-ring. Just leave it alone and you won’t break it.

    lee -

  7. n3cXiHR1xYMk5GEx
    n3cXiHR1xYMk5GEx
    5wWZRchjJXLtjqvk
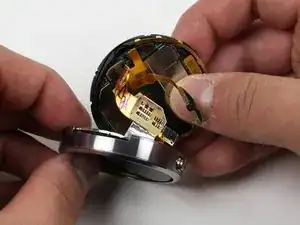
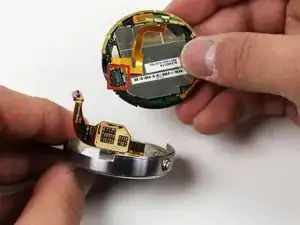
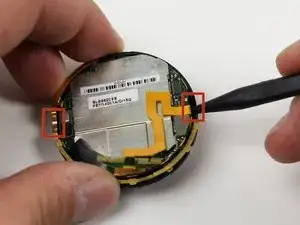
    • Detach the copper ribbon connecting the motherboard and the display.

    • For reassembly, attach copper ribbon where it is marked.

    • The copper ribbon is fragile and easily disconnects. Remember where it goes so as to reconnect it properly.

    Steps 5 and 6 are the wrong way round. You remove the motherboard off of the watch display before you take off the rubber o-ring.

    CAT-TV -

    I could handle mine without disconnecting those flat cables - it is harder to work with the parts connected to each other and demands special care, but possible, worked fine to me.

    Tarik -

  8. XECWGuVhDOFSFiLJ
    XECWGuVhDOFSFiLJ
    suVjJAMppHytrsOp
    shDdNNq2M4Iup1fd
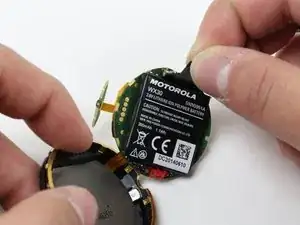
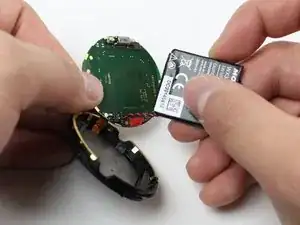
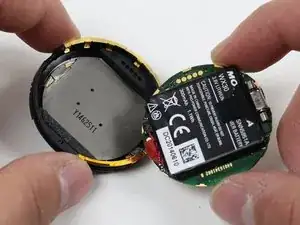
    • Use the spudger to separate the battery casing from the rear housing.

    • For leverage, place the spudger in either groove in the rear housing.

    I would say this procedure misses some steps, and this particular one is another glued part, but not as strong as the rear cover, so apply some

    Tarik -

  9. Ctp2vBUsGt2rOlAd
    • Lift the black plastic pull-tab and pull back on the battery until it's removed from the battery casing. The battery is very firmly secured, so you may have to use a great deal of force.

    • There are two strips of adhesive securing the battery. You may have to use the spudger to loosen the adhesive. Use care not to damage electronics.

    Detailed description like this is good to understand what is underneath, stuff we have to handle before actually seeing them - this is the kind of step description I mentioned to be missing before.

    Tarik -

    and again, the blue opening clip is best here to slide under the battery.

    Tarik -

  10. BbIRc1MyVhCK4BCi
    • Once the battery is separate from the back of the battery casing, disconnect the red and black wire by prying or pulling it straight up from the board (perpendicular to the board surface).

    .....and this is where I destroyed the watch.

    The little leads snapped off the main-board.

    Thanks motorola, thanks for making a watch that once the battery expires, you intended us to add to the landfill with it.

    Lesson learned. Smartwatch=WASTE of money.

    Jim Burgee -

    Disconnecting wires seems to be the tricky part. When I tried to I was apparently not gentle enough and the little fragile socket snapped from the board.

    Erik Ušaj -

    It would be better to say pull the connector perpendicular to the board. Intuitively it looks like parallel. I almost pulled too hard

    Jerry -

    Yeah you lift the battery connector upwards, don't pull it or it'll snap.

    Christopher Tsamados -

    I replaced battery following this steps.

    Really useful.

    Thanks

    Sandeep Tharayil (Sans) -

    You do not need to use heat OR remove the back of the watch to open it. The four retaining pins (not mentioned, I don’t think, in this guide) can be removed and then the “guts” pull right out the back. There are four retaining pins (or clips, whatever you want to call them) that look like this when they’re partially extracted: https://photos.app.goo.gl/yYfXtvdAvQWe79... . With all four extracted you can just pull on the back where the strap cutouts are and it’ll slide right out of the case. My new battery is coming tomorrow, if I have time after I put it back together I’ll post a video to YouTube with a complete disassembly.

    Here’s a blurrycam video of me removing the last clip: https://photos.app.goo.gl/1VC6gaFwyxd82N...

    Noah Erickson -

    Thanks man, this made it a huge bit easier. Took me only ~45 Minutes to replace the battery, because its a little tricky to get the pins out.

    Joshua Sieren -

    Despite my observations on steps above, I did follow this guidance and it ended successfully, thank you for the instructions!

    FYI I also got the essential toolkit, which I used to perform this task - very good and useful basic kit, I recommend it.

    Final comment: those 20-25 minutes expected is for professionals or those with experience doing this kind of watch maintenance. In my case, first watch I ever opened (though having some experience with bigger electronics), I spent near 3 hours. If, like me, you have never experienced watch maintenance, consider it 3-4 hours to do it as careful as possible.

    Tarik -

    and to complete the assembly and make it as solid as it originally is, you may want to reinstall the 4 small pins removed on step 4 (read comments), for which you need delicate tweezers - with the right one, it was much easier to reinstall than I tought it would be.

    Tarik -

Conclusion

To reassemble your device, follow these instructions in reverse order.

Keslyn Huntington

Member since: 30/01/15

1661 Reputation

41 comments

Thanks for the guide. However I found several steps at least misleading, or not directly applicable to my Moto 360. I'm not sure if this is because the Moto 360 internal construction has varied over different production iterations.

The key difference is this guide implies that the inner body can simply be slid up and out of the metal shell with slow and careful prying. Actually, there are 4 curved plastic parts (call them locking pins) that fit corresponding slots in the metal shell and the plastic inner body at each side of the top and bottom clasp attachment points. Once inserted during manufacture, there is no way the body will ever slide up and out of the shell. I had to apply significant pressure to bend the shell out and pry the body out past the locking slots. However, it's possible that the locking pins could have been removed with tweezers permitting a less energetic disassembly of the watch.

Mario Becroft -

Actually, there is a way to remove them. They are flat and tiny, near the watchbands' holes. To remove them, insert something (like a needle, or a toothpick) into the 4 carved out parts and their heads will pop out. Use a screwdriver or nail to gently peel it out. After that, hold the top and bottom (where the watchbands are), and pull the inner body up.

Tran Hoang Nhat -

I made a video that includes removal of the retaining clips, a critical step missing from all the iFixIt Guides: https://youtu.be/r1as_h5jnBM

davedogcaddy -

To answer Mike's question, the outside dimensions of the rectangular battery are 30mm x 28mm x ~2.6mm. However, that's not the full story, as the part of the battery module containing the electronics and where the wires attach is thinner than the rest, providing a space about 3mm wide along the narrow edge of the battery that sits above other components on the board.

My asseessment is that there may be space for a slightly larger battery if it was not rectangular, but this would require careful design and provide only marginal benefit.

Mario Becroft -

could an ipod nano battery fit inside?

freestyle695 -

Thanks to Mario and Tran for the advise. The guide definitely wasn't enough and your descriptions helped a lot, for sure.
Neil Huang -

Thanks for this interesting real world guide. For a device that costs hundreds of dollars, they should have made it much easier to change the battery. My Moto 360 died after only 16 months and Moto wants $100+tax to refurbish it. Not worth it. :(

blisterpeanuts -

On assembling back, how to adhere the back plastic again?

Utkarsh -

I agree with Mario's comment. This guide is deficient. I partially destroyed my first Moto 360 when prying off the black rear cover. Then I saw a French YouTube video that showed how to do it properly.

My Replacement battery from eBay was faulty - open circuit. Disassembled it and reattached the negative terminal to the battery with some new tape and all good since.

Michael Kean -

I completed this yesterday, took me an hour. My 2 year old 360 was becoming unusable, shutting off at 37% & whenever i asked it to do anything mildly taxing. I heated the back with a heat gun, managed to warp it slightly at the edge by the strap but no harm done. It did not break. I used a sharp thin blade to slide between the back and the case to slice through the glue. This guide as stated above misses out the locating pins part. They do come out with a bit a teasing. I did not remove the o-ring either, seemed no need. The next hard part was getting battery housing out of the rear case (step 7). I used a plastic tool & just kept teasing it out. It came eventually. Changed the battery , remember to note where the battery wire sits & not just where to connect it! Reassembled, using only the existing glue points with care. Put the back on after slicing off the loose glue parts, re-applied some heat to the back and it re-stuck!! Watch powered up! Today 7 hours in and the battery is at 72%. Job done.

Andy C -

where can i buy a back cover?

lavic62 -

did you guys add an adhesive to reseal? or to the battery to get it to stick again?

john huie -

Definitely need an answer to this question, something that iFixit should have included in this guide. Seems to be a very integral part to replacing the battery, since the adhesive used to secure the battery in place as well as replace the back cover is ruined once you pry everything apart. Any comment from Keslyn or any of the others at iFixit on this? Would be great if they would chime in.

splangele -

Don't use heat, and don't peel off the back cover. Just pull out 4 catches and open the case. See: https://youtu.be/Jw3n5qbGv-I

Chris K. -

Posted some pictures for removing the back cover fasteners here: Motorola Moto 360 Case Locking Fastener Replacement

Chris K. -

Chris K is correct. Take the strap off first. No heat, a bent pin in the slots (had to slightly lift the edge of the back cover with a spudger) and pop the 4 catches out. May even be possible to pull the catches out with a pin, without touching the back at all. but I didn't manage that. Also, leave the O-ring alone. Once the catches are out the innards of the watch slides out with a gentle pull.

Took me about an hour. Several minutes of which was trying to find the fourth catch which I'd knocked off my workbench.

Battery now lasting longer than it ever has done. I guess the software has improved since my old battery was new.

Also... buy a new, third party replacement battery. Don't buy an 'original' because they'll be as old as the device (and probably second hand) and just as worn as the one you're replacing.

Dominic -

Thanks for the guide. I used it to replace my old battery. I may have be broken the copper ribbon while trying to open it but fixed it with a piece of tape for now. But the touch screen still doesn't work. Any ideas on what cable I may have not plugged in?

K K -

Hii KK, Where do you get new battery?

My battery also gone...

Upendra -

Hi Upendra,

I got it from Amazon.

https://www.amazon.com/dp/B018F1WT8G/ref...

K K -

Please anyone suggest where to buy.. i need new battery for moto360 1st gen.. I am from mumbai.

Upendra -

For having never opened a watch before, I took it all a part without issue and back together (using the iOpener Kit and a YouTube video), which is a success. I thought the hardest part was going to be taking off the back, but it was putting the four pins back in. Painful! But the watch is no longer vibrating. Someone said that the battery is too close to the vibration motor, but I don't know which part that is. Can anyone point it out? I would hate to take it a part again to get it wrong again! I guess my new battery will last longer without vibration, but still...

Lindsay -

Even with this guide and the comments, I managed to destroy my watch following it. The removal of the back, there is a thin film over the back plastic. I heated up the back enough for the film to peel away from the plastic back, but the film half still stuck to the watch. There were also the problem with the locking pins, which on further inspection may be able to be removed through the watch strap area. Remove the watch strap first!!!!!

When trying to prise the watch from the metal casing (nb this was before I read the comments and saw about the locking pins), the watch suddenly came free... Unfortunately because of this, the ribbon cable for the touchscreen tore along with it. What is happening is as you are prising the back off, you are essentially breaking the locking pins, which are plastic and suddenly give way.

THIS GUIDE NEEDS UPDATING..... AS IT STANDS, IT IS NOT SUFFICIENT TO CHANGE THESE WATCH BATTERIES WITHOUT POTENTIALLY DESTROYING THE WATCH. I would recommend reading a few other guides. RIP! ;(

Chris Brazier -

Is there any significant different between the Gen 1 and Gen 2 360 in disassembly and battery replacement?

Sam Blanchard -

I follow the instruction step by step, but now my screen remains black. When i put my smartwatch in the charge dock it buzz and screen appear a little bit light but it remains black... any tips?

Simone Pappalardo -

DO NOT RISK YOUR WATCH FOLLOWING STEP 4.

I got stuck at that point where I couldn't get the rear housing off. Turns out it's locked into place with four little pins. Followed a video guide where they used a small flathead screwdriver to push the pins out of the four holes in the rear housing, but I just used a razor blade to push them out. After that, the housing came off easily, no potentially damaging prying necessary.

JDD -

I will say this is a decent guide, since I just completed replacing the battery in my Moto 360 and everything works so far as it did prior to the replacement. I did also follow the one YouTube video as well: https://www.youtube.com/watch?v=r1as_h5j... because of the additional step of removing those 4 pins that are not talked about in this guide. My only issue is no mention of adhesives to replace the original stuff. It was recommended to me to retain as much of the black putty type adhesive that you can from the removal of the back cover and re-heat that to replace the cover. It balls up very easily from using the prying tools to separate the cover, so I ended up peeling it off and throwing it out. I am now faced with finding a suitable replacement. Also need to find some kind of thin double-sided tape to re-secure the battery to the board it was attached to.... But all-in-all, I did NOT destroy my watch and it works as it should. Thanks to the author and contributors. Good job!

splangele -

Did you find the adhesive and thin double layer tape? Could you please share? Thank you for your collaboration.

Isiah Loza -

My only issue is the fragile pins that connect the battery to the main board. I was lucky enough not to break the back plate (and kind of proud of me), but when trying to detach the connector for the battery on the motherboard, the 2 tiny metal pins of the connector came with the connector as I was trying to wiggle it out. It was literally impossible to take out, I carefully pulled on it, it did not move a micron and finally broke.


I have 2 other 360s and both batteries are starting to fail, they both have LCD damage from heat caused by the charger and/or overheating/swollen batteries. Now I’m scared to open them and ruin them as well. Kudos to Motorola for making a watch with a practically unserviceable battery, a faulty charging mechanism and no service centers that can replace it (second biggest city in Canada…) – class action lawsuit seems appropriate to me.


I really want to succeed and not break the connector this time, anybody has faced this issue? Any advice on how not to break that flimsy connector?

Olivier -

This guide was actually really helpful with opening the watch. I found that removing the ring after disconnecting the cover was more convenient. Unfortunately i broke the screen when pushing the back cover back on the watch :(

Joep Brauer -

There is a better way. Easier, and much lower risk. Everyone please do not follow this tutorial. You need only remove the 4 retaining clips *first* in order to effortlessly open the watch for battery replacement.

https://www.youtube.com/watch?v=Jw3n5qbG...

be gentle with the clips, so you can reuse them.

jeff -

I can confirm that removing the four retaining clips works. I’ll try to post a video.

Noah Erickson -

I just replaced my battery, placed it into the charging cradle and it buzzes every three seconds, and the

motorola “M” flashes. Did I do something wrong? Or does it just need to charge? Help!

Bruce

Bruce Beau -

Why is there only one category for the 360, instead of two for the two versions produced? It looks to me like this guide is for version 1, with a glued back, while version 2 has the locking pins?

Byrn -

Backlight is ok, but no image on the display… I suppose the pins of both side of the light sensor are normally soldered on the display… I break this part I think (on the tutorial pictures this is the same)…

I think this is not the good way to proceed !

Philippe Gressé-Lugué -

Would you please provide a battery replacement guide for the Moto 360 2 (2nd gen)?

Bruce W. Mohler -

no heat or Iopener needed : I followed the video and slid out the retaining pins. worked flawlessly. https://www.youtube.com/watch?v=Jw3n5qbG...

davidlanchart -

Ok, battery replacement went smooth. Assembled watch afterwards and is now running again. Problem s only that it does not charge anymore… Suppose the charging mechanism must have been damaged. :-( Any ideas, if not, byebye Moto360…

Fabian Kohlmann -

I'm having a similar issue that it doesn't charge right post repair.

Christian Sayers -

I was able to get in and out of the watch easily enough thanks to the guide, but after putting it back together the device doesn't boot properly. The M logo just blinks on and off slowly.

I was able to get I to the boot menu and the device status shows “locked” and it won't factory reset. Is there a fix for this? Normally I would just flash an oem image onto it via USB but that isn't possible with no USB port available.

Christian Sayers -

Just did the replacement with just the basic iFixit essential electronics toolkit successfully by following this tutorial (https://www.youtube.com/watch?v=wl61mDJl...) instead which require no iOpener.

Just some tips that you may found helpful,

1. For the ‘plastic piece’ used in the video for removing the pin, I just made myself one by cutting off the corner of a plastic folder. I tried using the guitar pick included in the toolkit but it seems a bit too thick to get the job done.

2. For the part where you are required to separate the ‘circuit board’ from the back plate, a guitar pick is quite useful.

3. For the part where you separate the battery which is stuck onto the board, use a jimmy and then you can quickly remove the battery.

I hope that will be useful for someone who attempts this in the future.

English is not my first language so I'm sorry for any grammatical mistake.

Good luck to anyone who is trying to attempt this replacement.

Ken Sze -

Thanks for this tutorial, i made it till the finish, i have some problems with copper ribbon that connect motherboard with the display but i finalize replacement without doing that step. I just was cautious to not break it during old battery take over. Now my old Moto 360 is like brand new, thanks again :)

Yakoob -