Introduction

The computer comes with a minimum of 2 GB of memory, installed as a pair of 1 GB fully buffered, dual inline memory modules (FB-DIMMs) in two of the DIMM slots. This procedure will show you how to add more memory or remove the memory riser for maintenance.

  1. HbfbJXnPZYLGx6qK
    HbfbJXnPZYLGx6qK
    uy3JMTOEa1LkwmFn
    • Shut down the computer.

    • Warning: Always shut down the computer before opening it to avoid damaging its internal components or the components you are installing. Do not open the computer or attempt to install items inside it while it is on.

    • Wait 5 to 10 minutes to allow the computer’s internal components to cool.

    • Warning: After you shut down the system, the internal components can be very hot. You must let the computer cool down before continuing.

    • Unplug all external cables from the computer except the power cord.

    • Touch the metal PCI access covers on the back of the computer to discharge any static electricity from your body.

    • Unplug the power cord.

    • Put on an ESD wrist strap.

    Updated to reflect same procedure for all models in range

    DavidM -

  2. WPKXNvaiqiIJKYN4
    • 1) Hold the side access panel and lift the latch on the back of the computer.

    • Warning: The edges of the access panel and the enclosure can be sharp. Be very careful when handling them.

    • 2) Remove the access panel and place it on a flat surface covered by a soft, clean cloth.

    • Replacement Note: Make sure the latch is in the up position before replacing the access panel. If the latch is down, the access panel will not seat correctly in the enclosure.

    Is this the actual width of the drive or the internal layout.

    Stephen -

  3. Rjrpjev2ueUsITYf
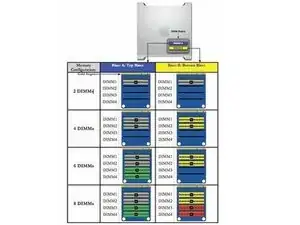
    • Additional pairs of 1 GB, 2 GB, or 4 GB FB-DIMMs can be installed in the open DIMM slots. Maximum memory is 32 GB.

    • DIMMs must be installed as pairs of identical size and type, from the same vendor. Use the provided illustration, like-colored DIMMs must match.

    • DIMMs for Mac Pro (Early 2008) must fit these specifications:

    • 800 MHz, DDR2, FB-DIMMS

    • 72-bit wide, 240-pin modules

    • 36 memory ICs maximum per DIMM

    • Error-correcting code (ECC)

    • Important: For proper operation of Mac Pro (Early 2008) computers, Apple recommends using only Apple-approved Mac Pro (Early 2008) FB-DIMMs

  4. VnKR2VWxcX2JUlnZ
    • Warning: Always wait 5–10 minutes for the computer to cool down before you remove or install memory. The DIMMs may be very hot.

  5. Ie1JdX2jWLRLICgI
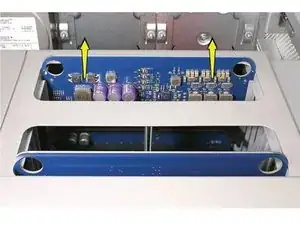
    • Holding the memory riser card by the two finger holes, pull it out of the memory cage and place the card DIMM side up on a soft, clean cloth.

  6. bTJwrPNXj5NVPZFB
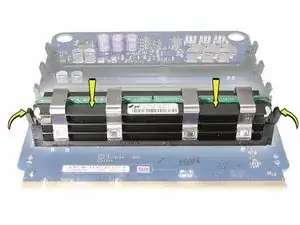
    • Open the ejectors on the DIMM slot by pushing them out to the sides, and remove the DIMM from the riser card.

  7. I3qiIZLANP5yFfUK
    • Replacement Note: Align the DIMM in the slot on the riser card and push both ends of the DIMM down until the ejectors snap back up into place.

    • Warning: FB-DIMMs carry heatsinks on either side of the DIMM. Never attempt to remove the heatsinks from the DIMMs. Doing so could damage the DIMM.

Conclusion

To reassemble your device, follow these instructions in reverse order.
Joshua Byrne

Member since: 03/05/13

7725 Reputation

0 comments