Introduction

This guide is an internal prerequisite.

  1. QvVK4TYshldqWAI1
    • Remove the single 12 mm Phillips screw securing the top of the rear speaker housing to the upper case.

  2. eotMKER5tUxUyR2j
    • Remove the single 2.2 mm Phillips screw inserted horizontally into the side of the optical drive.

    • This screw is located in a gap within the right speaker assembly, and is visible only from the hinge edge.

    Finding this screw wasn't easy

    Leonardo Echeverria -

    Where did you find that Screwdriver?

    jesusalbaregidor -

    I put my laptop vertically so I could get the screw out. Trying it sideways while the laptop laid flat wasn’t working.

    Mr Poofy -

  3. RqX1xtCZrnGsmxiv
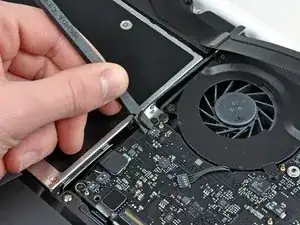
    • Use the flat end of a spudger to pry the AirPort/Bluetooth ribbon cable connector up off the logic board.

  4. XhuMdFXRxNraGHcF
    • Use the flat end of a spudger to pry the rear speaker connector up off the logic board.

    • Pry up underneath the wires.

    • This connector is very delicate and easily broken.

    Step 10. If you are having difficulty with the small connector, insert something thin and long underneath it (preferably not metal, as you can scratch the motherboard that way). There is some space under it that you can use to get it loose.

    Remember, the amount of force required to loosen it is very small. Take a break if necessary if you are getting frustrated.

    Stephen Eilert -

    I would recommend not removing this as part of this step. You can easily slide the drive under the speaker wire -- just lift it from the side with two screws carefully.

    Matt Mastracci -

    i just broke the connector! Be very carefully here. Needed to sold the speaker cabels then...

    rafa74 -

    I broke it, obviously... I tried to put it back; it seems to be solid enought, but the speaker now sounds really bad(low and noisy-undefined). Any ideas on how to fix it?

    gl84 -

    PLEASE TAKE THIS STEP AWAY!!!!!

    I now have the same as the rest of the loyalty of Ifixit’s…. I glued it and have the crappy tinny low volume sounds, thanks

    Peter -

    Same here. I broke it too, tried to glue it back and have sound, luckily, but very bad quality. THIS STEP IS UNNECESSARY!

    Jens Lubbadeh -

    This step has been very badly explained. I too have now broken my speaker connection. As others have said, you're just trying to lift the cable up NOT "PRY THE SPEAKER CONNECTOR UP OFF THE LOGIC BOARD" as instructed here! Doing this will break the soldered connection to the board. Now I need to take it to a professional for a solder repair.

    Nick -

    Hi There, broke the connector.

    I could not remove the cable even with the broken off connector.

    Soldered it back on, low wattage and very little tin needed.

    When putting the drive back in, I found that the loudspeaker cable could easily fit under the drive holder.

    So, in future in case of problems with the drive, no more broken off connectors..

    vos474 -

    Do not try to remove that connector ! It is too much fragile. As other users did, I broke it … And I don’t know if it will be possible to repair it.

    Jean-Pierre Giovanni -

    Same here, I was very careful, but the connector broke off, of course. Tried to glue it back, but now the sound it very low, noisy, almost useless. Any idea to fix it? :)

    szezo -

    Are you f****g serious? This step is unnecessary!!!!!!!!!!!!!!!!!!

    My connector broke!!!!! How can i fix it????

    Jack son -

  5. cuNq1SK4ZoUFGQN3
    • Carefully rotate the rear speaker assembly (with AirPort/Antenna cables still attached) out of the lower case.

  6. KjEWbnIkFuu5VjRO
    • Use the flat end of a spudger to pry the optical drive connector up off the logic board.

    The connector broke while removing it... be careful

    Leonardo Echeverria -

  7. yoDB3eMjQiloCFmT
    • Remove the single 4.5 mm Phillips screw securing the optical drive bracket to the upper case near the fan.

    The screw here in my laptop was stuck. If this happens to anyone else I recommend using needle nose pliers, and put rubber band over the screw, and grasp the screw by the sides with the plier to work it out slow until you can unscrew it.

    Mr Poofy -

  8. v1LaQ1VTksGtvLqv
    • Remove the two 2.5 mm Phillips screws securing the optical drive to the upper case near the optical drive opening.

  9. I2V2JRXo1oFovlAF
    • Lift the optical drive near its connector and pull it away from the upper case to remove it from the computer.

Conclusion

To reassemble your device, follow these instructions in reverse order.

Walter Galan

697731 Reputation

0 comments