Introduction

When replacing your hard drive, you must transfer the Torx screws from the old drive to the new one.

  1. RdKslWbbyVKNdorc
    • Remove the eight 4 mm Phillips screws securing the lower case to the MacBook.

    According to this page http://support.apple.com/kb/HT1651?viewl..., the 8 screws are not identical.

    Can anybody tell me where each kind of screw is supposed to go?

    Gregoire -

    They are all 100% Identical. You were probably looking at a different model, or Apple has entered the wrong information... Hey, It happens...

    Owen Davies -

    The screws on the Late 2009 are identical. The blue lock compound might make tightening some require a little more effort.

    svenaustx -

    Can I replace it with a SATA 3 cable?

    nm -

    A1342 macbook does not have the right controller to support sata III

    Owen Davies -

    hi, i just got back from the apple store and they are really keen for me to upgrade to a new laptop since my battery is old and the screen is cracked, so glad i found ifixit i would love to upgrade this puppy! gonna make it a real sleeper! styler hall wrote about sticking 16 gb of ram in his a 1342 ? is this a simply mather of ordering 3 4gb sticks ?aslo i currently have 4 gb and would like to upgrade to 8 ( or indeed 16) does that mean i need to buy all new sticks or can i continue to use the old one and stick a new one next to it ?

    thanks again mick van aar, perth western aus.

    michelvanaar -

    The A1342 will take up to 16 GB of RAM, however, there are only two RAM slots, so use two 8-GB RAM modules. Other World Computing (OWC) is a great reference source for info on exactly which RAM to use with which model; prices are usually much better on EBay though. Add an SSD from OWC and your machine will really scream!

    I hope that helps!

    gdesbrisay -

    Gregoire is right. The 8 screws are absolutely NOT identical, I’m looking at them right now, weeowey weeowey.

    John Guzman -

    I just wanted to say that, in 2020, i used these instructions to replace the magsafe socket on my A1286, mid-2012, pre-Retina MacBook Pro. The internal layout is not quite the same but close enough for me to do the job. I skipped the steps of fully disconnecting the fans and speakers because of what others had said about breaking the sockets. it just meant I had to be extremely careful when lifting up the main board so that I did not tear and break the connections. I was able to disconnect the old magsafe socket with the board flat and in situ, but there was no where near enough room to be able to aline and press home the new par home. Reluctantly i had to lever up the board. This was difficult as there is a tapped post that holds a screw in the way close to where the USB sockets are, that prevented the board lifting up and out. I had to be quite forceful to manouevre the sockets out from the edge of the case.

    Paul Burridge -

  2. 1hgTLEYwbMJScnWp
    1hgTLEYwbMJScnWp
    4FfgMS2wrQ1vpKT1
    GVdOUDCoEApQ1keZ
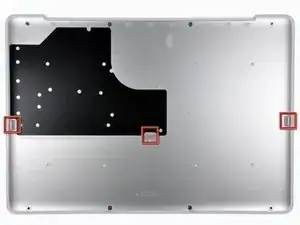
    • The lower case is constructed of rubber-coated aluminum. Do not excessively bend the aluminum during removal, as any permanent deformation will cause tolerance issues after reassembly.

    • Slightly lift the lower case near the vent opening.

    • Continue running your fingers between the lower and upper cases until the upper case pops off its retaining clips.

    • The location of these three clips is shown in the third picture.

    Do the retaining clips have to be re-engaged when replacing the lower case?

    John Morley -

    Answering my own question, the clips re-engage when the lower case is correctly positioned. You can help them by gently pressing the lower case with your thumbs midway along the two short sides. When everything is correctly aligned the eight screw holes line up.

    John Morley -

    Rather than running your fingernail down the sides to free up the retaining clips, I found that using an old credit card, inserted about 1/4”, to run along the left and right side popped those end retaining clips right off with no problem. You may need to twist the card slightly when in the middle area to help pop those off.

    bdahl385 -

  3. uRyXhccipZHxG6cV
    • For precautionary purposes, we advise that you disconnect the battery connector from the logic board to avoid any electrical discharge. This step is optional and is not required.

    • Use the flat end of a spudger to lift the battery connector up out of its socket on the logic board.

    • It may be easier to use your fingernails to lift up on both sides of the connector.

    you do not need to remove the battery when replacing the hard drive or ram

    brilldoctor -

    beware not to lift the connector to close of the angle, as the picture suggest it. It might broke the angle. Attack by the middle.

    naamol -

    Not necessary?

    hikkymemo -

    Be careful of the corner of the battery cable connector when trying to pry it off with the spudge. I knocked the corner of mine. No operational impact but was not very pleasing!

    jljordanweb -

    Not necessary, but a good idea, so as to avoid any spurious charges going through the boards...

    svenaustx -

    @Svenaustx - What could happen if not removing this battery? Worst case? Not a geek on this but did change RAM on my Macbook Pro "15. Can't remember disconneting the battery back then. Shouldn't it be sufficient shutting the Mac off and ensure it has been used for an hour or so before replacing RAM?

    Allan Clarke -

    i used a metal pry and noticed some sparking when i disconnected the battery. replaced ram. now it wont turn on. did i fry it?

    Ian Lynch -

  4. iBVgTHbruT2ZoRei
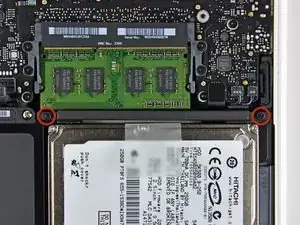
    • Remove two 11 mm Phillips screws securing the hard drive bracket to the upper case.

    • These screws are captive in the hard drive bracket.

    Which screwdriver do I need for this? I can't seem to get them moving with the Philips one I used for removing the case of my Macbook.

    xyasjah -

    You´ll need a Phillips 00 and a Torx T6 Screwdriver

    nm -

  5. UHWwvP2fvqYkCWCZ
    • Lift the retaining bracket out of the upper case.

    • When putting the bracket back after replacing the drive, it is easy to put in backwards. If it doesn't seat smoothly, then reverse it and try again.

  6. E6qwrulu1M1V2tMt
    E6qwrulu1M1V2tMt
    RHt1lPHWRtFvCf1d
    miNxaqRiiFBUlJDY
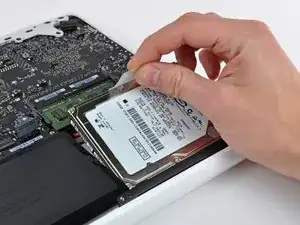
    • Lift the hard drive by its pull tab and pull it away from the upper case, minding the cable still attaching it to the logic board.

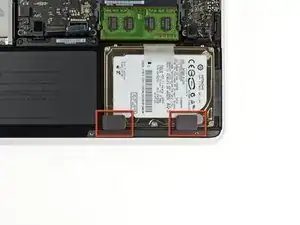
    • In some revisions of the MacBook A1342, the hard drive bracket may include two rubber brackets (as highlighted in the second picture.) The correct orientation of the rubber brackets is shown in the third picture.

  7. aIL2JFBX1p6lwRKf
    aIL2JFBX1p6lwRKf
    EBjnF4YqvPDZFhht
    • Remove the hard drive cable by pulling its connector straight away from the hard drive.

  8. 4ubrxbOrdrgf22sj
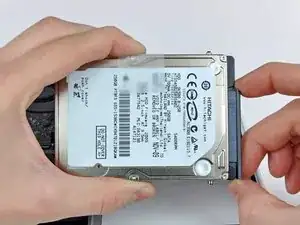
    • Remove the two T6 Torx screws from each side of the hard drive (four screws total).

    • You'll need to transfer these screws to your new hard drive if you're changing drives.

    • If you are installing a new hard drive, we have an OS X install guide to get you up and running.

    If you don't have a T6 Torx screwdriver, you can use snub nose pliers to unscrew them by clamping on the screws and turning them out.

    Marissa Stardance -

Conclusion

To reassemble your device, follow these instructions in reverse order.

Walter Galan

697731 Reputation

21 comments

awesome guide! This really made it so easy to figure out exactly what I was doing. The large, sharp pictures really made me feel confident that I was doing everything properly. Thanks!

dcmcnyy -

can i install an ssd instead of a normal hd?

brian ramdhan -

Yes, absolutely. I switched mine out with a Kingston 120GB SSD.

qosmioamit -

can this model A1342 take an SSD with SATA3 instead of SATA2?

Nikhil M -

By the looks of it. The Crucial MX100 is explicitly said to be compatible and has SATA III:

http://www.ramcity.com.au/buy/crucial-mx...

Albert -

I replaced the original 250GB Hitachi hard drive with a 1TB Samsung HN-M101MBB. Everything worked fine, but now the fan is always running. Maybe the temeprature sensor of the hard drive doesn't connect with the computer?

Ralf Steikert -

Excellent guide. I'm a complete n00b when it comes to HD/SSD install so this guide was magic. With the right tools, its just so easy. After also replacing RAM, I'm looking forward to a much more pleasant and productive time with my new old 2010 Macbook :) Thanks, iFixit!

kyteflyer -

Thank you! I was able to easily change the hard drive of my daughter's Macbook. Didn't need the spudger at any point though, which is good as only had makeshift options available for that.

(Wasn't able to update the OS on same drive as it didn't show as an option in OS installation even after trying Erase/Partition steps using the Utility, as mentioned at several places online. But did finally manage to clone from Time Machine backup and then update the OS onto that.)

maighaa -

Can I use/nstall a 7mm thick 2.5-inch SSD (solid state drive)?

Eric Stealth -

Hey I have a 2011 13" that needs a new hard drive , would this work ? Also any other options ? Plz help!!

Juan marin -

Hey I need to know what hard drive I could use for my 2011 MacBook Pro. Also is there other options ? Thanks !!

Juan marin -

No Torx screwdriver? No problem! You can easily remove and replace the Torx screws with some good pliers or vice grips.

Scott Rollans -

I had to use a pair of crimpers to get a good grip on one of my torx screws that was stripped. I'm gonna be investing in a small pair of those adjustable pliers(with the crew thing on one of the handles) for my tinker toolbox.

Sarah Haggerty -

No problem with replacing the drive, but when I rebooted, some keys on the right hand side of the keyboard, including L and the Return key, had stopped working. What could it be?

Vaktmesteren -

I just swapped the original 250 Gb HD with a 275Gb Crucial MX300 2.5-inch SSD on my sister's MacBook and the speed is just amazing !

Thanks a lot for this guide, you saved my sister's mac :)

davbouchard -

The only hiccups i came across was that the Phillips #00 screwdriver didn't really want to fit the 11mm screws in step 4. So i striped one of the screws a little bit. Maybe it requires a different size. Also i wish that there was a link to show the process in reverse but it's easy enough to figure out. Overall the process was painless, the instructions are short and simple and the pictures are an amazing aid. I took it at an easy pace with music playing in the background on my iPhone. So I have just finished installing a Samsung 500gb Solid State Drive (pre loaded with El Capitan) into my little MacBook. She booted right up and now with an upgraded hard drive, a little extra Ram, and a updated OSX, i have just extended the life of my little old Macbook. It's now the perfect travel/school laptop with out having to risk loosing, damaging or getting my new MacBookPro stolen.

smartparts000 -

This was a pretty easy fix. The longest part was waiting for the Time Machine restore to complete. I was worried for a bit tho because I didn't have the original install disks, I bought my MacBook used off of Amazon for pretty cheap. Now that I have a new 1Tb SSD, I'm thinking of boosting my RAM up to 8Gb even though I just installed 4Gb a few months ago from the 1Gb that it came with. I'm so glad that my friend told me about this site!

Sarah Haggerty -

Hi, I switched to a 480 GB OCZ TR150 SSD from the list of spare parts but my MacBook does not recognize the SSD. Back to the original HDD everything works fine. What can I do to get the SSD working?

sweitenberg -

After i made it, My macbook just starts and after 2 seconds turns off. What can i do?

Martin Molina -

my drive mounting brackets are different than the one you show, on one side has the screws on the drive, the other side has rubber mounts for the drive

mfmayes -

Does anyone know a way to get the orange and black rubber grommets put back into the case?

Scyth3934 -