Introduction

  1. BqUERrphOP3UhFBR
    BqUERrphOP3UhFBR
    IWZWkL4VnJkRAiYA
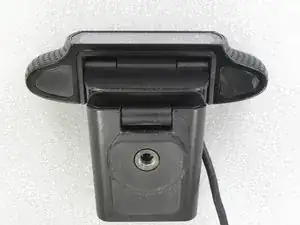
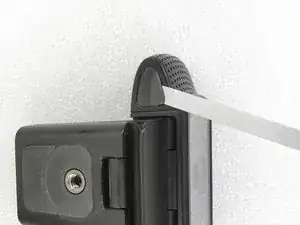
    • On the bottom side of the webcam, remove the stickers from both sides

    If you remove the rubber stickers and don’t see any screws underneath, it’s because there are actually two layers of stickers. The top sticker is the rubber that you can see, and underneath it is a plastic sticker. Sometimes they come away together, sometimes you will need to pry away the plastic sticker after first removing the rubber.

    drspod -

    Existem dois adesivos em ambos os lados.

    Jose Gustavo Abreu Murta -

    You can heat the stickers with a lighter , so they come off very easy .

    kar bouter -

  2. 2AEkk1fFnfLOIKqr
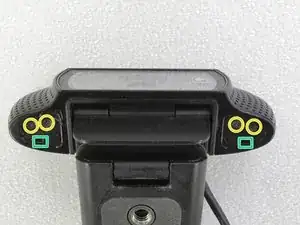
    • Remove the four Phillips screws.

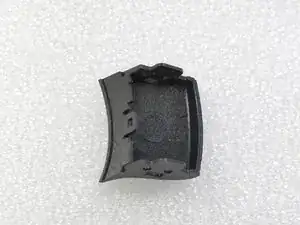
    • Press into the holes to unlock the side covers.

    what screwdriver size did you use? I stripped mine and it’s the smallest screwdriver I already get it’s the PH000 philips size

    xkntgnzn -

    The screw may be easily removed with appropriate screwdriver.

    The dimensions must be match! PH1 I think…

    Jose Gustavo Abreu Murta -

    Comprei 3 kits de chaves e nenhuma tirou esse bendito parafuso, amanhã levarei a camera junto na hora da compra

    renanzinho.castro -

    Renanzinho, se usou a chave incorreta pode ser que tenha danificado a cabeça do parafuso. Para mim, foi super fácil a remoção desses parafusos. Use a chave tipo PH1.

    Jose Gustavo Abreu Murta -

    Removing the side covers was the most difficult part of this procedure. The covers did not want to release so it took a lot of prying with a small screwdriver to get them to release. The side opposite the hole were stuck and it took quite a bit of force to get that side released. Logitech should have had release holes on both sides of the covers.

    Don -

    Don , did you press the holes to unlock the side covers?

    Jose Gustavo Abreu Murta -

    Yes I did but, the only movement I saw was very little. I had to pry under the outer edge of the opposite side to get it to fully release. No real problem other than the first time one does this it takes a while to figure out the details.

    Don -

    Best screwdriver bit for all the screws is PH00

    Jérôme Pirotte -

    This step definitely doesn't work as described. A very small standard screwdriver pushed into the hole behind the tab will very slightly pry the side of the speaker mount out. At the same time, use a second standard screwdriver inserted in the side to pry it out slightly so it doesn't lock back into place. Then there is a second tab at the top side that has to be levered free. On the side you just opened, move your screwdriver from the bottom to the top and carefully lever it out, and it will pop free. Then get your fingers under the side that is freed and pull forward.

    tkircher -

    This is a very good description on how to get the side pieces open:

    "Then there is a second tab at the top side that has to be levered free. On the side you just opened, move your screwdriver from the bottom to the top and carefully lever it out, and it will pop free."

    This helped me get it open easily. Thank you!

    Andy B -

    Tkircher, 35 people have successfully performed this procedure. I don't think you read this - "Press holes to unlock side covers."

    Jose Gustavo Abreu Murta -

    tkirtcher read it, and they are correct. Your instructions are decent, but very unclear on this step. The covers don't just come off just like that when you "press holes." You have to know how they are going to come off - they don't just slide off the sides like your picture implies - and there is a bit of prying involved AFTER you press the holes to "unlock" the side covers.

    "35 people have successfully performed this procedure" maybe. But at least 34 of them didn't comment on this forum the missing details of the process, without which one could very much feel as if they are about to break the device.. Thankfully, tkircher helped out.

    And thank you for posting the guide. Consider being less snarky to people who post details you ignored to help others.

    Shane Heroux -

    like the above, I had issue even with "Press holes to unlock side covers"
    that only releases the bottom, you'll also need to pry from the opposite side like Don suggested to get it to release

    ErieQuiet -

    Tkircher, my main language is not English. I wasn't sarcastic. It could be a misinterpretation. I'm sorry.

    Jose Gustavo Abreu Murta -

  3. 3JSu6MIxIXmdDqtK
    3JSu6MIxIXmdDqtK
    4FVG4uUaEUaQJ3LF
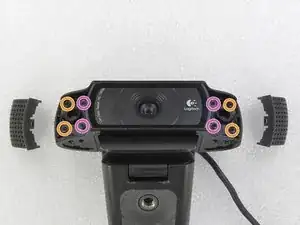
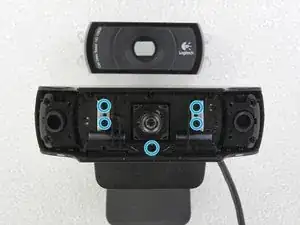
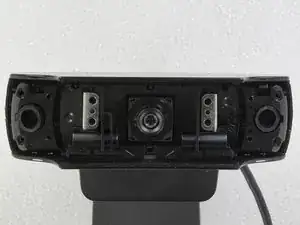
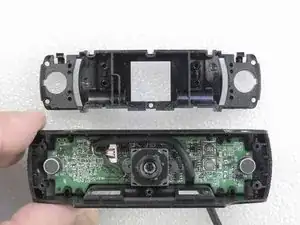
    • Once you’ve removed the side covers, unscrew all eight Phillips screws highlighted.

    The inner four of these screws can sometimes be extremely tight. They will easily strip if you are unable to get them to turn. I had one screw that I was unable to remove so I had to break that screw fixture on the clear plastic cover. Once you can remove the clear plastic you no longer need to worry about these screws. If they are stuck they will just stay in the black plastic support as they only hold down the clear plastic.

    drspod -

    Use the correct screw driver. So easy to unscrew.

    Jose Gustavo Abreu Murta -

    These screws are a different size to the ones in step 2.

    Michael Van den Acker -

    Yes, that is correct.

    Jose Gustavo Abreu Murta -

    The strength of a thousand locomotives will not allow you to remove the side covers even if unclipped. Be prepared to break either the side covers or your fingers.

    michaldobrzynski -

    Michal, of course, you must gently unlatch the side covers to remove them!

    For me, it was easy…

    Jose Gustavo Abreu Murta -

    Jose:

    I am 6 foot 3 with large strong hands to match. In the end, it took channel locks gripping the correct screwdriver to get the leverage to make the first few turns.

    The next time I get a flat, I would like to call on you to lift the care while I change the wheel.

    For those who come after us, prepare to use deadly force on these four small screws.

    Robert

    Robert McCullough -

    Robert McCullough,

    “Give me a place to stand and with a lever I will move the whole world.

    Archimedes

    Use the correct screw driver. So easy to unscrew.

    Jose Gustavo Abreu Murta -

    My camera is working so the only thing I wanted to do was to get to the lens itself to see if cleaning it would correct the washed-out image I am seeing. So, to release only the main front glass cover on the camera you only need to remove the four inside screws. That will give you access to the lens itself for cleaning, if necessary. However, I now can see that the lens itself on my camera is not clear. It looks kind of milky. Wiping it does not change the milkiness of the lens. So, it look like there is nothing I can do to correct the issue. I have two of these cameras that have the same milkiness on the lens. I’m guessing it’s time to get two new cameras although I hate to have to spend $$$$ to replace them…

    Don -

  4. 1tt54XZ2JZMRWsnE
    1tt54XZ2JZMRWsnE
    1QGZZ4erXciyny35
    HtWrcgyBnQWlcHLD
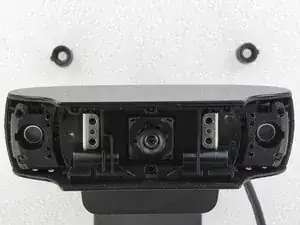
    • Remove the lens's cover.

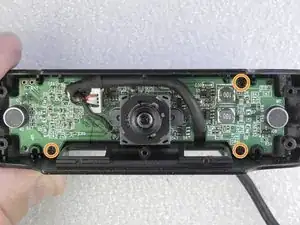
    • Remove the five Phillips screws of the metal bracket.

    • Remove the rubber pieces of both microphones (one on each side).

    Don’t forget to remove the screw just below the camera lens as well.

    Michael Van den Acker -

    You must do this at previous step.

    Jose Gustavo Abreu Murta -

    Unfortunately you skipped mentioning it in the previous step when removing the 4 metal bracket support screws.

    Fernando @ NavarettePCs -

  5. 2Pqc6OSjgCek3HWp
    • Carefully remove the metal supports from the webcam's base.

  6. 3cKYqf3nENpPGjiP
    3cKYqf3nENpPGjiP
    DYiGCaOwkBQiQub2
    • Carefully remove the base of the plastic support. Loosen the three screws that secure the electronic circuit.

    The directions forgot to mention to remove the screw directly below the lens before this step.

    Max Watson -

    Max, you skipped step 4 where I inform you of the need to remove that screw bellow the lens.

    Jose Gustavo Abreu Murta -

  7. BFJ26C3K6emnXvZS
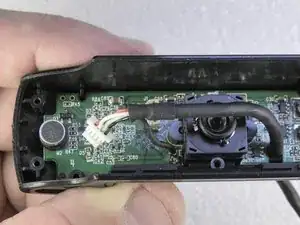
    • Disconnect the USB cable connector.

    BE VERY CAREFUL not to apply too much force when trying to remove this header. The socket will easily come away from the PCB and then you will need to solder it back on again. Mine was extremely tight and separated from the PCB.

    drspod -

    Is it a PH 1.25 or PH 2.0 connector? thanks.

    Abdiel Adams -

    Please put this warning loud and clear. My socket came loose from the print, and I can not solder it again...

    Disconnect the USB cable connector. Be very careful. Hold the socket with a plyer, and then pull out the plug.

    Or even, do not pull the plug out, just cut the wires, and solder the wires ....

    ruud -

  8. j1AWXRNNdqepYfet
    • Remove the electronic circuit.

  9. Pgqbjfv46NdOtSjV
    Pgqbjfv46NdOtSjV
    nJFCXW5YuOVCpsAZ
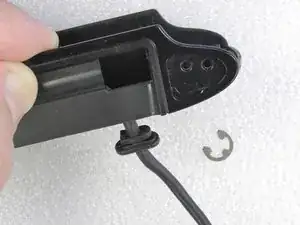
    • Release the clip that secures the cable holder. Pull this cable holder out of the camera.

  10. vHJncQMN3sfTrJxO
    vHJncQMN3sfTrJxO
    mUCIRPQju3hyERou
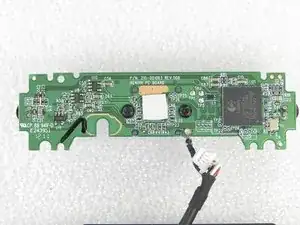
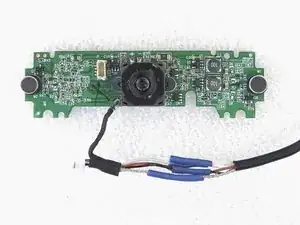
    • Front and back images of the webcam's electronic circuit board.

    Does anyone know of any place to purchase a replacement lens assembly for the C920 HD camera? My lens has been damaged by solar UV rays and is all cloudy which deteriorates the quality of my images. It looks like replacement of the lens assembly would be relatively easy as I can only see two screws holding it in place. However unfortunately, the image shown for the backside of the pc board has a piece of paper covering the area where lens may have some connections so it.

    Don -

    The lens is easily removed without taking anything apart other than the two side panels and the clear glass cover piece and then very carefully turning in CCW (counter clock-wise). I would suggest using a pair of small tweezers and gently rotating the lens. Try not to move the lens around too much or you will damage the focusing mechanism. Now, I need to find a resource where I can purchase a replacement lens.

    Don -

    Why does mine so much more inside it than the pictures, I know my ex was secretly recording me but could she have switched cameras with one that she could control? ie…making it not work/focus or even intercept the video even if I had disabled my wifi on my computer?

    Chrismark189 -

    I wish I could upload a picture of mine

    Chrismark189 -

  11. u4BHg5gO5amsX5y3
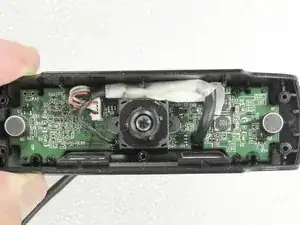
    • The problem was the broken cable on the back of the camera. I've cut the faulty part and redid the connections by soldering them and insulated them with heat shrink tubes.

    Is the silver one the shield of usb cable or something else?

    Abdiel Adams -

    The aluminum foil is also a shield.

    Jose Gustavo Abreu Murta -

    How did you find the break, or did you just assume and replace most of the cable with a spare?

    Andrew4D -

    Usually the cable breaks where it can be bent. I cut a piece of the cable near the device and did the continuity tests with a multimeter, to prove that the cable was ok at that point.

    Jose Gustavo Abreu Murta -

    I replaced the whole cable and left a piece of the old silver shield wire on the pcb so I could then solder the new shield wire and wrap with heat shrink. The other point is that old cable had an integral rubber gland but the new one doesn't. Tried a very small cable-tie but that gets in the way of seating the pcb so will add some glue in the cable hole. Works a treat.

    temp1 temp1 -

    Where did you get the replacement cable from? Was is a specific cable or just any usb cable you had lying around?

    Sonstwer -

  12. kiLbFdmecL5BjRia
    • The repaired cable is reattached to the camera. Wrapped it with some masking tape. Camera tested: OK!

    • Assemble the webcam following the steps in a reverse order.

    Take care of the available space, it's a very tight area for cable management.

    mauril26 -

    Why does mine so much more inside it than the pictures, I know my ex was secretly recording me but could she have switched cameras with one that she could control? ie…making it not work/focus or even intercept the video even if I had disabled my wifi on my computer?

    Chrismark189 -

    Hi Chrismark,

    If you want, send me the photo from your camera

    Jose Gustavo Abreu Murta -

    Thanks so much for sharing this info! It seems to be a common problem of this model :(

    valéria vinczéné e. -

Conclusion

To reassemble your device, follow these instructions in reverse order.

Jose Gustavo Abreu Murta

Member since: 07/07/10

4692 Reputation

31 comments

Excellent! Helped me figure out how to get the base off to mount it to an ikea worklamp as a hacky boom.

Cory Elsmore -

Can you post a guide or technique of the process?

Or share some photos? (On meta.ifixit.com)

Kind-hearted, spirited Man -

Cory,

I did not understand your question.

This repair guide contains several photos.

Jose Gustavo Abreu Murta -

thanks for an excellent guide . I am now more positive that it is something I can perform now. Many thanks

Graham Klaer -

im having trouble releasing the 4 screws on step 3!!! the screw driver keeps slipping and i’ve tried a few and another webcam…

Dojo Mats - Sunny -

Dojo, Use the correct screw driver. So easy to unscrew.

If you have damaged the screw head, you can use pliers. You will need to replace the damaged screws.

Jose Gustavo Abreu Murta -

They’re quite tight screws on the ones I’ve worked on . Super, super soft metal too, very easy to strip out.

Catherine Mateo -

All of the screws used in this camera for the two side covers and the main cover glass (steps 1 through 3) can be loosened with a Phillips #0 screw driver. I don’t know about the other internal screws as I haven’t gone that far in the process. Mine were not super tight so they came out quite easily.

Don -
Many thanks for this excellent guide!! Helped me to repair my camera

Samuel Anaya -

Not all the webcams are as quality as Logitech HD Pro Webcam c920. Because this is rich its specifications and full of features. Ordinary or the built-in webcams are just ways of calling at high definition resolution with low framerate.

Frank Edward -

Suddenly c920 stopped working..i thought wire is broken..but after opening up..no broken wire is visible..what must be the problem and how to solve?..pls help

pankaj meshram -

Pankaj, you must measure continuity of wires of cable with multimeter.

Jose Gustavo Abreu Murta -

In my case, I was replacing the damaged cable with a new cable I ordered from eBay. That requires de-soldering the black wire on the PCB and soldering the new one in place. Those who venture into that task should know that (a) the solder tab on the replacement cable is extremely delicate, so it is important to fully remove the old solder with a solder-sucker to put the tab in place, and (b) the newly-soldered wire must be oriented parallel to the camera, because otherwise, it will mechanically interfere with re-assembly. Great guide though! THANKS!

Bob Sneed -

Thanks for taking the time to document this procedure. Great instructions!!

K.C. Shoemaker -

Can the crystal cover be separated? Mine shipped with dirt in between the layers

Quentinlowery -

Response from someone else:

Hi Quentim,

I Think the crystal cover is glued.

Kind-hearted, spirited Man -

Hi Quentim,

I Think the crystal cover is glued.

Jose Gustavo Abreu Murta -

For years i’d been listening to salesmen in stores like Best Buy who told me that webcams are made to be replaced; not repaired. Thank you so much for enlightening me and saving me the $150 that Amazon wants for a C922. I repaired my C920 and it works like the day i bought it! It didn’t cost me a penny. Thank YOU!

DJ Gicomeng -

Thanks for your work on this guide Jose, much appreciated.

Seems the cables in these commonly break near where the cable joins the body.

Catherine Mateo -

Is it possible to rotate the camera lens module 90’? I’m trying to mount the camera vertically, but still have the picture come out in the normal orientation. I realize I could rotate the image in the software, but this tends to skew the aspect ratio.

Dave Kerry -

Great Article! Saved me $$$.

Bill Noble -

I had to solve my issue where my webcam would constantly lose focus. Thanks to this guide for disassembly i got the issue fixed in no time. Beats having to pay for another cam.

Jerome Soucy -

I have this Logitech C920 Webcam bought in 2012

now the video stopped working, the audio works ok, but the video is just completely blank, even no video noise. How this can be fixed?

Yura DM -

This disassembly instruction also works for the Logitech C930e

Stephan Zaaijer -

Valeu amigo! Meu gato mastigou quase todo o cabo dessa câmera, criando curto circuito desativando todos os outros dispositivos USB conectados no PC. Ainda bem que tudo voutou a funcionar ao desconectar a câmera... (não sei como não queimou a placa mãe :p), então precisava trocar todo o cabo pelo menos com outro USB que não uso mais, e quase cheguei a quebrar a tampa superioir pensando que era tudo lacrado com travas sem parafusos, mas os parafusos estavam lá né, escondidos abaixo daquelas borrachinhas...hehe

Belo tutorial, consegui soldar tudo direitinho perto do conector (já que era a única parte que não estava danificada) quase igual ao que você mostrou aqui usando tubinhos e tudo e agora tá tudo funcionando sem problemas. Obrigado mesmo! : )

David_Br -

The disassembly guide is great; I agree that soldering the ground cable on a replacement cable (from Amazon) requires care, to heat and remove the old cable, remove the old solder with a solder sucker, and/or desoldering copper mesh. Be careful because the circuit board lands are on top and bottom of the board. A circuit board vise is a big help.

PUT THE CABLE THROUGH THE HOLE IN THE BODY BEFORE YOU SOLDER!

There are three or four types/sizes of screws. I wish I would have documented what I took out as I went along. I was able to reassemble by guesswork. Everything is a tad loose. If I did it again, I would tape each group to a piece of paper and label as you go along.

You need a professional technician's screwdriver "0" or you will have problems.

You may find the cable, $11.95, soldering and desoldering gear $13-$20 for hobbyist grade, circuit board vise or equivalent, and professional screwdriver are about equal to the cost of a replacement camera. But then, you would not have learned anything or had fun.

ivan -

Ivan,

A basic rule of thumb when disassembling appliances is to separate screws by type and size. I have a plastic box with several separations, especially for this use.

And save the assembly sequence. The photos in this guide may help you.

Jose Gustavo Abreu Murta -

Thank you. And also compliments for Logitech for the screw connections inside the webcam, with this manual easy to work on. A better cable connection would be fine however

ruud -

Liguei a minha em um hub alimentado e ela não quis mais funcionar. Será e há possibilidade de conserto?

Alex Ocker -

Bom dia senhores, infelizmente não tenho habilidade para fazer esses reparos muito bem esclarecidos aqui e a mão já não ajuda mais. Gostaria de saber se algum dos senhores me indiquem um local onde eu possa fazer o reparo na minha Logitech c 920 aqui no Brasil - Rio de Janeiro. Grato a todos

JORGE DUTRA -

Saludos José Gustavo, al parecer mi versión de C920 ha de ser del primer ensamblaje. Quitando las calcas mate, está completamente liso, no están los tornillos. ¿Hay manera de quitar toda la tapa inferior para poder llegar a dichos tornillos o se podrá desmantelar de alguna manera? Gracias por tu respuesta.

Smckfly Malpica -