Introduction

Replacing the battery on your Kindle 2 is fairly simple. It only requires removing the back cover and a few screws.

  1. tFSCV5NCLvslROAv
    tFSCV5NCLvslROAv
    Y2xHVJgKixskh6jb
    uYYrYVZFo6pxGmp6
    • Lay the Kindle face down on a soft cloth to protect its screen.

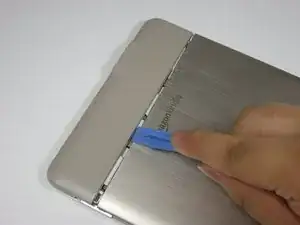
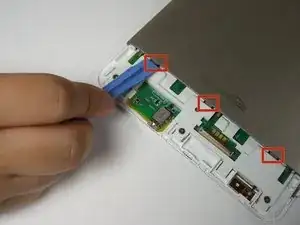
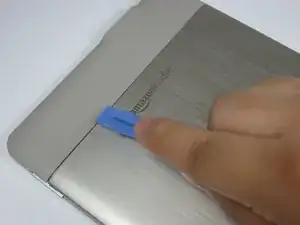
    • Wedge the plastic opening tool in the small opening between the grey plastic and the metal casing.

    • Move the plastic opening tool across the opening while pressing down to separate the grey plastic from the metal casing.

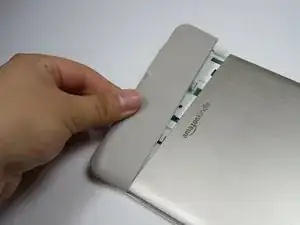
    • Slide the gray plastic top piece away from the Kindle's metal casing.

    • Once the gray plastic top piece is detached from the metal back cover, remove it.

    I had a heck of time using the spudger. I have found that grabbing the corners and using my thumbs to push the plastic away worked like a champ.

    teamhudson -

    Thanks for this tip, was successful using the thumb method :)

    Rosie A. -

    to help get enough grip with my thumbs, I used a piece of old yoga mat to increase friction between thumbs and the top plastic piece

    Rosie A. -

    For anyone still looking for this in 2020, see my comment here for how to properly remove the back.

    Kindle 2 Teardown

    Dave76 -

  2. DQfEncvDSVecVEok
    DQfEncvDSVecVEok
    atnXwbeBEbNIhSfV
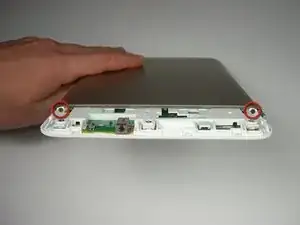
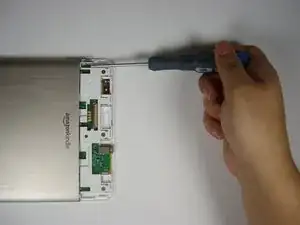
    • Use a Phillips #00 screwdriver to remove the two 4 mm screws from the metal casing.

  3. LMxReeGrxluARKYY
    LMxReeGrxluARKYY
    IbKDLrQmJsnQEEdl
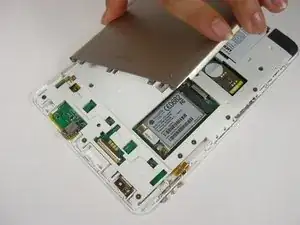
    • Use the plastic opening tool to push down and pry towards the metal casing to release each of the three clips that hold the metal case in place.

    • Remove the metal casing.

    • The volume control button rests in a slot on the side of the Kindle. When the metal casing is removed, the volume control button may fall out. When reassembling, place the volume control button back into its slot.

  4. f2kKX5vuL2PvQOOk
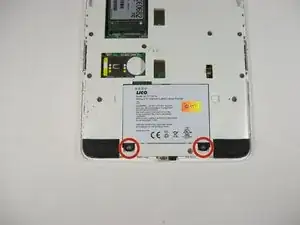
    • Use a Phillips #00 screwdriver to remove the two 3 mm screws that hold the battery in place.

    • The battery should be removed before continuing with the rest of this guide to prevent harm to you and the device.

  5. dLnFrYP2E32CGugi
    dLnFrYP2E32CGugi
    2rdSIry2RHfNoRKV
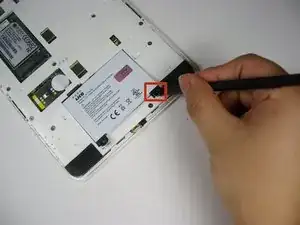
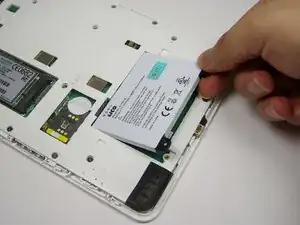
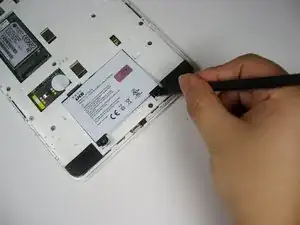
    • Pry upward under the black tab with the spudger to dislodge the battery.

    • Use your fingers to lift the battery out of the device.

Conclusion

To reassemble your device, follow these instructions in reverse order.

Dayna Scott

Member since: 17/04/13

978 Reputation

9 comments

I followed this guide, without changes, and was able to successfully swap a battery on a Kindle DX. The DX is essentially a Kindle 2 with a larger screen.

Eric -

Thanks, easy and went well!

Maybe you need a thinner spudger, TH?

Laz -

Easy! Worked well with the tools described. Kudos for making this available, it gave my old Kindle a new breath of life!
stevenwaegenaer -

Easiest replacement I've done. Thanks!

shockwav -

An ebay-acquired battery fit perfectly, but failed to reboot the kindle or accept a charge.

the battery looks idential to the Kindale battery to an old analog voltmeter.

I conformed that the kindle terminals were receiving battery voltage.

The replacement guide was just fine, Back to the original battery, which is well past its best-by date!

Charles Kennedy -

Hello,

Any advice on where to buy a battery online (shipping to Portugal)?

From what I read not all batteies are good, and besides from ebay etc, I don’t know any good shop for this kind of product.

Thank you

Pedro R. -

I did this procedure with no problem. However, kindle still doesn’t work and has the same Critical Battery scene. I contacted Amazon and they advised I corrupted the software by installing new battery.

dirk -

thanks, worked like a charm. I used a pocket knife blade to get the top plastic part off.

Jack -

Thank you so much for the guide! I was able to get my wife’s first Kindle (her favorite) back up and running. Super easy thanks to your guide.

icabod5000 -