Introduction

This guide details how to remove the outer shell and the rubber spine on the speaker. This guide also marks the first steps to access the JBL Flip 4's battery, speakers, circuit boards, etc.

  1. TPdTjBXgaNNyAUQE
    TPdTjBXgaNNyAUQE
    uyxjyBvlQ5EvE4JM
    SXsnMdYGMSiQt6TY
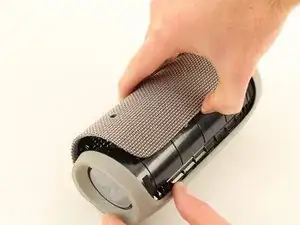
    • Insert the plastic opening tool in the crack in between the cover and the rubber spine with the power button.

    • Pry off the cover, beginning with the side without the volume and bluetooth buttons.

    • When prying the cover off, the six clips (three along each side of rubber spine) that attach the cover to the speaker will make snapping sounds.

    • Watch out not to damage the clips on the buttons' side, pry open with caution.

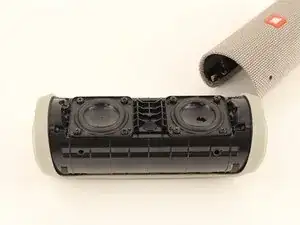
    • Pull the cover off with your thumbs.

    Important suggested edit to these instructions - make sure to pry off clips/ridges from BOTH sides before attempting removal of the cover.

    I interpreted these instructions as saying you only needed to pry clips from one side - then peel off cover. Doing this broke a clip from the other side. Bummer. I'd like others to avoid that.

    k9612 -

    If you do break a clip - save it. They are relatively easy to glue back into the cover.

    k9612 -

    My Flip4 had a single long clip on the non-button side that ran the entire length of the rubber spine. The other side (with play/ vol buttons) had three seperate clips (middle and both sides) as mentioned above.

    takentrashout -

    What if my speaker battery dies very fast and makes weird crackling noise, is it counted as faulty battery?

    Jayden Koh -

    Yes. I first thought one of the drivers was defective.

    Paul Sommer -

    What was the fix in the end ?

    Jack Mulcahy -

    I used the flared edge of a metal measuring spoon handle since I didn’t have an opening tool. Worked great! Replacement battery from iFixit is on order. Thanks for the guide!

    Greg -

    My battery was glued. Tried it anyway to remove. Battery exploded!!!!

    Don't go on if the battery is glued.

    darthvader007 -

  2. MqSuoCcPNBeHtZpb
    MqSuoCcPNBeHtZpb
    bRHK1IRZthrIHwUj
    YFp1hjI2RBYUSP5B
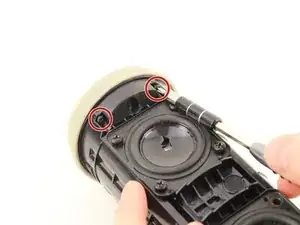
    • Remove four 13 mm JIS #0 screws attaching the rubber spine to the speaker, located on both sides of the inside of the speaker.

    • Use the plastic opening tool to release the clips holding the central part of the rubber spine.

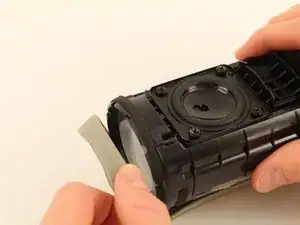
    • Pry away one end of the rubber spine with your thumbs and it should come off.

    • Prying off the spine may take some persuading.

    • The speakers are strong magnets. Keep it away from other sensitive electronics.

    Suggested Edit : Be careful when removing the screws that they don't get attracted to the speaker (magnet). They can scratch the speaker.

    k9612 -

    Note : screws don't need to be removed from their “channel” (it’s quite difficult). Just unscrew fully and leave in channel.

    k9612 -

    Note or precaution: Place a piece of cardboard over the speaker or use a plastic/rubber/nonmetalic handled screwdriver when loosening/removing the 13 mm screws. The speaker magnets are so powerful that the end of my metal jewelers phillips screwdriver was pulled into the speaker, tearing the plastic/rubber cone. I destroyed two speakers in the process of replacing the battery. Had to buy the speakers from JBL ($16 each).

    Clark Brown -

    The rubber spine was fixed with glue strips.

    Jaider -

    I have 2 Flip 4's bought approx. a year apart. The older speaker was exactly as described here. The newer speaker does not have the 5 end screws, instead it has a twist to lock end plate. Make sure the top screws that secured the rubber end are removed, as these will prevent end cap twisting. I used rubber gloves to get a grip and twist end cap counter-clockwise to unlock. I found that if you grip end cap too tight it makes it even harder to twist off. Someone may find a better solution, like prising the tags around circumference, but be warned these look flimsy.

    Phil -

    Great guide. Only problem is that the battery on mine was in a neoprene sheath and had swollen. It was a bit of a problem to get out. There didn’t seem to be room to fit something to push it out without damaging wires or the motherboard. At the risk of a fire, I worked it back and forth and pulled with a pair of needle nose pliers. Yes there were sparks and some smoke. I did it outside and knew I was risking the whole thing catching on fire. Luckily it went ok.

    Q Switch -

    Great guide! I have a model with the twist-off caps (not 5 screws) with helpful, though subtle, lock/unlock icons on the plastic. Only other problem was replacing the white neoprene battery retainer cover (2 screws). One screw slipped off my screwdriver and fell into the unit - probably stuck to a speaker magnet now. But it doesn't seem to be affecting the sound. iFixit is the best!!

    Jen Morris -

    Una duda tienen la tapa que lleva al principio la bici en la parte de afuera

    Alexis Jesus -

Conclusion

To reassemble your device, follow these instructions in reverse order.

Philip Pang

Member since: 08/10/18

1285 Reputation

0 comments