Introduction

You may have to replace the Infinity v2 10.1 motherboard if the device no longer turns on and works. This process requires a soldering iron, so make sure to follow all the safety warnings and instructions in this guide and in the instructions of your soldering iron. You may be able to replace the motherboard without fully removing the battery from the LCD display, depending on what needs to be fixed on your device. Only remove the battery completely if you need to access the LCD as well.

  1. MbTyY4IiXhQ1Xdtc
    MbTyY4IiXhQ1Xdtc
    VVFNdoEJAMLXMSQT
    f5UnSnWwZyND4GQR
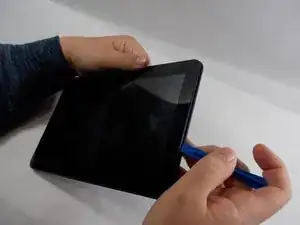
    • Slightly pry open one corner of the device by using your finger nail to separate the screen from the back case.

    • Use an opening tool to carefully detach the back case from the tablet. Start by inserting the tool where your fingernail opened a gap, and work around all four sides of the device.

    • There will be a slight click noise as you free each tab.

    • Once the case is completely free, carefully lift it and place it face up on the workstation, being cautious not to damage the speaker wires connecting the two halves.

  2. FbD1eBpGgWIDnpHQ
    FbD1eBpGgWIDnpHQ
    h5nDOKMT3PE6cKy4
    • Remove the speakers from the case by gently lifting them up and out of their slots.

  3. CYJYK4tWVN4tD5rK
    CYJYK4tWVN4tD5rK
    PW5uufwUGKOLUqQk
    ukebQVT3L4FRrQaE
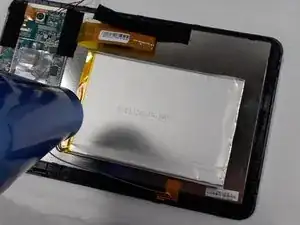
    • Pry beneath each side of the battery using a spudger.

    • The adhesive may be too strong to manually remove, so heat can be applied using the iOpener. This evenly heats the adhesive and allows the battery to be lifted away easier. Do not place the iOpener directly on the battery; always apply heat on the opposite side of the device.

    • You may use a blow-dryer on a cool setting. Keep the dryer moving and at least 6 inches from the battery to prevent dangerous bubbling of the battery due to excess heat.

  4. 2cmdeyfQYLXMoYlH
    2cmdeyfQYLXMoYlH
    2CVlrEsxPwnFaRg4
    • Desolder the red and black wires connecting the battery to the motherboard.

    • Once the solder is melted, use tweezers to remove both wires from the motherboard.

    • The solder and iron will be extremely hot. Use tweezers to grab the wire to avoid burning your fingers from accidental contact with the iron.

  5. VhFdS1CnJgIcU3x5
    • Turn on your soldering iron and allow it to heat up. Once it is hot, press the tip of the iron to the both of the solder points that attach the wires to the motherboard until the solder is melted.

    • Once the solder is melted, use tweezers to remove the wires from the motherboard.

    • The solder and iron will be extremely hot. You can use tweezers to grab the wire to avoid burning your fingers from accidental contact with the iron.

  6. xNAZmhQVovDuG31J
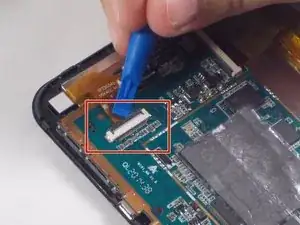
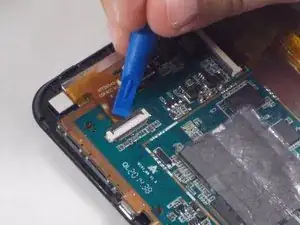
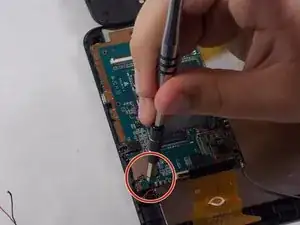
    • Use your thumb or opening tool to lift the black connector holding in the ribbon cable.

  7. GhXympglVbEJGy2d
    • Remove the camera by gently picking it up and pulling it free from the connector.

    • Avoid touching the lens of either camera.

  8. K5jTZVa1TqetRBBv
    K5jTZVa1TqetRBBv
    4QnF2bdhMLKi6oYU
    • Remove the camera from the device by using your thumb or prying tool to lift the black connector holding in the ribbon cable.

    • Remove the camera by gently picking it up and pulling it free from the connector. Avoid touching the lens of either camera.

  9. ONBKOo26uPJQMBF3
    • Use your finger to lift the black connectors on each ribbon cable. Remove both ribbon cables that connect the two screens to the motherboard by pulling them out of the connectors.

  10. BbGFKwcEGpGrummH
    BbGFKwcEGpGrummH
    my2IrrqQAa3gOwuN
    CTyvVRBVD41GTJmV
    • Remove three JIS #0 screws that hold the motherboard to the screen.

  11. eFEJCYZ32FkUmSjN
    • Remove the motherboard by simply lifting it up off the LCD.

Conclusion

To reassemble your device, follow these instructions in reverse order.

sammytarbokas

Member since: 31/10/19

193 Reputation

0 comments