Introduction
My 12 year old battery-driven automatic Grayson G239 flip calendar clock often has the wrong date, even with new batteries. For example it shows 31 days in months with only 30 days and doesn't recognise leap years even though it is suppose to. Thus the errors get greater unless its manually corrected 5 times a year! (for the five short months)
This guide shows how simple maintenance can cure this problem which I could not find on the internet (as of 2022).
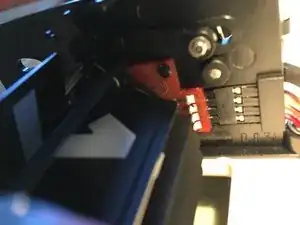
The flip calendar (day, date and month) is primarily driven mechanically by the battery-driven clock every day. But at the end of a 30-day month an electric motor, driven by the same battery in the clock, moves the date through 2 days instead of 1 day. This happens due to rotating contacts aligning on a printed circuit board (pcb) adjacent to the 'months' wheel.
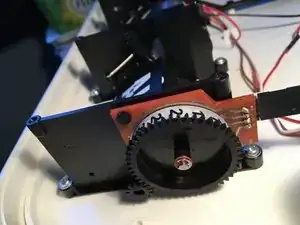
Similarly at the end of February it moves on 4 days or 3 days if it is a leap year. So there is a similar pcb with contacts adjacent to the 'leap year' wheel.
After about 10 years of use, dirt can accumulate between the electrical contacts and the copper tracks on both the pcb's such that no electric current can pass to drive the motor. The dirt can be simply cleaned off with 'switch contact cleaner' without having to dismantle anything. (Note: a weak battery can also show this fault ie there is enough power left in the battery to drive the clock but not enough to drive the motor as well)
If you don't have any contact cleaner you could try dismantling the units and manually cleaning the contacts and adding a little lubricant, but that sounds like hard work.
-
-
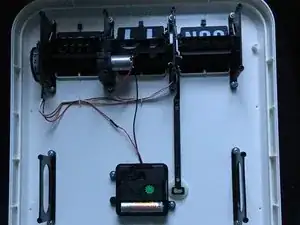
1st image just shows the top half of the clock with back removed (after undoing 12 screws). Note the silver motor at middle top.
-
2nd image shows orange printed circuit board (pcb) for leap year correction. Spray or drip a few drops of contact cleaner on copper tracks of pcb so it dribbles into the gap. Note you can't see the contacts, but the cleaner will run into the gap if you turn the unit upside down. Turn the big cog around a few times to help the cleaning process.
-
3rd image shows another orange printed circuit board for month adjustment. Again spray or drip a little contact cleaner onto the pcb copper tracks and let it drip into the gap. Again help the cleaning process by rolling through the months immediately after using the cleaning solvent. Dry up any excess cleaning fluid if necessary.
-
To reassemble, turn the front and back parts of the clock assembly upside down before putting them together, so that the three adjusment switches on the back drop into the right position. Then replace the 12 screws.
With the battery in, you can now test that it works by manually cycling though the days with the black switch at the back to ensure the dates are correct for the shorter months (Feb Apr Jun Sep and Nov).


