Introduction

The image sensor is an optical device used to capture light and store the visual data into digital storage. This guide will help take apart the camera and replace the sensor.

  1. nPsmTbsWHKkgBbKI
    nPsmTbsWHKkgBbKI
    oMtWnxCTqnvWgNxq
    GliLhHeZiuKLNNx4
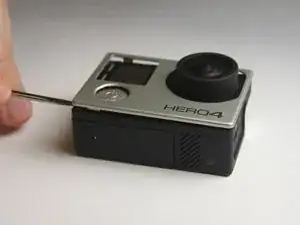
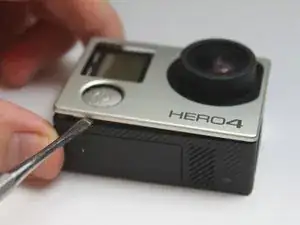
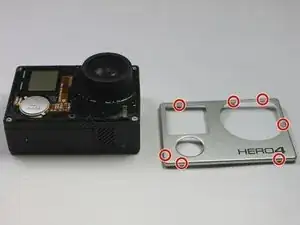
    • Start by removing the silver plastic face from the camera using a plastic opening tool. Insert the plastic opening tool into the middle of each edge and lift up the tabs that keep the camera face on.

    • The seven plastic tab locations are marked in red.

    • Try using the plastic opening tool before switching to the metal spudger. We tried using the plastic opening tool to pry the camera face off, but found that it did not give us enough leverage.

    • There may be glue holding the camera face on to the housing. Be careful not to flex the camera face too much, or it will crack.

    First step should be make sure you remove memory card first. I accidentally left mine and broke it trying to remove the assembly from the case.

    Brad Hodgkinson -

  2. v2wTHDQUSpNscOnL
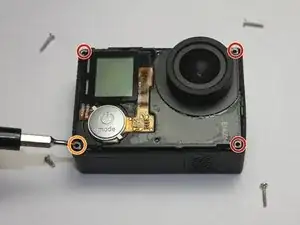
    • Remove the three 8 mm Phillips #000 screws on each corner of the camera.

    • Remove the single 4 mm Phillips #000 screw on the bottom left corner of the camera.

    The screw heads are Philips #0 on my Hero 4 (and not #000 as described in the instructions).

    Marcus Jaschen -

    Definitely a 000

    Brad Hodgkinson -

    Just want to point out that the screw in the top left corner is slightly placed beneath the LCD. Use caution when trying to unscrew.

    Ben Resnick -

    Mine was as well, I’m glad I’m not the only one

    Robert Ditch -

    and &&^&^$^ instructions waste my money

    jiaweiboss -

  3. tJEQBhukublYoCsD
    tJEQBhukublYoCsD
    DYYUiwyHAvHOSXjI
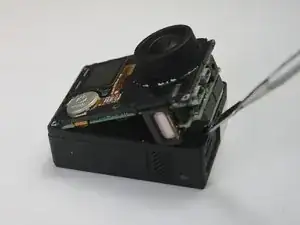
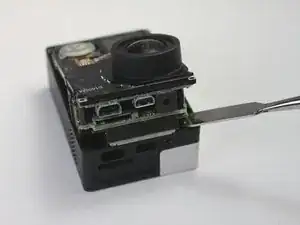
    • To remove the motherboard assembly from the camera casing, use the plastic opening tool on the lens side of the camera to pry the motherboard assembly out of the camera housing.

    • To avoid breaking the plastic on the lens side of the camera (see photo), pry along the edges near the corners.

    • Try using the plastic opening tool before switching to the metal spudger. We tried using the plastic opening tool to pry the motherboard assembly open, but found that it did not give us enough leverage.

    • Do not try to pry near the power button side of the camera. This will break important cables inside.

  4. NnW3hPSdcaTZdAvH
    NnW3hPSdcaTZdAvH
    FIyLHanugVpGU1ck
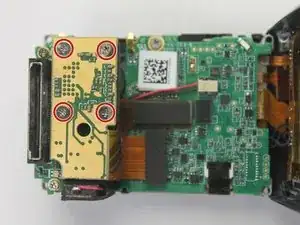
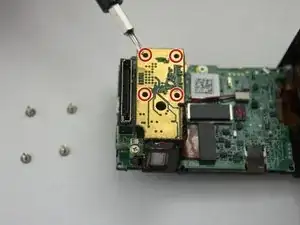
    • Remove the four 8 mm Phillips #000 screws securing the camera sensor assembly.

  5. EEcIgyq1mfLObrqA
    EEcIgyq1mfLObrqA
    dM5AqjeYiqOUXUSE
    vdcOGcDKrBoarpZr
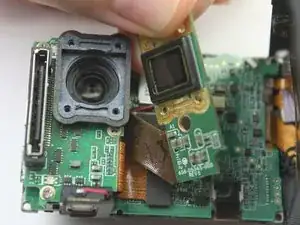
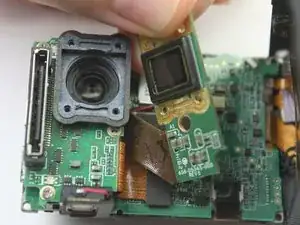
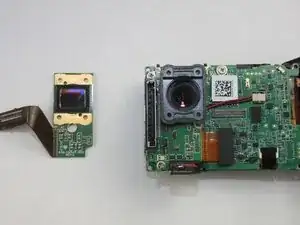
    • To remove the sensor assembly, simply peel off the lens towards the attached ribbon cable.

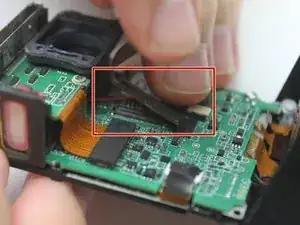
    • The sensor has ribbon cables running to the motherboard via a black rectangular connector.

    • To remove the sensor, use the spudger to pry up each side, Then, lift the connector straight up from its socket.

    • With the old camera sensor assembly removed, you can now replace it with a new sensor.

    The thin copper tabs, visible on the far right screen of STEP 5, have pulled out (as it did with mine). How do you get these back in? They are very thin and when the 2 halves of the camera are put close together, there is no room to access this, or get leverage to force them back in the slots they came out of.

    Keith -

    did you guys figure it out on how to put it together?

    gens909 -

    Same thing happened to me. Nightmare to put back in. The ribbon connectors are for the rear lcd and I think the side button. To re attach the cable you basically need to remove the motherboard from the front piece to get to the tabs where the ribbons go into. There is very little cable length to attach it and it comes off very easily while trying to re assemble.

    Brad Hodgkinson -

    @ keith

    looks like you can't. Mine did the same thing and I think it's now trash. I should have just used the procedure to unscrew the lens without taking the camera apart.

    Larry Clark -

    I was able to flip up the white tabs and after much frustration got the ribbons back in. However once my camera got back together the touch screen wasn't working. Anyone know which ribbon or connector this is?

    Derek W -

    I either damaged something or dislodged something because the colors on the LCD screen are washed out and the image is not clear, almost pixelated. The camera itself works and the image taken appears to fine. I'll live with it like this.

    Steve Remsing -

    I bought the image sensor form ifixit, replaced it, and... 3/4 secs after turning the GoPro on, it still freezes :(. Now I do not even see the image in the display anymore -_-'

    ALEJANDRO ALCANTARA -

Conclusion

To reassemble your device, follow these instructions in reverse order.

Bradley Welsh

Member since: 26/08/15

764 Reputation

3 comments

Did GoPro make an updated version of the sensor, or are all the ones sold on the web just the same as the one that keeps failing in the cameras? Do you have a part number for the sensor that is supposed to work better? No point replacing the sensor with the same one the camera came with as it will likely fail withing a year just like the original one. Please advice.

David Kvick -

thanks for the instructions - easy to understand and carry out. my GoPro 4 is now up and running again

Nigel Jones -

Pregunta el sensor de la go pro hero 4 black es el mismo de la gopro hero 4 silver???

Jacinto -