Introduction

As there is a difference between the screen of the device and the display it is important to know which part needs replacing. If the outer plastic clear portion of your device has cosmetic scratches, cracks, or dents, use this is guide to replace the screen. Run a finger on the outer surface of the device to determine which part has been damaged.

  1. BNHUEhkppHt1nTow
    • Unscrew the four screws (size: 3.175mm) on the left and right side of the Element Electronics GC-1020 device using the PH#0 screwdriver.

  2. UO2RFBnNFqVwXmhh
    • Carefully pull the back of the device (the silver portion) apart from the rest of the device.

    • If you pull back too forcefully the power button would move out of place.

  3. KRmYglBpmvWXbXoO
    • Unscrew the bottom of left and right sides of the motherboard.

    • Notice these screws are slightly larger than the ones on the outside of the device.

  4. OP3FWeAVH1Bh4KP1
    OP3FWeAVH1Bh4KP1
    cvgSFGBKvAanApMA
    • Carefully bend the plastic frame to remove the motherboard.

    • Be sure that the power button, stays attached to the outer frame, as moving the motherboard it may cause it to loosen.

  5. jvtOZ2dZUnWOAwwE
    jvtOZ2dZUnWOAwwE
    iyS6ihFBlEqykyB2
    5SbnlqMKy5sRq1EI
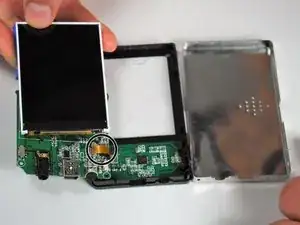
    • Detach the screen by disconnecting the thin piece of ribbon cable attached to the PCB (printed circuit board).

    • Use a pair of tweezers to carefully pull the ribbon from the circuit board.

    • Take care not to damage the ribbon, as you will need it intact to reattach your new screen.

  6. XOsP1GMvIV46NiFZ
    XOsP1GMvIV46NiFZ
    ucZtELShZoohFh5B
    QIUIxdUytXYcvSXO
    • Carefully pry apart the screen from the frame of the device.

    • Separate the two by peeling away the thin plastic layer that makes up the screen of the device.

    • If done correctly, your detached screen will look like this.

Conclusion

To reassemble your device, follow these instructions in reverse order.

Lashaun Noel

Member since: 25/09/15

591 Reputation

0 comments