Introduction
My machine would not turn on any more (you'd press the button and nothing happens). So I decided to take a look inside.
I struggled a bit tricky to disassemble it and I would have benefited from some instructions, so I decided to write down a few pointers on how to go about it. Unfortunately I only realized too late and only took crappy pictures.
I also did some extensive reverse-engineering that I'll share along the way and the schematic at the end.
Tools
-
-
Always start by unplugging your device and wait until it is fully cooled down (the temperature reading is analogue, so you can use it as an indication)
-
Then remove the water compartment. Place it far from where you are working on the device.
-
The device is sectioned into three general compartments:
-
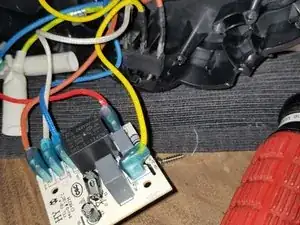
Bottom compartment (easiest to access): contains a simple controller board that allows you to turn the device on/off with a toggle button and turns it off automatically after a prolonged period of misuse.
-
Middle compartment (hardest to access): contains the cabling, the pump, and a valve.
-
Top compartment: contains the heating block with heat switches and fuse, the levers, the indicator lamps, and some water tubing.
-
-
-
Pretty straight forward to access. You'll need to find a good surface to place the device sideways without damaging the levers (or the thermometer).
-
The use of a piece of foam, or ugly pillow might be handy.
-
Use a regular Phillips (+) screwdriver to remove the six screws at the bottom of the device. Note that the one in the centre front is shorter than the others. Make sure it goes back in the right spot!
-
Remove the bottom plate. You'll find a PCB and some cabling, that's it. Go to the last step for some hints about the PCB.
-
-
-
You can access the top without removing the bottom. In fact, it is easier to do so, so I recommend at least putting it back on (without tightening the screws) and putting it upright.
-
There are four plastic plugs in the tray for the cups, marked with a triangle (see picture). I used a 3mm (1/8") drill to make a small hole and pulled them out. Unfortunately, I could not find a non-destructive way to remove them.
-
Green circles: open hole with screw
-
Red circle: remove plug with drilled hole (just sitting on top of the tray)
-
Below you find four screws, you'll need to remove. Now lift the entire piece up. The metal area with the thermometer will also lift. Be careful, there is a cable (pipe?) from the thermometer, going to the heating block. You can losen a screw there to remove it. Be careful not to smear the white paste everywhere (you'll want to keep it on there).
-
-
-
Blue square: valve (I guess to release pressure at the end)
-
Green square: cables going to the pump, valve and bottom compartment.
-
Red circle: outlet of the pump. I think the translucent hose on the right side is a overpressure release (as it goes back into the water tank). The thinner one on the left goes into the heating block.
-
Pink circle: heating block. I measured 50Ω across it (230V/50Ω = 4.6A -> ~1060W). Probably different for a 110V version!
-
Blue circles: heating switches (regulate the two different temperatures for coffee and steam)
-
-
-
Caution: you're likely to do some minor damage to your coffee machine. Consider twice if you really need to get into this compartment. It only contains the cables, valve, and the pump.
-
For getting into the centre compartment, you'll have to have both the top and bottom already removed.
-
Next, remove the three screws in the bottom compartment. This should allow you to remove the second bottom plate.
-
Optional: To make your live easier, I'd recommend to fully remove the bottom plate. Remove all plugs from the toggle switch and the PCB. I would recommend to label them (e.g. with the labels on the PCB).
-
If you messed up/forgot to label, you can check out the wiring diagram in the last step, but beware that the cables might have different colours for you!
-
-
-
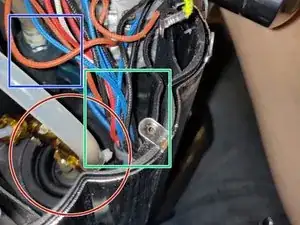
Remove the ground (green-yellow) wire from the metal finger (red circle).
-
Next, bend up the little metal pins, marked with green circles. Be extremely careful, it is very easy to damage them! They won't survive more than a few bends. In fact, one broke just after opening and closing it once!
-
You'll need to bend them a little outward (like the ones marked with a green circle or a little further, the one with a red circle is not bent enough yet)!
-
Make sure you don't miss any of them. There is a good number. You won't have to touch the ones at the bottom.
-
Now you should be able to slide the metal carefully down. If you encounter too much resistance, make sure you're not hitched on anything (like the cables) or that you didn't forget any of the metal fingers.
-
At the side you should find a hole in the plastic that gives you access to the pump and the cables.
-
-
-
I'm impressed with the simplicity of this device. The only thing the PCB does is to turn off the device off if it has not been used in a while (the pump was not used). Everything else is directly wired.
-
My original drawing is attached - I was making it while I traced the cables. I'll add a cleaned up version soon.
-
Cables/wires: b = blue, bk=black, o=orange, r=red
-
T,M,B are the top, mid, and bottom pins of switches, respectively.
-
From what I can tell, the PCB is very basic. It consists of an AC-DC down-converter to power a microcontroller that can measure if the button is pressed or the pump is running and actuate a relays to turn the entire device on and off.
-
To reassemble your device, follow these instructions in reverse order. Be particularily careful with those metal noses - and remember that you can probably never do it again without breaking them off :(


